
Sweet-Sour Pickles How to Make Them
Whenever I think back to summer afternoons at my grandma’s house, I still remember that smell drifting from her tiny kitchen—warm cinnamon, a hint of vanilla, and something sweet and comforting that just made you feel at home. The first time I tasted zucchini in a dessert, I was honestly a little surprised. I mean, zucchini in cake? It sounds a bit odd, right? But trust me on this one—it’s a game-changer. This zucchini swirl snack cake is one of those recipes that kind of sneaks in healthy vegetables while showering you with incredible flavor. My kids ask for this all the time, especially on days when I want to whip up something quick but still feel like I’ve baked something special. It’s surprisingly simple, always moist, and best of all, it disappears in minutes at my house. The best part? You don’t even need fancy ingredients—just some everyday staples. Honestly, this one’s a lifesaver on busy nights when dessert feels out of reach but you still crave that warm, sweet comfort. Come on, let’s get baking—you’ll see what I mean.
What is Zucchini Swirl Snack Cake?
Think of this as a cozy, moist cake that combines the humble zucchini with a gentle swirl of cinnamon-spiced batter, creating a picture-perfect, slightly marbled treat. It’s essentially a rustic snack cake with a little surprise hidden inside. The name might sound a little fancy, but it’s so approachable that I like to think of it as a “my-vegetables-are-allowed-in-dessert” kind of treat. The concept is simple: grate fresh zucchini (don’t peel it, unless you prefer a smoother look), mix it into a lightly sweet batter, add a touch of spice, and then swirl some extra cinnamon sugar through for that beautiful marbled effect. And yup, the zucchini keeps it wonderfully moist, so every bite feels just right—never dry, always comforting. This cake is perfect for tea breaks, everyday snacking, or even a casual brunch. It’s unpretentious but so satisfying—kind of like that favorite T-shirt you reach for when you want something familiar and delicious.
Why you’ll love this recipe?
There are so many reasons why this zucchini swirl snack cake has become a staple in my kitchen, but here are a few of my favorites. First, the flavor—oh my gosh, it’s just the right balance of sweet and spicy. The cinnamon swirl adds a wonderful caramelized note that makes everything smell like a bakery come morning. What I love most about this is how incredibly easy it is to make; you just mix everything in one bowl, pour, swirl, and bake. No fussing over complicated layers or fancy techniques. Plus, it’s super budget-friendly—the main ingredients are pantry staples like flour, sugar, and zucchini, which I almost always have on hand. My kids ask for this all the time, and honestly, it’s one of those baked goods that gets better as it sits—though it’s so good warm that I often can’t wait. You can also customize it: switch out the cinnamon for apple pie spices, toss in some nuts, or even drizzle a little caramel glaze for extra decadence. It’s versatile enough to suit any occasion, but simple enough to whip up when you’re craving a little sweet, homemade comfort. And let’s be real: It’s not just good—it’s addictive.
How do I make Zucchini Swirl Snack Cake?
Quick Overview
This cake comes together quicker than you might imagine. You start by preheating your oven, then grate the zucchini—don’t squeeze out the moisture, trust me, it keeps the cake so moist. Mix the dry ingredients in one bowl and the wet ingredients in another. Fold everything together just until combined, then pour about half the batter into a prepared pan. Sprinkle a cinnamon-sugar mixture over it, dollop the rest of the batter on top, and swirl it around with a knife to create that pretty marbled look. Bake until the center is just set and a toothpick comes out clean. It’s that simple! The smell alone will draw everyone into the kitchen—so be ready for hungry family members or friends wanting a slice.
Ingredients
For the Main Batter:
• 2 cups all-purpose flour (I like unbleached for richer flavor)
• 1 cup granulated sugar (or coconut sugar if you want a healthier twist)
• 1 teaspoon baking powder
• ½ teaspoon baking soda
• ½ teaspoon salt
• 1 teaspoon ground cinnamon
• ½ teaspoon ground nutmeg (optional, but adds a nice warmth)
• ½ cup vegetable oil (or melted coconut oil for extra flavor)
• 3 large eggs
• 1 teaspoon vanilla extract
• 1½ cups grated zucchini (about 1 small zucchini, no peeling necessary)
For the Filling:
• 2 tablespoons packed brown sugar
• 1 teaspoon ground cinnamon
• 1 tablespoon flour (to help it set and not sink)
For the Glaze (optional but recommended):
• ½ cup powdered sugar
• 1–2 teaspoons milk or lemon juice
• A splash of vanilla (if you like)
Step-by-Step Instructions
Step 1: Preheat & Prep Pan
Set your oven to 350°F (175°C). Grease a 9-inch round cake pan or line it with parchment paper—trust me, this batch is sticky so parchment is easier. I like to give the pan a light spray of non-stick spray and dust it with a little flour to make sure nothing sticks. While it preheats, grate the zucchini—you don’t have to squeeze out the moisture, I tested both ways and leaving the moisture in keeps the cake really moist and tender. Just set aside grated zucchini, and you’re good to go.
Step 2: Mix Dry Ingredients
In a large bowl, whisk together the flour, sugar, baking powder, baking soda, salt, cinnamon, and nutmeg. Make sure everything is well combined—this ensures an even rise and that each bite has a little spice boost. I’ve learned from experience that dry pockets of baking soda can cause uneven baking, so stir thoroughly.
Step 3: Mix Wet Ingredients
In another bowl, beat the eggs, then add the oil, vanilla, and grated zucchini. Mix well until everything is nicely combined. The batter will look a little speckled with green (not to worry!) but it’s a promise of that zucchini moisture.
Step 4: Combine
Pour the wet mixture into the dry ingredients. Gently fold everything together just until there are no dry pockets—don’t overmix, or the cake can turn dense and rubbery. A few lumps are totally fine; it’s better than overworking the batter.
Step 5: Prepare Filling
Mix the brown sugar, cinnamon, and flour. This simple cinnamon-sugar blend creates that irresistibly swirled look and flavor. I like to sprinkle it evenly over the first layer of batter, but if you prefer, you can also mix it right into the batter for a sweeter, more uniform cinnamon flavor.
Step 6: Layer & Swirl
Pour half the batter into your prepared pan. Sprinkle the cinnamon-sugar mixture evenly over the batter. Add the remaining batter on top by spoonfuls, then use a butter knife or skewer to swirl through the batter gently—creating a marbled, beautiful effect. Don’t over-swirl; you want the cinnamon streaks to be visible, not completely mixed in.
Step 7: Bake
Pop it into your preheated oven and bake for about 35-40 minutes. Check doneness with a toothpick inserted in the center—if it comes out clean, you’re golden. Ovens vary, so if it’s browning too fast, tent it with foil. Let it rest for about 10 minutes after baking—this makes slicing easier and helps set the cake’s structure.
Step 8: Cool & Glaze
Transfer to a wire rack and cool completely before glazing. The glaze is optional but adds that shiny, sweet finish. Mix powdered sugar with a splash of milk and vanilla until smooth—if it’s too thick, add a little more milk. Drizzle over the cooled cake and watch it set—trust me, it’s pretty and addictive.
Step 9: Slice & Serve
Use a sharp serrated knife for clean slices. Serve this warm with a cup of tea or coffee, or enjoyed at room temperature. It’s equally good on the second day—if it lasts that long. Great for breakfast, snack time, or after dinner—we really don’t judge.
What to Serve It With
This cake is versatile and a bit of a chameleon. For breakfast, I love pairing it with a hot cup of coffee or a glass of cold milk. The moist crumb makes it perfect for mopping up with a napkin or a spoon, if you’re feeling indulgent. For brunch, serve slices alongside fresh fruit or yogurt—my family’s favorite way is with a dollop of whipped cream and a drizzle of honey. After dinner, I think it makes a lovely simple dessert—especially with the extra glaze or a dusting of powdered sugar. If you have little ones, I sometimes sneak in a few chopped nuts or mini chocolate chips into the batter for extra excitement. And honestly, these days I make it just as much for me—because sometimes, there’s just nothing better than a slice of homemade cake with that cozy cinnamon swirl. It’s also perfect with a glass of cold milk or a cup of tea, making any moment feel just a little more special.
Top Tips for Perfecting Your Zucchini Swirl Snack Cake
Over the years, I’ve learned a few tricks that really elevate this simple cake into a standout treat. First, let’s talk zucchini prep. I usually grate it with a box grater, then give it a gentle press with my hands to remove excess moisture—this keeps the cake from becoming soggy, especially if you plan to store leftovers. I’ve tested it both with and without squeezing out the moisture, and honestly, leaving it in produces a lovely, tender crumb every time. Next, about mixing: don’t overmix once you add the flour—this can lead to dense, rubbery cake. Mix until just combined, and avoid beating too vigorously. Swirling—trust me, this is part of the fun. Get a gentle swirl pattern going; I find that a figure-eight shape works best for that marbled effect and even cinnamon distribution. Want to make this gluten-free? Swap the all-purpose flour for a good gluten-free blend. Just remember, the texture might be slightly different, but I swear you won’t miss a thing. The best baking is about experimenting, so don’t be afraid to try tweaks—like adding nuts, chocolate, or even swapping the cinnamon for pumpkin pie spice during fall. Ovens vary, so keep an eye on your cake after about 30 minutes—look for that beautiful golden edge and a dry toothpick. And if the glaze seems too runny, add more powdered sugar, or for a richer flavor, try a splash of maple syrup. Trust me, these little adjustments make a big difference.
Storing and Reheating Tips
This cake keeps surprisingly well—my secret is to store it properly so it stays moist and fresh. For room temperature, keep it in an airtight container or cover loosely with plastic wrap—just aim to finish it within 2-3 days. Refrigeration extends its life to about a week; just ensure it’s wrapped tightly to prevent it from drying out. If you have leftovers and want to keep that cinnamon swirl looking pretty, wait to add extra glaze until serving—regardless of storage, this cake is best enjoyed within a week. Freezing is a great option too: tightly wrap the slices or the whole cake in plastic, then foil, and freeze for up to 3 months. Thaw at room temperature or gently warm slices in the microwave—adding the glaze afterward keeps the top glossy and fresh-like. One tip I’ve learned: if you plan to reheat, cover the slice with a damp paper towel to maintain moisture. And for the glaze, I usually re-whisk it to loosen it up if it thickens too much after sitting in the fridge. Nothing beats the charm of leftovers, especially when you’re craving that tender crumb and comforting cinnamon aroma again.
Frequently Asked Questions
Final Thoughts
This zucchini swirl snack cake has truly become one of my kitchen staples. Not only is it a sneaky way to get some vegetables into dessert, but it’s also unbelievably forgiving and adaptable. I’ve made it with whole wheat flour, swapped out spices, and even added a handful of chocolate chips—every version was loved. It’s a perfect example of how baking doesn’t have to be intimidating; with just a few humble ingredients, you can whip up something that’s not only delightful but also feels like a warm hug in cake form. Whether it’s a last-minute snack, a weekend treat, or something to brighten a casual get-together, this little cake never fails to bring smiles. And the smell—oh, the smell alone makes the house feel cozy and inviting. I can’t wait for you to try it and hear what you think—trust me, this will soon become a go-to, just like it is in my house now. Happy baking!
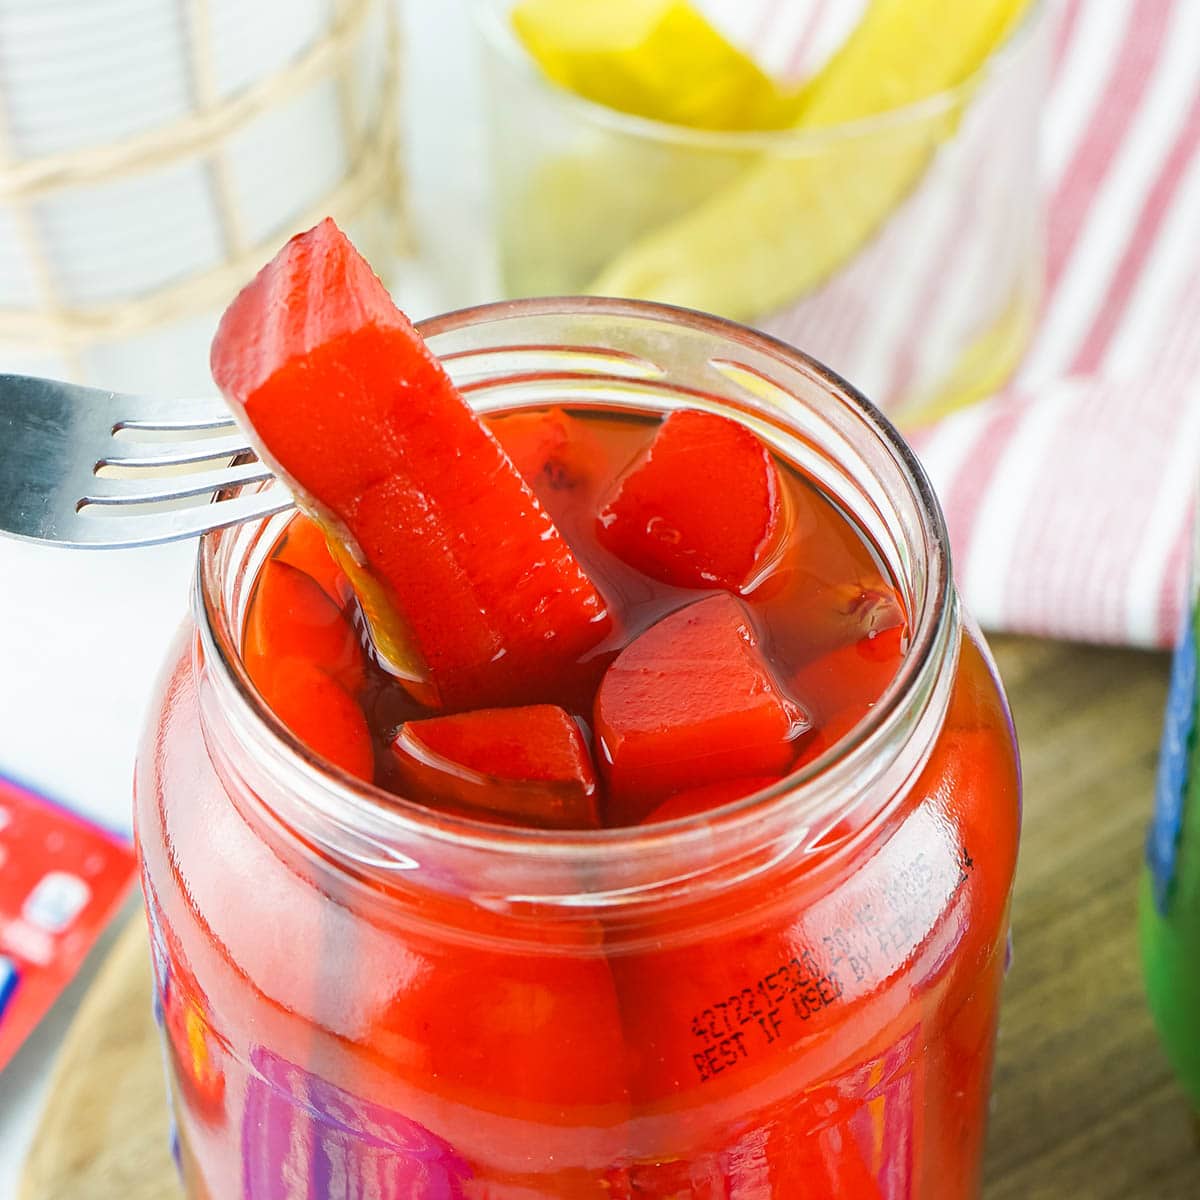
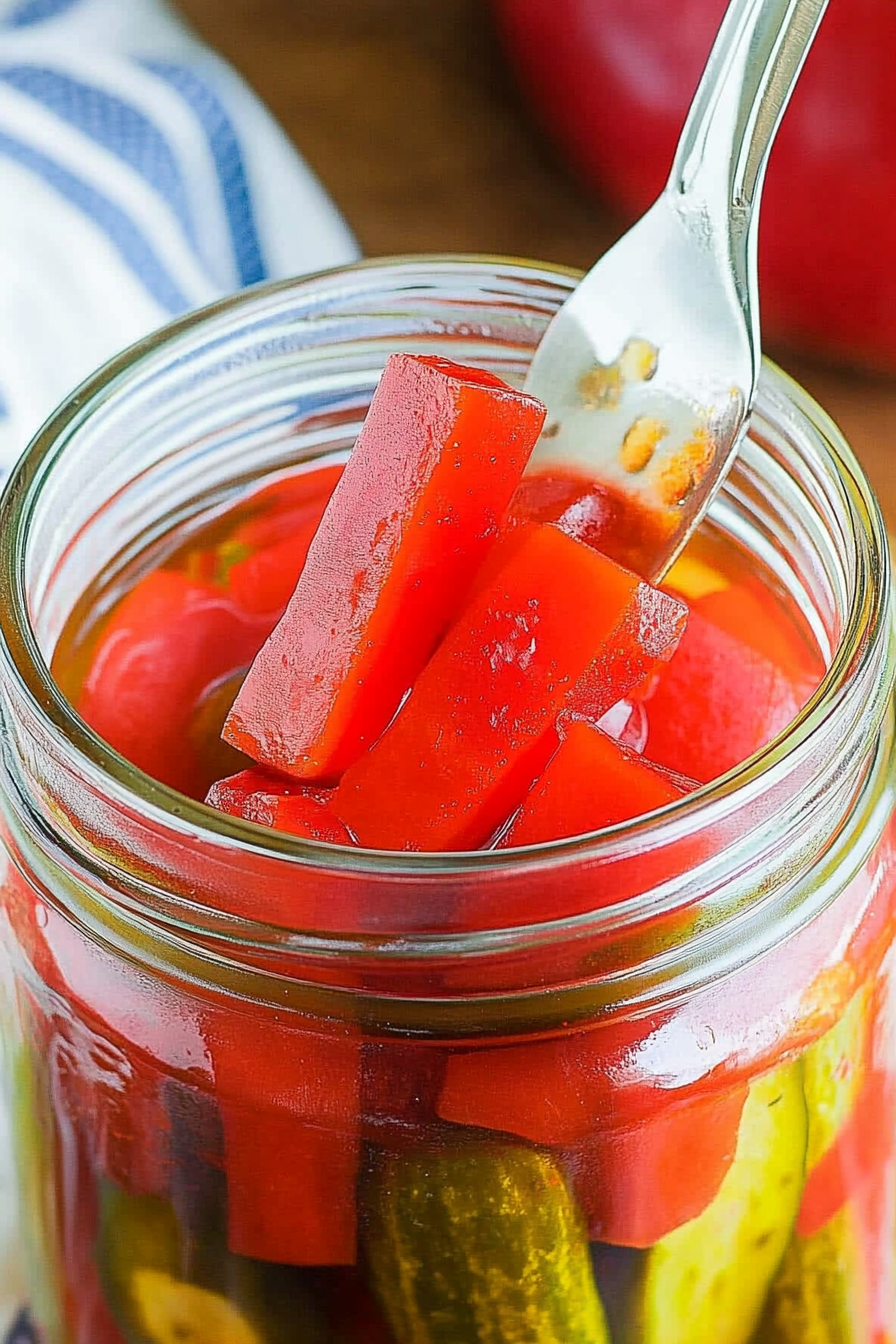
Kool-Aid pickles
Ingredients
Method
- Open the jar of pickle spears and pour in one packet of Kool-Aid powder. Secure the lid and shake vigorously to mix.
- Remove the lid again and slowly add 1/4 cup of sugar, letting it settle slightly before replacing the lid.
- Shake the jar well to combine all ingredients. Refrigerate for 3 to 5 days, shaking once daily for flavor infusion.

Ah, the smell of those pickles takes me right back! My grandma made them too—such a comforting memory.