
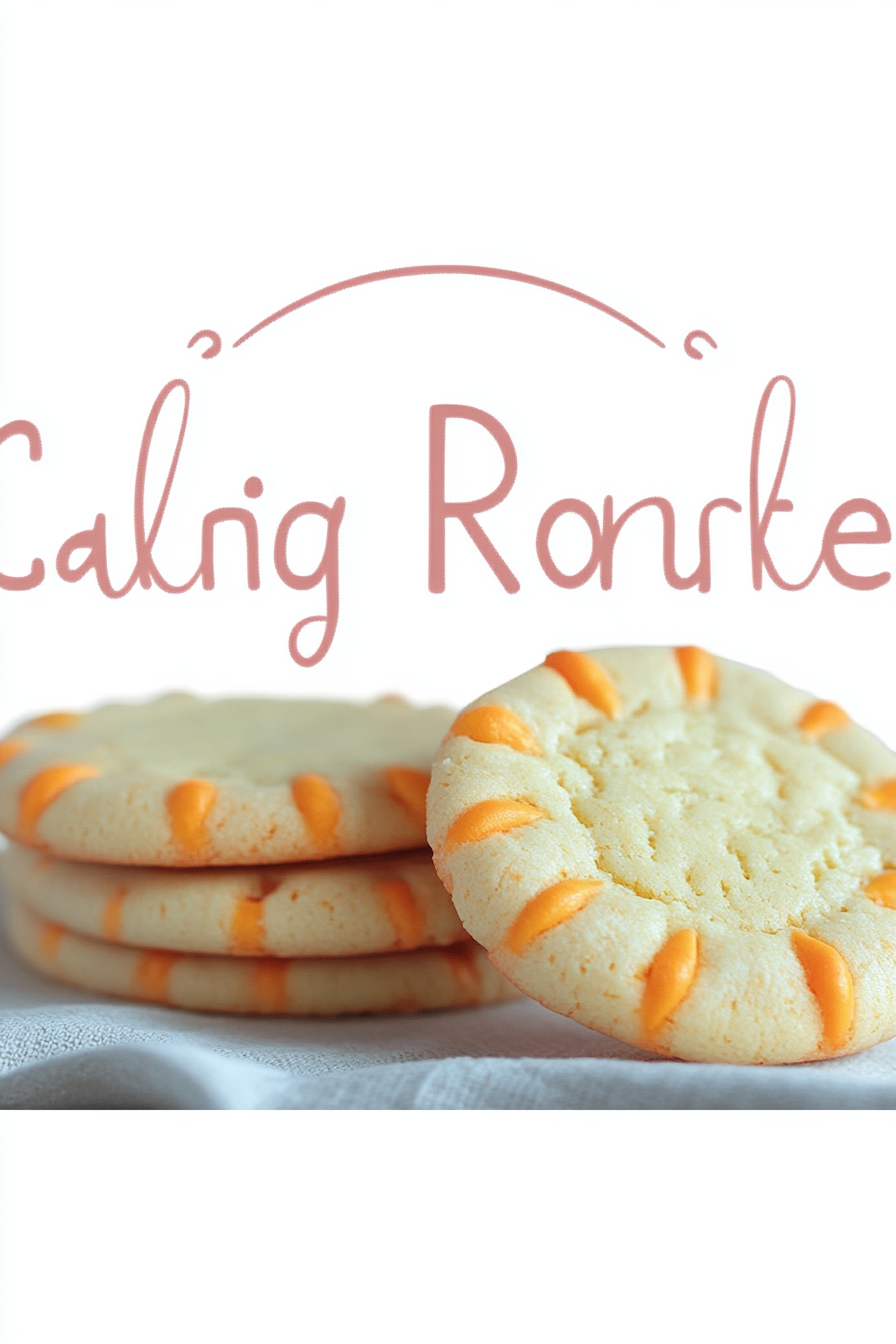
Sweet Candy Corn Cookies How to Bake Them
Have you ever had that experience where you’re craving something sweet but don’t want to spend hours in the kitchen? Or maybe you’re trying to sneak some veggies into your kids’ diet without them noticing? That’s exactly why I keep coming back to this chocolate zucchini bread—it’s a total game-changer. The smell alone when it’s baking makes my house feel cozy and inviting, like I’ve just lit a candle and turned on some jazz. And the best part? It’s insanely easy to make, and you’d never guess there’s zucchini lurking inside—trust me on this, people always ask for seconds! I’ve tested this recipe with all sorts of tweaks, added a handful of walnuts, swapped in almond milk, and honestly, it always turns out moist, flavorful, and just a little decadent. My kids ask for this all the time, and I love that it sneaks in some veggies without any fuss. Plus, it’s perfect for breakfast, a snack, or even a quick dessert. Let me walk you through this beloved recipe—promise, it’s like giving your baking routine a little warm hug.
What is chocolate Zucchini bread?
Think of chocolate zucchini bread as a mash-up of comfort food and little health boost, all wrapped into one loaf. It’s essentially a moist, tender bread made with shredded zucchini and rich cocoa powder, giving it that luscious chocolate flavor. The name might sound fancy, but it’s wildly simple to whip up—kind of like a best-kept secret in the baking world. This recipe comes from the idea that adding zucchini keeps the bread super moist without making it heavy, and the chocolate makes it irresistible. It’s kind of like a sneaky way to get your kids to eat vegetables, only they’re too busy enjoying the melt-in-your-mouth goodness to notice. Think of it as the loving relative of banana bread, but with a chocolaty twist that turns ordinary afternoons into mini celebrations. Whether you’re making it for friends, family, or just yourself on a cozy weekend, this little loaf always hits the spot.
Why you’ll love this recipe?
What are some good reasons to make chocolate zucchini bread?
- Flavor: Rich, chocolaty, and slightly sweet—everything you want in a decadent treat. The zucchini adds a gentle
- Simplicity: No fancy gadgets needed! Just basic ingredients you probably already have in the pantry. I always do this when I need something quick and satisfying.
- Cost-efficiency: Using zucchini from the garden or store-bought makes this budget-friendly—you’re hiding veggies in a way that feels indulgent.
- Versatility: Eat it as breakfast with a smear of butter, or serve it as a dessert with a dusting of powdered sugar or a drizzle of glaze. It’s totally adaptable.
- Personal touch: Over the years, I’ve experimented with adding nuts, swapping ingredients, and even making mini loaves for gifts—everyone loves it. Plus, my kids tell me it’s better than any store-bought cake. That’s a win in my book!
What I love most about this is how it secretly packs a veggie punch while tasting like pure chocolate bliss. It’s a win for busy mornings or when you need a little sweet escape without the guilt. Plus, it’s a family favorite—I’ve made this countless times, and it never fails to bring smiles around the table.
How to Make Chocolate Zucchini Bread
Quick Overview
This bread comes together faster than you’d think—no complicated steps or fancy tools required. It starts with grate, mix, pour, bake, and enjoy. The secret is mixing the wet ingredients just enough to combine, folding in the grated zucchini and chocolate chips, then baking until it’s perfectly moist and a toothpick comes out clean. The aroma alone is worth the effort. What makes this method stand out is how forgiving it is—overmixing can dry it out, but I’ve learned that a gentle hand keeps everything tender. This recipe is a lifesaver on busy nights or weekends when you want something sweet but don’t want to fuss. Plus, the oven does most of the work—by the time you set the timer, your house is filled with the smell of warm chocolate and zucchini. Trust me, it’s irresistible, and you’re going to want to keep this as your secret weapon.
Ingredients
For the Main Batter:
– 2 cups all-purpose flour (or whole wheat if you prefer a heartier crumb)
– 1/2 cup unsweetened cocoa powder (preferably Dutch-process for richness)
– 1 teaspoon baking soda
– 1/2 teaspoon salt
– 1/2 teaspoon baking powder
– 1 cup granulated sugar (adjust slightly if you like it sweeter)
– 1/2 cup brown sugar (for depth and moisture)
– 1/2 cup vegetable oil or melted butter (I tested with almond oil and loved how it made everything creamier!)
– 3 large eggs (fresh ones make a difference—trust me)
– 1 teaspoon vanilla extract
– 1 cup grated zucchini (squeeze out excess moisture—you don’t want soggy bread!)
For the Filling:
– 1 cup semi-sweet chocolate chips (or chopped dark chocolate, if you’re feeling fancy)
– Optional: 1/2 cup chopped walnuts or pecans for a little crunch
For the Glaze:
– 1/2 cup powdered sugar
– 1-2 teaspoons milk or almond milk
– Optional: a splash of vanilla or a sprinkle of cocoa powder for flavor
Step-by-Step Instructions
Step 1: Preheat & Prep Pan
Set your oven to 350°F (175°C). Grease your loaf pan with butter or a quick spray of baking spray and line it with parchment paper if you like—it makes removal a breeze. I always do this to prevent sticking and to keep things neat.
Step 2: Mix Dry Ingredients
In a big bowl, whisk together the flour, cocoa, baking soda, salt, and baking powder. I’ve learned that sifting the cocoa really helps avoid lumps—nothing’s worse than biting into a clump of cocoa! Whisk until everything is well combined and aerated—that’s the secret to a light, fluffy crumb.
Step 3: Mix Wet Ingredients
In a separate bowl, beat the eggs, then stir in the sugars, oil, and vanilla. Whisk until smooth and slightly frothy. I always do this until the mixture looks shiny and well combined—that’s when you know it’s ready to marry the dry ingredients.
Step 4: Combine
Pour the wet mixture into the bowl with the dry and fold gently—don’t overmix! You want just enough to combine. Overmixing can make the bread dense and tough, and nobody wants that. If the batter looks thick, that’s fine—it’ll bake up light and tender.
Step 5: Prepare Filling
Gently fold in the chocolate chips and nuts if using. I love scattering some on top too before baking—it looks pretty and adds extra chocolatey goodness. For a fuss-free approach, just mix everything evenly into the batter.
Step 6: Layer & Swirl
Pour half the batter into the loaf pan, spread evenly, then sprinkle with more chocolate chips or even a swirl of nut butter if you’re feeling adventurous. Then add the rest of the batter on top. For a marbled effect, gently drag a toothpick or skewer through the batter—swirling and creating pretty ribbons of chocolate and zucchini magic.
Step 7: Bake
Pop it in the oven and bake for about 50-60 minutes. Check doneness by inserting a toothpick in the center; it should come out clean or with a few moist crumbs. Keep an eye on it if your oven runs hot—sometimes I tent it with foil halfway through to prevent burning the top.
Step 8: Cool & Glaze
Let the bread cool in the pan for about 15 minutes, then transfer to a wire rack. This step is key—it stops the cooking and keeps the inside moist. Meanwhile, mix your powdered sugar glaze and drizzle it over the warm bread. It soaks in just enough for a shiny finish and extra sweetness.
Step 9: Slice & Serve
Once fully cooled, use a serrated knife to cut neat slices. I swear, this bread tastes even better the next day—kept wrapped at room temp or in the refrigerator. Serve it with a cup of coffee or a glass of milk—perfect way to start or end your day.
What to Serve It With
This chocolate zucchini bread is so versatile—seriously, it’s a little miracle loaf! For breakfast, I love it toasted with a pat of butter or a smear of cream cheese. The kids are obsessed with it as an after-school snack—pair it with a cold glass of milk or hot cocoa, and it disappears in minutes. For a cozy brunch, serve slices alongside fresh fruit and a pot of strong coffee or tea. If you want to dress it up as a dessert, dust with powdered sugar or drizzle with caramel or chocolate sauce. Sometimes I add a dollop of whipped cream or a scoop of vanilla ice cream—it’s like a little piece of heaven. And if you’re feeling extra indulgent, serve it warm with a side of berries or sliced bananas. Honestly, this bread is like your new best friend in the kitchen—a crowd-pleaser and a personal favorite.
Top Tips for Perfecting Your Chocolate Zucchini Bread
After making this so many times, I’ve learned a few tricks to make it truly perfect every time:
- Zucchini Prep: Always squeeze out excess moisture after shredding. I use a clean dish towel or paper towels to gently press out the water—no one wants soggy bread, and excess moisture can make the texture gummy.
- Mixing Advice: Be gentle when mixing wet and dry. I fold just until combined—think of it as giving your batter a tender hug. Overmixing is the enemy here, and it can turn your loaf dense and heavy, which nobody wants.
- Swirl Customization: For a prettier look, I sometimes add a swirl of peanut butter or cream cheese in the middle before baking—looks gorgeous and tastes amazing.
- Ingredient Swaps: Love nuts? Go for walnuts or pecans—they add crunch. Want it gluten-free? Swap the flour for a blend of almond and rice flour. Just keep in mind that gluten-free versions might need a slightly different baking time or temperature.
- Baking Tips: Check doneness early if you have a hotter oven—baking times can vary. Using an oven thermometer can make sure you’re baking at the right temp. And I always rotate my bread halfway through baking for even color and texture.
- Glaze Variations: If you prefer a different flavor, mix in a teaspoon of espresso powder for a mocha twist or a splash of vanilla extract for extra warmth. Glaze consistency should be pourable but not runny—slowly add milk until you reach that perfect drizzle texture.
One thing I’ve learned: every oven is a little different, so trust your nose and toothpick testing. When your home smells like warm chocolate, you’re almost there!
Storing and Reheating Tips
This bread stays fresh longer if stored properly. Wrap it tightly in plastic wrap or keep it in an airtight container. At room temperature, it’ll last about 2 days—beyond that, it’s best to refrigerate it, especially if your house is humid or warm. To keep it moist, I like to keep a slice wrapped in a paper towel inside a resealable bag. Reheating is a breeze—pop a slice in the microwave for about 10 seconds, or toast it lightly for extra crunch. If you want to freeze leftovers, wrap the entire loaf tightly or slice it first—then freeze in a zip-top bag for up to 3 months. When you’re ready to enjoy, defrost at room temp or microwave until warm. Just hold off on adding glaze until you’re ready to serve—since it can get sticky if stored on top. Trust me, a freshly glazed slice straight from the microwave is pure bliss!
Frequently Asked Questions
Final Thoughts
If you’re looking for a recipe that combines cozy nostalgia with a little bit of indulgence—this chocolate zucchini bread is it. Every time I bake it, I feel a little kid again, sneaking a warm slice straight from the oven. It’s hearty enough to satisfy a sweet tooth but wholesome enough to make you feel good about seconds. The secret ingredient? Love. Because I’ve made this so many times, I know that the simple act of mixing by hand, gently folding in chocolate chips, and letting the oven work its magic creates something truly special. Plus, it’s adaptable—add nuts, swap ingredients, make mini loaves for gift-giving. I hope you try it and discover the joy of baking a loaf that’s as comforting as a hug. Happy baking! And I’d love to hear how yours turns out—leave a comment or share your own twists!
candy corn cookies
Ingredients
Method
- Preheat your oven to 350°F. In a bowl, cream together the butter and sugar until light and fluffy.
- Add the egg and vanilla extract to the mixture and mix well.
- Gradually mix in the flour and baking soda until combined.
- Using a cookie scoop, form dough into 1.5-inch balls and place on a baking sheet lined with parchment paper.
- Decorate each cookie with candy corn pieces on top before baking.
- Bake for 12 minutes or until edges are golden. Cool on wire racks.


Love these cookies! They’re perfect for fall and so easy to make.
I love how these cookies combine fall flavors with a quick bake—perfect for satisfying that sweet craving without all the hassle!