
Simple Homemade Bagels Recipe
Have you ever had that moment where you’re craving something sweet but don’t want to go all-in on baking a big fancy cake? That’s me pretty much every other week. I remember as a kid, my mom would sneak grated zucchini into her banana bread—it was our secret weapon for sneaking in veggies without a fuss. Well, this chocolate zucchini snack cake is kind of like that secret—it’s moist, rich, and downright addictive, but it’s also loaded with zucchini, which keeps it ridiculously tender and healthy-ish. It’s one of those recipes I’ve made a million times, and every single time, it disappears in minutes at my house. Trust me, you’ll love how this combines the earthy sweetness of zucchini with gooey chocolate—it’s honestly a lifesaver on busy nights when you want something homemade but don’t want to spend hours in the kitchen. Plus, my kids actually ask for seconds, so it’s definitely a win in my book. And hey, I’ve tested this with almond milk, and it made it even creamier—so feel free to swap ingredients to suit your pantry. Let’s get baking, shall we?
What is a Zucchini Snack Cake?
This chocolate zucchini snack cake is basically your new favorite quick treat—think of it as a cross between a brownie and a moist cake, with a sneaky vegetable boost. The idea is simple: grated zucchini gets folded into a tender, chocolate-rich batter. It’s just enough to add moisture and a tiny bit of healthiness without compromising that decadent chocolate flavor. The name might sound fancy, but honestly, it’s just a cozy, homemade cake you whip up in one bowl, bake in under an hour, and enjoy with a glass of milk or a cup of coffee. Think of it as your secret weapon for satisfying a sweet tooth without feeling like you’ve overindulged. And because it’s so easy, you’ll probably find yourself making it on a whim—say, for unexpected guests or a rainy afternoon treat. It’s versatile enough to serve at brunch, dessert, or even as a quick snack, which makes it a real all-rounder in my kitchen rotation.
Why you’ll love this recipe?
What I love most about this chocolate zucchini snack cake is how incredibly forgiving and versatile it is. The flavor is rich and chocolatey, with just a hint of earthy sweetness from the zucchini—no one will guess the secret ingredient! It’s perfect for when you want a treat but don’t want to spend hours in the kitchen or dirty every pot and pan. Plus, it’s super budget-friendly, using simple pantry staples: flour, cocoa, sugar, eggs, and the zucchini hiding out in the fridge. I’ve made this countless times, and it never fails to brighten a dull day. Is it adaptable?you can swap in different kinds of chocolate chips, add nuts, or sprinkle a little sea salt on top for a sophisticated finish. What I adore most is the texture—moist, dense, and just a little fudgy. The kids love it because it’s chocolate, and I love it because I can sneak in some extra veggies without fuss. Honestly, it’s what I call a “keeper” recipe—reliable, comforting, and just the right amount of indulgence.
How do I make Zucchini Snack Cake?
Quick Overview
This cake comes together quickly because most of the prep is just grating zucchini and mixing everything in one bowl—no fancy mixers or gadgets needed. You start by preheating your oven, grating the zucchini, and mixing your wet ingredients. Then, you combine everything into a smooth batter, fold in chocolate chips, and pour it into a loaf pan or baking dish. While it bakes, your house will fill with the warm smell of melting chocolate—trust me, it’s pure comfort. Once baked to perfection, you let it cool just enough to slice easily, then drizzle with a simple glaze or serve as is. The whole process from start to finish takes about an hour, and the end result is a gorgeous, fudgy, veggie-packed treat everyone will ask for again and again.
Ingredients
For the Main Batter:
– 1 1/2 cups grated zucchini (squeeze out excess moisture)
– 1 cup all-purpose flour (or almond flour for a gluten-free version)
– 1/2 cup unsweetened cocoa powder
– 1 teaspoon baking soda
– 1/2 teaspoon salt
– 1/2 cup granulated sugar (or coconut sugar for a healthier twist)
– 1/2 cup packed brown sugar
– 2 large eggs
– 1/2 cup vegetable or melted coconut oil (or applesauce for a lighter version)
– 1 teaspoon vanilla extract
For the Filling:
– 1/2 cup chocolate chips (dark or semi-sweet)
– Optional: chopped nuts, shredded coconut, or a splash of espresso powder for extra depth
For the Glaze:
– 1/2 cup powdered sugar
– 1-2 teaspoons milk or lemon juice (adjust for desired thickness)
– Optional: cocoa powder for a richer glaze
– Additional chocolate drizzle or sprinkles for decoration
Step-by-Step Instructions
Step 1: Preheat & Prep Pan
Set your oven to 350°F (175°C). Grease a loaf pan or square baking dish with butter or non-stick spray—I like to line mine with parchment for easy cleanup. Grate the zucchini on the fine side of your box grater, then give it a good squeeze to remove excess moisture—this keeps your cake from getting soggy. Set aside.
Step 2: Mix Dry Ingredients
In a large mixing bowl, whisk together the flour, cocoa powder, baking soda, salt, and sugars. I always do this first so everything is evenly distributed. It’s that classic dry toss that ensures your cake bakes up fluffy and well-mixed.
Step 3: Mix Wet Ingredients
In a separate bowl, beat the eggs, then stir in the oil and vanilla. If I want to add a little extra flavor, I sometimes sprinkle in a pinch of espresso powder here—it just deepens the chocolate flavor. Combine until smooth, then stir in the grated zucchini. I tested this with almond milk once, and it actually made the batter even creamier—so feel free to swap liquids if you like.
Step 4: Combine
Pour the wet mixture into the dry ingredients, gently folding until just combined—be careful not to overmix, or the cake can turn dense. The batter will be thick, but don’t worry—that’s what makes it fudgy!
Step 5: Prepare Filling
Fold in the chocolate chips and any extras like chopped nuts. I love using half semi-sweet and half dark, just to get a richer flavor with little bursts of melty chocolate in every bite. If you want to get fancy, sprinkle a pinch of sea salt on top before baking.
Step 6: Layer & Swirl
Pour the batter into your prepared pan, smoothing the top gently. If you’re feeling playful, sprinkle a few more chocolate chips on top or swirl some extra melted chocolate into the batter for a marbled effect. It’s basically like painting deliciousness!
Step 7: Bake
Pop it in the oven and bake for about 30-35 minutes. Check for doneness by inserting a toothpick—it should come out with a few moist crumbs but no wet batter. Ovens vary, so start checking around 30 minutes. The smell that wafts through your house at this point? Heaven.
Step 8: Cool & Glaze
Let the cake cool in the pan for about 10 minutes, then transfer to a wire rack to cool completely. When it’s more or less at room temp, drizzle with your chosen glaze or just dust with powdered sugar if you prefer that clean look. I often wait until the cake is just barely warm before adding the glaze—so it seeps into all those nooks and crannies.
Step 9: Slice & Serve
Use a sharp knife to cut neat slices, wiping it clean between cuts for perfect squares. Serve warm with a dollop of whipped cream or ice cream if you’re feeling fancy. Honestly, this tastes just as good cold, so don’t hesitate to stash leftovers in the fridge. It also keeps well in an airtight container for a couple of days—though, honestly, it’s usually gone by then!
What to Serve It With
This chocolate zucchini snack cake is so versatile, it pairs with just about anything. For a cozy breakfast, I love slicing it and serving it alongside a steaming cup of coffee or espresso. The richness helps jumpstart the day, and you get that perfect balance of decadence and comfort. If you’re hosting brunch, present it with fresh berries, a swirl of whipped cream, or a dusting of powdered sugar—embodying that effortless, inviting vibe everyone loves.
As a dessert, it’s a no-brainer. Serve with a scoop of vanilla ice cream or a splash of warm caramel sauce. I often sneak a little sea salt on top for a savory contrast that makes it feel more like a special treat. And when we just need a quick casual snack, a small square with a glass of milk or hot cocoa hits the spot—my kids ask for this all the time when they want something sweet but don’t want the fuss of a big cake.
On family nights, I like to make this ahead of time and keep it in the fridge, so everyone can have a little slice whenever they need a pick-me-up. It’s one of those recipes that I turn to when I want to add a little homemade magic to a busy week, without the stress. Plus, it’s almost impossible to mess up—pretty much foolproof once you get the hang of blending the ingredients gently.
Top Tips for Perfecting Your Chocolate Zucchini Snack Cake
Over the years, I’ve picked up a few tricks that really elevate this cake from good to truly memorable. First, make sure to squeeze out every bit of moisture from the zucchini—it keeps the cake from being soggy. I’ve tested different grating techniques, and using the fine side of the box grater yields a more tender crumb. If you notice your batter starting to be too thick, don’t hesitate to add a splash of milk or almond milk—this keeps everything flowing smoothly.
When it comes to adding the chocolate chips, I like to fold them gently to distribute evenly, but you can also sprinkle some on top before baking for that gorgeous melty crust. For visual flair, I sometimes swirl a few teaspoons of melted dark chocolate into the batter in streaks—looks pretty and tastes divine.
About ingredient swaps: I’ve tried coconut sugar, which makes the cake slightly denser but adds a lovely caramel flavor. For a gluten-free version, swap the flour for almond or oat flour—they work surprisingly well, just watch the moisture level. Baking is all about adjustments, so don’t worry if your oven runs a little hot or cold. Start checking your cake around 30 minutes, then go from there.
And the glaze? I find that a simple powdered sugar and milk mixture is foolproof, but for more flavor, add a teaspoon of vanilla extract or a pinch of cocoa powder. Use a spoon or squeeze bottle for drizzling—make it fun! Just remember: patience makes perfect. Let the cake cool enough before glazing so your topping doesn’t melt away. Little touches like a sprinkle of sea salt or chopped nuts on top just take it over the edge.
Storing and Reheating Tips
This cake is best enjoyed within a day or two, but if you’re leftovers type, here’s what I do: Keep it covered tightly in an airtight container at room temperature for up to 2 days—if it lasts that long! For longer storage, slice it up and stash in the fridge. I usually wrap individual pieces in plastic wrap and store in a resealable bag—keeps it fresh and easy to grab morning or evening.
Reheating? Just pop a slice in the microwave for about 15 seconds—it softens back up beautifully. There’s something cozy about eating it warm, as the chocolate chips glisten and the aroma wafts through the house. If you prefer it cold, just serve straight from the fridge—either way, it’s delicious. To freeze, wrap tightly with foil or store in a freezer-safe container for up to 3 months. Thaw overnight in the fridge or at room temperature for a quick treat later.
As for the glaze, I recommend waiting to add it until just before serving if you plan to freeze the cake. The moisture can make the glaze drift or make the cake soggy. This little trick helps keep everything looking and tasting fresh ingoing!
Frequently Asked Questions
Final Thoughts
If you’re looking for a cozy, versatile, and slightly sneaky way to get more veggies into your family’s dessert rotation, this chocolate zucchini snack cake is it. It’s one of those recipes I keep coming back to when I want something homemade but don’t have a ton of time—yet I still want it to taste like a hug. The combination of that fudgy texture, rich chocolate flavor, and tender zucchini makes every bite feel like a little celebration. My kids ask for this all the time, and I never feel guilty serving it because it’s packed with hidden greens! Whether you serve it warm with a dusting of powdered sugar, or cold straight from the fridge, I promise it’ll become a staple in your kitchen too. Don’t forget, you can tweak the ingredients to make it your own—swap in your favorite chocolate, add nuts, or enjoy it cake-style or muffin-sized. Happy baking, and I can’t wait to hear how yours turns out!
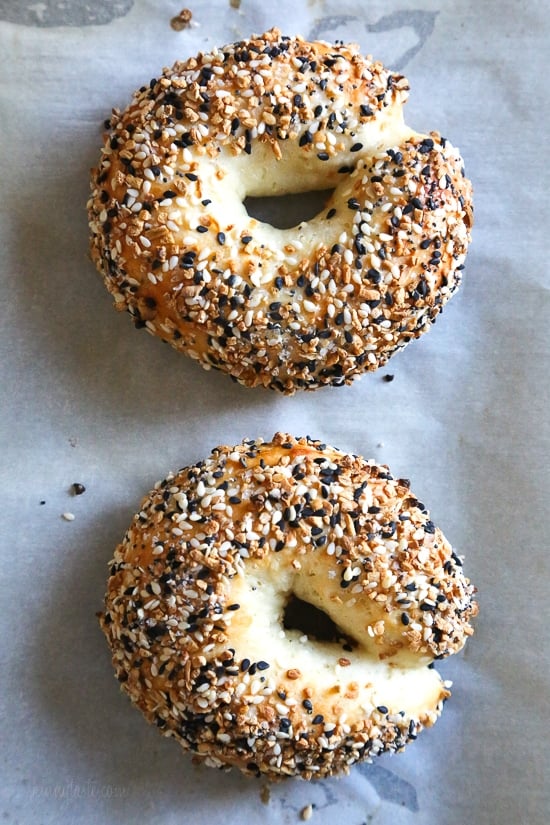
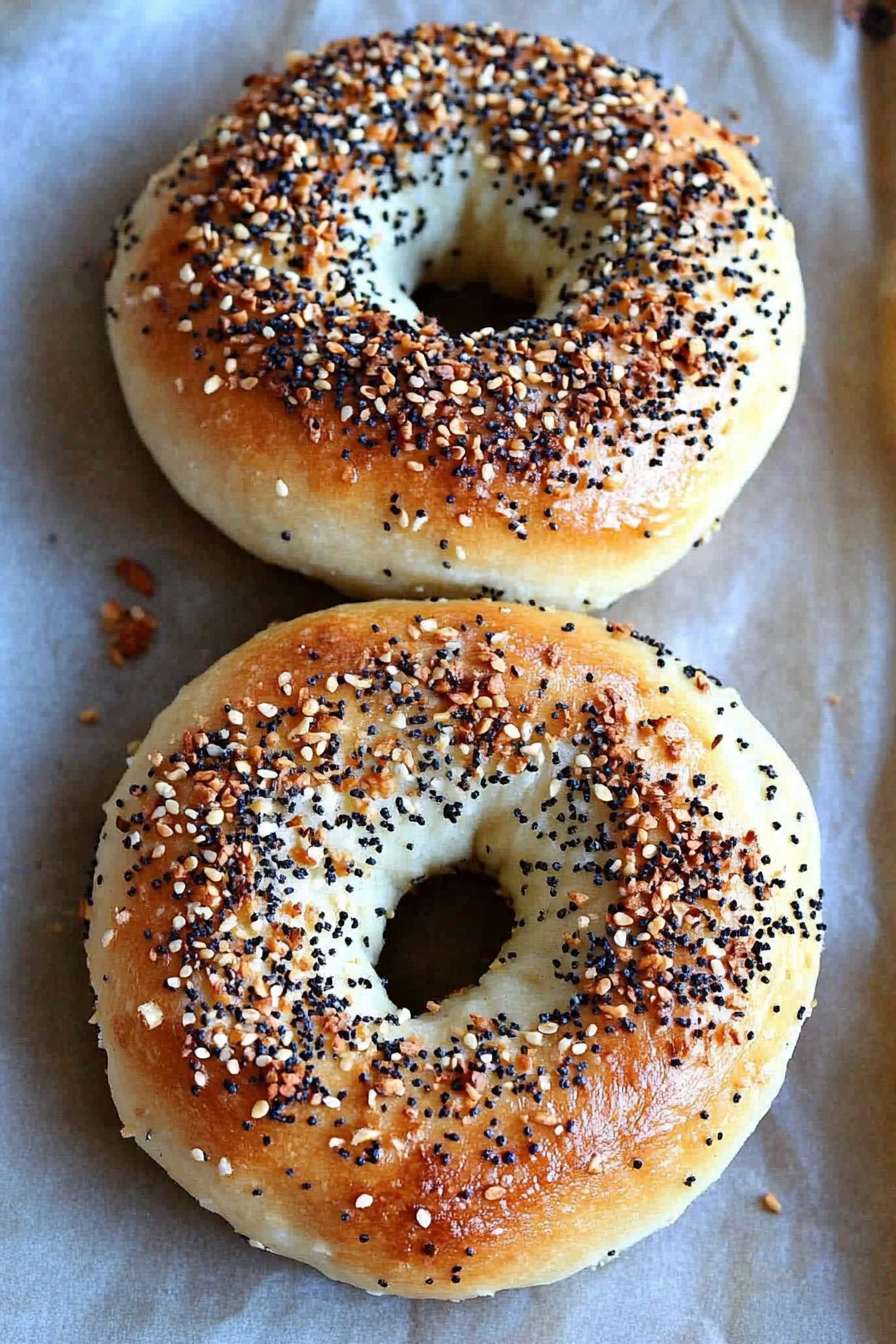
bagels
Ingredients
Method
- Preheat oven to 375°F. Line baking sheet with parchment paper or a silicone baking mat. Lightly spray for non-stick.
- Combine flour, baking powder, and salt in a medium bowl; whisk well. Add yogurt and stir until it resembles small crumbles.
- Lightly flour your work surface. Turn dough onto surface and knead a few times until tacky but not sticky, about 15 turns.
- Divide dough into 4 equal parts. Roll each into a rope about 3/4-inch thick and form into bagel shape by joining ends.
- Brush with egg wash and add optional toppings. Bake on prepared sheet for 25 minutes. Cool before serving.


I just tried this recipe and they turned out amazing! Perfect for when you want something homemade but don’t want to spend all day baking.
Oh, I totally get that craving! These bagels look perfect for satisfying it without the hassle.