
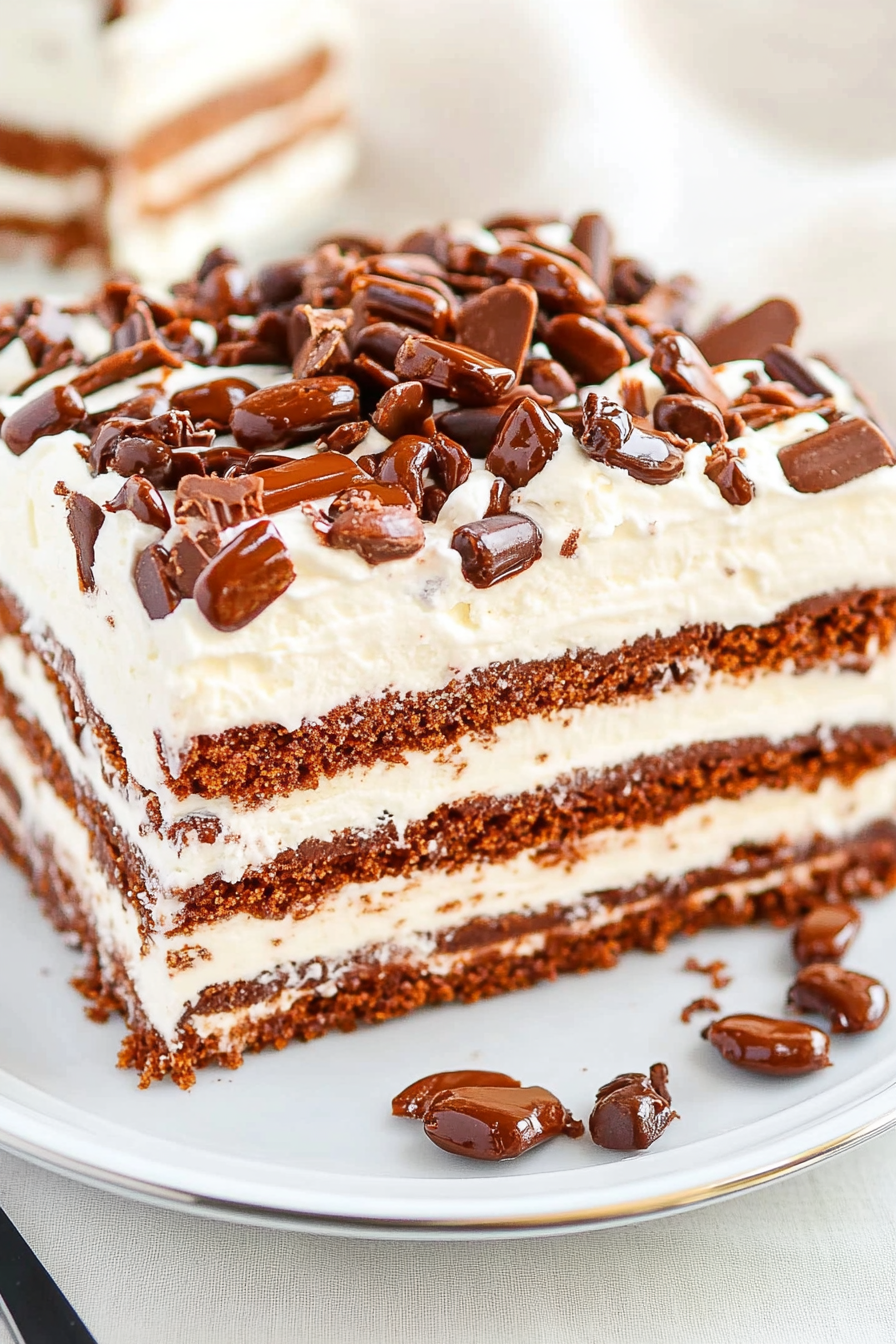
Shell-ebrate with Easy Turtle Ice Cream Cake
There’s just something about the smell of freshly baked banana bread that instantly takes me back — mornings at my grandma’s house, the aroma wafting through the kitchen, making everything feel cozy and safe. But here’s the thing: I love adding zucchini to the mix. It’s like sneaking in a little veggie goodness, and honestly, it keeps the bread so moist and tender. This zucchini banana bread with a sweet swirl is one of those recipes I’ve made countless times because it’s simple, forgiving, and my kids ask for it all the time. Plus, it’s perfect when you have overripe bananas sitting on the counter and a veggie stash in the fridge — a true “what’s in the fridge?” miracle! Trust me, this one’s a lifesaver on busy nights or when you’re craving something sweet but don’t want to turn on the oven for a big cake. The best part? Everyone leaves the kitchen happily, with crumbs on their faces, saying, “Can I have another slice?” I promise, once you try this, it will become a regular at your house, too.
What is Zucchini Banana Bread with a Sweet Swirl?
Think of this as a cozy, slightly healthier twist on classic banana bread. It’s essentially a moist, tender loaf packed with mashed bananas and grated zucchini, giving it a subtle veggie boost that you won’t even notice. The name says it all—there’s a delightful, sweet swirl running through the middle, made from a little extra sugar, butter, and cinnamon, that makes each bite irresistibly flavorful. It’s like getting a surprise inside your bread! The concept is simple: combine your ripe bananas with grated zucchini, then swirl in some cinnamon-sugar goodness before baking. It’s friendly enough for breakfast, chic enough for brunch, and just sweet enough for a cozy snack or dessert. The best part? It’s so forgiving. I’ve tested this with slightly less sugar, almond flour, even dairy-free options — and it always turns out great. Think of it as a warm hug in loaf form!
Why you’ll love this recipe?
What I love most about this zucchini banana bread with a sweet swirl is how it strikes the perfect balance between indulgence and health — without *feeling* like either. The flavor? Oh my gosh, it’s like a banana bread meets cinnamon roll, with that cozy cinnamon-sugar swirl that makes it feel special. The smell alone will make everyone in your house come running — it’s like a warm hug from the oven. And honestly, it’s crazy easy to throw together. I always do this when I need something quick and satisfying; it’s foolproof. Budget-wise, it’s super frugal because it uses everyday ingredients — ripe bananas, zucchinis from the garden, pantry staples. Plus, versatility is the name of the game. You can swap in gluten-free flour, add nuts or chocolate chips, or even make mini muffins for on-the-go bites. It’s one of those recipes that feels fancy but is really just a few things thrown together — my kind of baking!
How do you make Zucchini Banana Bread with a Sweet Swirl?
Quick Overview
This bread comes together in just a few steps. First, you mash the bananas and grate the zucchini, then mix the wet and dry ingredients separately. You fold everything together gently, layer in the cinnamon-sugar swirl, and bake. The secret is not overmixing — that keeps the bread tender. The swirl gets spread on top just before baking, and once it’s out of the oven, you let it cool slightly before drizzling with a sweet glaze or simply dusting with powdered sugar. Trust me, this method keeps your loaf moist inside and beautifully crusted on top. It’s the kind of recipe that feels like a little magic each time you pull it out of the oven!
Ingredients
For the Main Batter:
– 3 ripe bananas, mashed (the riper, the better; I test them with a quick squeeze)
– 1 cup grated zucchini (squeeze out excess moisture so your bread isn’t soggy!)
– 1/2 cup melted unsalted butter or neutral oil
– 1/2 cup brown sugar (or coconut sugar if you want to keep it lighter)
– 2 large eggs
– 2 teaspoons vanilla extract
– 1 3/4 cups all-purpose flour (or a gluten-free blend if you prefer)
– 1 teaspoon baking soda
– 1/2 teaspoon baking powder
– 1/2 teaspoon salt
– 1 teaspoon ground cinnamon (for that warm, comforting note)
For the Filling:
– 1/4 cup granulated sugar
– 1 teaspoon ground cinnamon
– 2 tablespoons melted butter (or coconut oil)
For the Glaze (optional but recommended):
– 1/2 cup powdered sugar
– 1-2 teaspoons milk or almond milk
– A splash of vanilla or lemon juice (for zing)
Step-by-Step Instructions
Step 1: Preheat & Prep Pan
Set your oven to 350°F (175°C). Grease a standard loaf pan with butter or line it with parchment paper — I love doing this because it makes for easy cleanup. Get everything ready: grate your zucchini, mash your bananas, and gather your ingredients so you’re not hunting through the pantry mid-mix.
Step 2: Mix Dry Ingredients
Whisk together the flour, baking soda, baking powder, salt, and cinnamon in a large bowl. I like to do this step first — it ensures even distribution of the leaveners. It also saves you from clumps in the batter later on.
Step 3: Mix Wet Ingredients
In another bowl, mash the bananas until smooth (I always do this with a fork, but a potato masher works great too). Stir in the melted butter, sugar, eggs, and vanilla. I’ve tested this with almond milk, and surprisingly, it made it even creamier — so don’t hesitate to switch it up.
Step 4: Combine
Pour the wet mixture into the dry ingredients, then fold gently with a spatula until just combined. Do NOT overmix — you want a tender bread, not a dense one. It might be a little lumpy, and that’s totally fine.
Step 5: Prepare Filling
Mix the sugar and cinnamon for the swirl filling. Melt the butter and stir it in. It should be crumbly but moist enough to spread. If it’s too dry, add just a touch more melted butter.
Step 6: Layer & Swirl
Pour half of the batter into your prepared pan. Sprinkle the cinnamon-sugar mixture evenly over the batter, then add the remaining batter on top. Use a knife or skewer to gently swirl the filling into the batter — don’t overdo it, just a few gentle passes for that marbled look.
Step 7: Bake
Pop it into the oven and bake for about 50-60 minutes. Check for doneness by inserting a toothpick into the center; it should come out clean. Every oven is a little different, so start checking at 50 minutes. If the top browns too quickly, cover loosely with foil.
Step 8: Cool & Glaze
Let the loaf cool in the pan for about 15 minutes, then remove it and let it cool completely on a rack. If you’re glazing, whisk together powdered sugar, vanilla, and milk until smooth. Drizzle over the cooled bread and let the glaze set before slicing.
Step 9: Slice & Serve
Use a serrated knife for clean cuts — I always wait until it’s just warm enough to slice without squishing the bread. Serve slices warm with butter, or plain with a cup of coffee. Right before serving, I love adding a dusting of powdered sugar or a drizzle of honey for that extra special touch.
What to Serve It With
This bread is so versatile, I often keep a few slices on hand for different occasions. For breakfast, pairing it with a robust coffee or a glass of milk is *perfect*. I like to serve it sliced and toasted with a little butter and jam for brunch — it’s a real crowd-pleaser. As a dessert, a scoop of vanilla ice cream or a dollop of Greek yogurt turns it into a cozy treat. And for a quick snack, I’ll cut a slice, heat it up for a few seconds, and slather it with almond butter. It’s our go-to for those busy mornings or when we want something sweet but not over-the-top. Honestly, my family adores the combination of flavors, and I’ve even handed out mini-loaf versions at picnics or brunch potlucks. It’s one of those recipes that’s just as delicious cold or warm — and always makes the house smell amazing.
Top Tips for Perfecting Your Zucchini Banana Bread with a Sweet Swirl
Over the years, I’ve learned a few tricks to make this bread absolutely fail-proof. First, don’t skip squeezing out the moisture from your grated zucchini. Too much water, and your bread can become crumbly or soggy. I use a clean kitchen towel or a fine-mesh sieve and give it a good squeeze — it’s a game-changer. Second, mixing is everything. I’ve made this with a frantic stirring and ended up with a dense loaf. Gently folding until just combined keeps it light and fluffy. When it comes to the swirl, I’ve played with the amount of cinnamon and sugar — trust me, a generous sprinkle makes the swirl a real star, but too much can sink to the bottom. A trick I learned: add a tiny bit of the batter on top before swirling, creating a layered effect that’s pretty and bites-sized. If you want to customize, try adding chopped walnuts, chocolate chips, or blueberries — each variation makes it uniquely yours. And don’t forget to test for doneness—you want a toothpick to come out just clean. I’ve learned this from years of baking, and it’s always worth it to get that perfect, moist crumb.
Storing and Reheating Tips
This bread stays fresh surprisingly long, especially if you wrap it tightly. For short-term storage, keep slices at room temperature in a breathable container or wrapped in plastic wrap for 2-3 days. If you want it to last longer, pop the loaf in an airtight container or zip-top bag and refrigerate for up to a week. To freeze, wrap it tightly in plastic wrap and then foil, and store for up to 3 months. Thaw overnight in the fridge or at room temperature; I like to warm slices in the microwave for about 15 seconds — it’s magic how fluffy and warm it feels again. A quick reheat in the oven works too; just cover with foil to prevent drying out. When reheating, wait to add any glaze or toppings until just before serving to keep things fresh. Trust me, this bread reheat beautifully — it feels like a little slice of comfort every time.
Frequently Asked Questions
Final Thoughts
Honestly, I could go on and on about this zucchini banana bread with a sweet swirl — it’s one of those recipes that’s both comforting and a little surprise every time. moist, flavorful, and endlessly adaptable, it’s become a staple in my kitchen. Whether I have overripe bananas or a forgotten zucchini on hand, this loaf always saves the day. Plus, it’s a wonderful way to sneak some veggies into your kids’ diet without any fuss. Every batch I make disappears in minutes, and I love hearing how everyone still finds new favorites in it — sometimes with a sprinkle of nuts, sometimes with extra cinnamon. If you’re looking for a cozy, versatile, crowd-pleasing bread that’s just like a hug, give this a try. I can’t wait to hear how yours turns out! Leave a comment, share your tweaks, and happy baking — from my kitchen to yours!
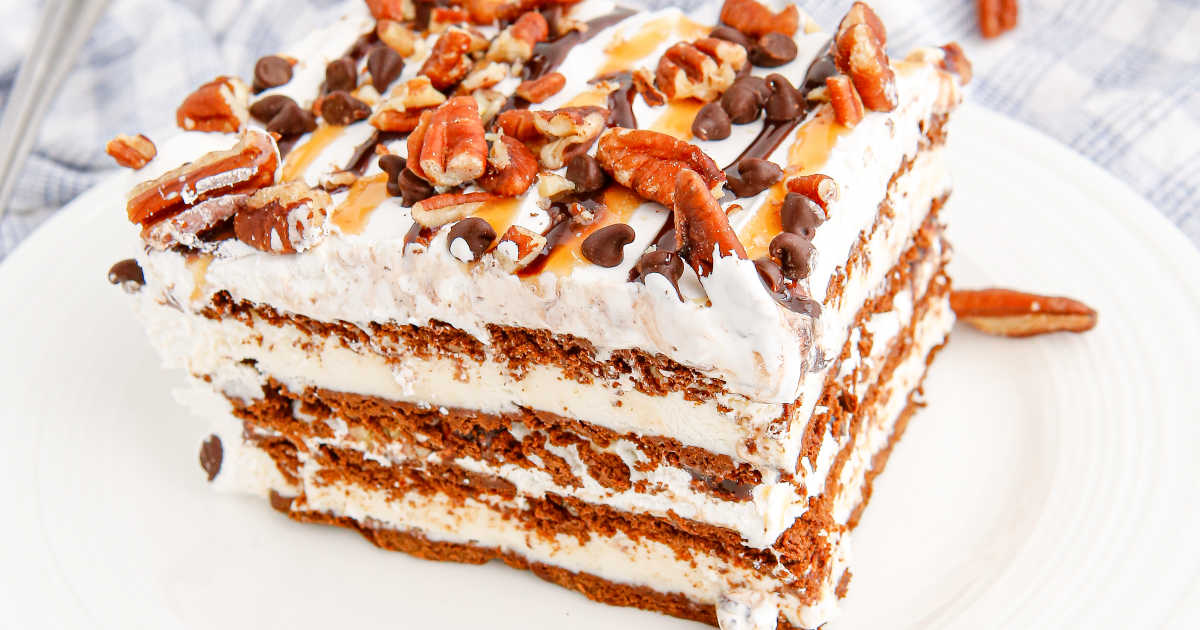
turtle ice cream sandwich cake
Ingredients
Method
- Line the bottom of a 9x13 inch pan with 12 ice cream sandwiches. You may need to slice one or two sandwiches to fit all into the pan.
- Spread half of the Cool Whip over the ice cream sandwich layer.
- Drizzle about ¼ cup of the chocolate sauce over top of the Cool Whip followed by ¼ cup of the caramel sauce. Sprinkle half of the pecans and half the chocolate chips over the top.
- Repeat the same steps with the remaining ingredients.
- Cover the baking dish loosely with aluminum foil and place in the freeze for 3 to 4 hours before serving. Slice into squares and enjoy.

This post made me smile—banana bread memories are the best kind. Thanks for the sweet throwback!