
Easy Peanut Butter Pie Recipe
There’s something about baking when I’m feeling a little nostalgic — it’s like wrapping myself in a warm blanket of memories, especially when I make this zucchini chocolate swirl cake. My kids ask for this all the time, and honestly, it’s such a sneaky good way to get extra veggies into their day without a fuss. The smell alone during baking is a game-changer—rich cocoa mingling with the earthy scent of zucchini, filling the house and making everyone hustle into the kitchen. This one’s a lifesaver on busy nights when I want a treat that’s almost healthy but so indulgent you’ll still feel like you’re splurging.
Plus, I love how versatile it is—adapt it with walnuts, or swap out the cocoa for a hint of cinnamon. I tested this with almond milk and it actually made it even creamier, so don’t hesitate to play around. If you’re like me and prefer baking something that’s simple but delivers big on flavor, this recipe is right up your alley. Trust me, once you try it, it’ll be making regular appearances in your kitchen, I promise!
What is Zucchini Chocolate Swirl Cake?
Think of this as a cozy, chocolatey loaf that secretly hides zucchini inside—kind of like a more fancy, grown-up version of those quick bread loaves you’d bake on a lazy weekend. It’s essentially a moist, tender cake with swirls of rich cocoa running through it, giving it that stunning marbled look, and the zucchini keeps it super moist without making it dense or heavy. The name might sound fancy, but it’s really just a simple homey dessert. The idea is that you grate fresh zucchini (no peeling needed—just give it a good squeeze to get rid of excess moisture), fold it into the batter, and then add a swirl of chocolate batter on top before baking. Elegant enough for guests, but easy enough for a weeknight treat.
Why you’ll love this recipe?
What I love most about this zucchini chocolate swirl cake is how it combines some of my favorite things—chocolate, zucchini, and the sheer joy of sneaking in veggies into dessert (hey, no shame here). The flavor profile is so satisfying—deep cocoa with a hint of earthiness from the zucchini, topped with a glossy chocolate glaze that’s irresistible. The texture? So soft and luscious, almost like a brownie but lighter, with beautifully ribboned swirls of chocolate that make it look as gorgeous as it tastes.
This recipe is a total crowd-pleaser because it’s so straightforward. You just whisk, layer, and bake. No fancy equipment needed. Plus, I’ve made this countless times, and it never fails—my family always asks for seconds. It’s budget-friendly, too—most of what you need are pantry staples, maybe a fresh zucchini from the garden or the farmer’s market. And what’s fantastic is how versatile it is: serve it as breakfast, afternoon coffee cake, or dessert after dinner. The glaze can be skipped or jazzed up with a dash of espresso powder for an extra kick. Honestly, I’ve tested this with nutbutters in the swirl—almond or peanut—and it turns out amazing.
How do I make Zucchini Chocolate Swirl Cake?
Quick Overview
This cake comes together in just a few steps—mix your dry ingredients, combine the wet, and gently fold everything together. The fun part is layering the chocolate batter with the zucchini batter and swirling them to create these beautiful marbled patterns. Baking is straightforward—just pop it in the oven, and the house fills with that warm, chocolaty aroma. Once cooled, a quick glaze makes it shine. It’s perfect for when you want a decadent treat that’s not too heavy, and I promise, the kids will love how it looks and tastes.
Ingredients
For the Main Batter:
- 1 ½ cups all-purpose flour (or almond flour for a gluten-free version)
- ¾ cup granulated sugar (can reduce a bit for less sweetness)
- ½ cup unsweetened cocoa powder (quality matters—use the dark stuff)
- 1 teaspoon baking soda
- ½ teaspoon baking powder
- ¼ teaspoon salt
- ⅓ cup vegetable oil (or melted coconut oil for extra flavor)
- ¾ cup milk (dairy or plant-based, like almond or oat)
- 2 large eggs
- 1 teaspoon vanilla extract
- 1 cup grated zucchini (squeeze out excess moisture)
For the Filling (Chocolate Swirl):
- ½ cup semisweet chocolate chips or chopped dark chocolate
- 2 tablespoons butter or coconut oil
- 1 tablespoon maple syrup or honey (optional, for sweetness)
For the Glaze:
- ½ cup powdered sugar
- 1-2 teaspoons milk or cream
- ½ teaspoon vanilla extract
- Optional: a sprinkle of cocoa powder or chopped nuts for topping
Step-by-Step Instructions
Step 1: Preheat & Prep Pan
Heat your oven to 350°F (175°C). Grease a loaf pan or line it with parchment paper—trust me, this makes removal so much easier. I usually do a quick spray of non-stick spray plus a dusting of flour or cocoa powder. Set it aside while you prepare the batter.
Step 2: Mix Dry Ingredients
In a large bowl, whisk together the flour, cocoa powder, sugar, baking soda, baking powder, and salt. Mixing the dry ingredients first helps prevent lumps and ensures even distribution of the leavening agents. It’s a key step I learned after a few over-mixed cakes that ended up dense—another thing: don’t overmix at this stage.
Step 3: Mix Wet Ingredients
In a separate bowl, whisk together the eggs, milk, oil, and vanilla until smooth. If the eggs are straight from the fridge, give them a quick beat first—they mix better that way. I’ve tested this with almond milk, and it still works beautifully—just adds a little nuttiness and helps keep the cake dairy-free.
Step 4: Combine
Pour the wet ingredients into the dry and gently fold until just combined. Do not overmix—that’s the secret to keeping it light. The batter will be thick but still pourable. Now, add in the grated zucchini and fold it in carefully. The moisture from the zucchini keeps the cake super moist, and squeezing out excess water beforehand makes a big difference in avoiding a soggy final result.
Step 5: Prepare Filling
In a small saucepan, melt your chocolate with the butter (or coconut oil) over low heat. Stir until smooth. Add the maple syrup if you want extra sweetness. Let it cool slightly but stay pourable—you want it to swirl nicely into the batter without sinking or pooling too much.
Step 6: Layer & Swirl
Pour half the batter into your prepared pan. Dollop spoonfuls of the chocolate mixture on top, then add the remaining batter. Use a skewer or knife to swirl the two together—try to create a marbled effect without overmixing. I do gentle figure-eight motions—that way, you get those lovely ribboned swirls. It’s kind of satisfying!
Step 7: Bake
Pop it into the oven and bake for about 45-50 minutes. Test doneness with a toothpick inserted in the center—if it comes out with moist crumbs, you’re good. Ovens vary, so keep an eye. If the top starts to brown too quickly, cover loosely with foil and continue baking.
Step 8: Cool & Glaze
Let the cake cool in the pan for about 15 minutes, then transfer to a wire rack. Once fully cooled, whisk your glaze ingredients until smooth and drizzle generously over the top. The glaze sets nicely as it sits, adding a shiny, chocolatey finish that makes it look bakery-fancy.
Step 9: Slice & Serve
Use a sharp serrated knife for clean cuts. This cake tastes even better the next day—stored in an airtight container at room temperature or in the fridge if you prefer it chilled. Serve with a dollop of whipped cream or a scoop of vanilla ice cream, or just enjoy it solo with a hot cup of coffee or tea. Those marbled swirls? A little piece of edible art!
What to Serve It With
This cake is incredibly versatile. For breakfast, try a slice with a robust dark roast coffee—trust me, that pairing will start your day with a smile. It also makes a fabulous brunch centerpiece, especially if you serve it alongside fresh berries and a cup of milk or espresso. As a dessert, it’s perfect served warm with a drizzle of extra glaze and a sprinkle of chopped nuts or flaky sea salt for that sweet-salty touch.
For a cozy snack, microwave a slice for 10 seconds and spread a smear of almond butter or nut cream on top. It’s seriously addictive—my kids ask for this all the time, whether it’s in their lunchboxes or after school. I love how it feels indulgent but sneaks in those healthy veggies. Plus, the chocolate swirl makes each slice feel special, not like a regular loaf but a little celebration in every bite.
Top Tips for Perfecting Your Zucchini Chocolate Swirl Cake
Over the years, I’ve picked up a few tricks that really take this cake from good to great. First off, squeezing out as much moisture as possible from the zucchini is everything. I pat it dry with a clean towel after grating—I’ve tested it both ways, and trust me, the drier the zucchini, the better your cake’s texture.
When mixing, fold gently to keep the batter airy, especially once you add the zucchini. Overmixing will develop gluten and make it dense, which nobody wants. Also, don’t rush the swirling step; a gentle hand and a skewer or toothpick makes those beautiful marbles look just right.
If you want to customize, swap the chocolate for layers of fruit preserves or a nutbutter ripple—just add dollops and swirl. I tested this with a hint of cinnamon mixed into the cocoa layer, and it was a hit. For the glaze, a splash of almond extract or a dusting of sea salt can add that professional touch. Personally, I’ve learned that baking at slightly lower temperatures for a little longer yields a more even bake—especially with denser loaves like this.
The key is patience—I’ve burned a cake or two in my early days because I rushed it. Now, I always do a toothpick test and watch the edges. Oh, and chilling the cake before slicing helps it hold together better—more clean cuts, less crumbling. If you don’t have powdered sugar, just blend a little granulated sugar in the food processor until powdery, and you’re set. Little adjustments like these really make a difference.
Storing and Reheating Tips
This cake is best enjoyed within 2-3 days if kept at room temperature, covered loosely with a cloth or foil. It stays moist and flavorful, especially if you skip the glaze until serving. For longer storage, pop it into an airtight container and refrigerate—just bring it back to room temp before slicing for that tender crumb. I’ve frozen slices wrapped tightly in plastic wrap plus foil, and they thaw beautifully in minutes. Just avoid freezing the glazed version, as the glaze can get watery when thawed.
If you want to reheat a slice, microwave on low for about 10-15 seconds—just enough to warm it without drying out. The glaze may soften, but the flavor stays rich. The trick is to store the glaze separately if you plan to keep it for more than a day. Reapply fresh if needed for a glossy finish.
Frequently Asked Questions
Final Thoughts
This zucchini chocolate swirl cake is one of those recipes that’s become a staple in my house—a little bit indulgent, a little bit sneaky, and incredibly satisfying. It’s perfect for when you’re craving something sweet but want a little hidden health boost. Over the years, I’ve tweaked it to match my family’s tastes—more cocoa, less sugar, extra zucchini—and every time, it turns out a little better. It’s not just a dessert; it’s a memory-maker, a comfort, and a reminder that baking is about joy, experimentation, and sharing something truly homemade. If you give this a try, I’d love to hear how yours turned out! Happy baking, and don’t forget to save a slice for yourself. You deserve it.
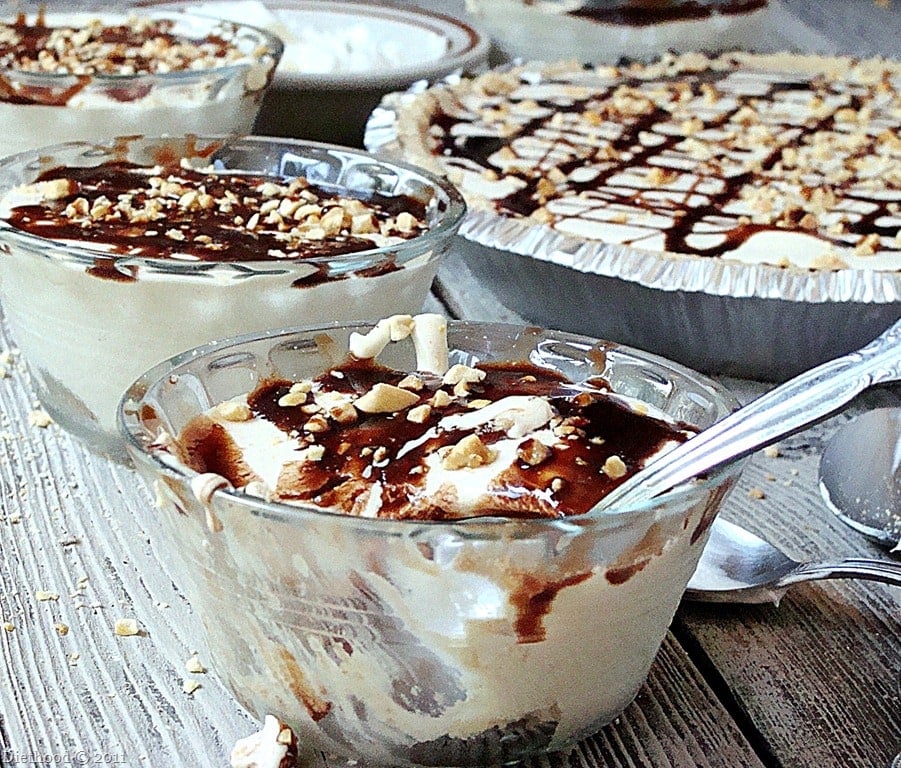
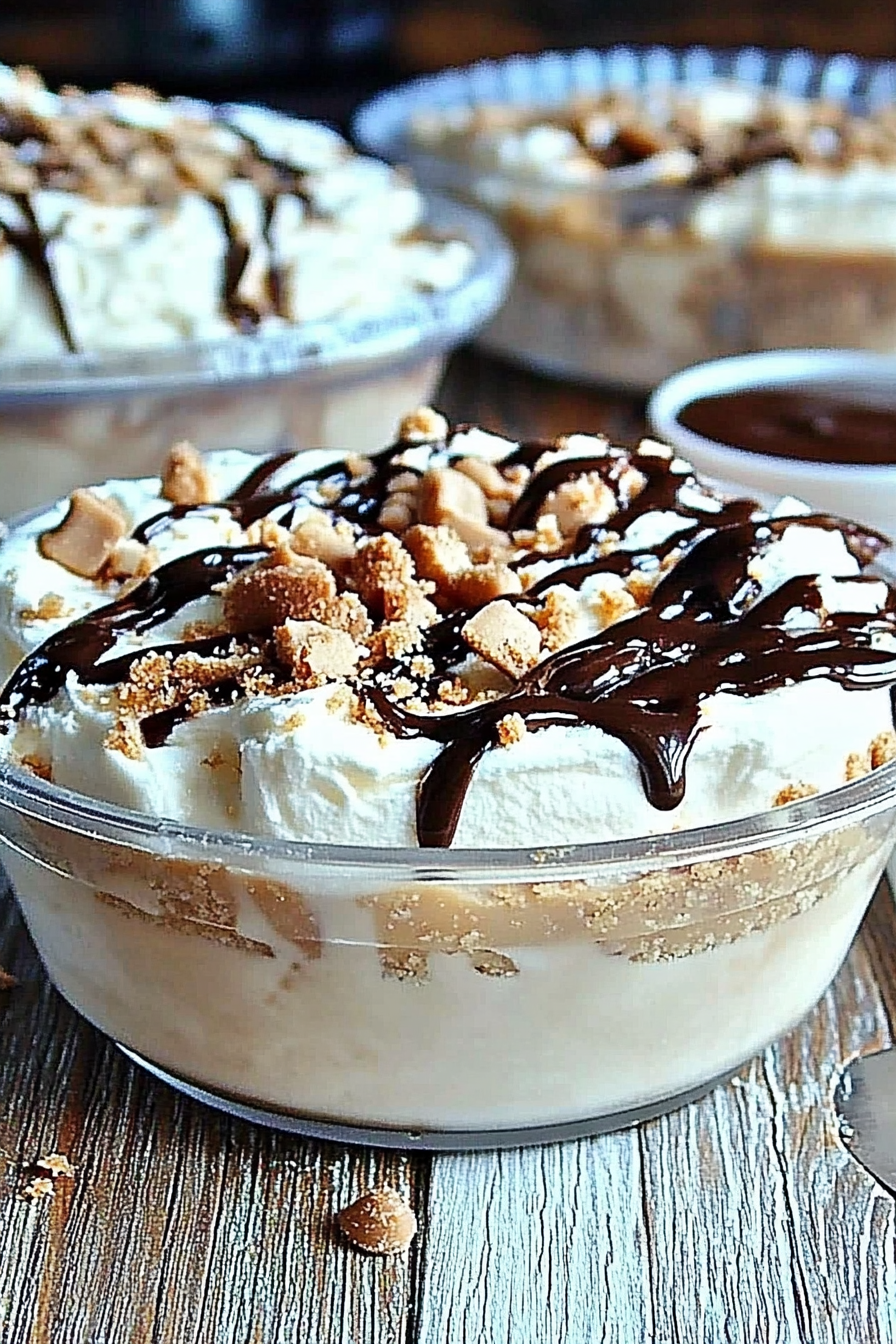
peanut butter pie
Ingredients
Method
- In the bowl of your electric mixer, cream together the cream cheese and powdered sugar.
- Set the mixer to low and add in the peanut butter and milk; mix well.
- Using a rubber spatula, gently fold in the whipped topping.
- Spoon the peanut butter mixture into two 9-inch graham cracker pie shells; cover and freeze until firm, about 3 hours.

This sounds so comforting—I love how baking brings back such warm memories! I’ll have to try this peanut butter pie soon.
This peanut butter pie sounds delicious—peanut butter is always a winner! The zucchini chocolate swirl cake also sounds cozy and comforting.
I’ve been craving comfort food lately and this peanut butter pie looks perfect. Definitely adding it to my weekend baking list!