Easy Creamy Fish Bake Recipe
You know those evenings when you’re craving something a little sweet but don’t want to fuss with complicated baking or a mountain of dishes? That’s exactly when I whip up this zucchini swirl cake. I’ve been making it for years — it’s one of those recipes that tastes like a warm hug and feels like home. The smell alone, when it’s baking, fills the whole kitchen and instantly settles everyone in. It’s got the perfect balance of moist-ness, sweetness, and that little hint of zucchini makes it feel healthier, even when it’s not. Honestly, I love this one because it’s so forgiving; I’ve tested it with almond milk, extra cocoa, and even a dash of cinnamon just to see what happens, and it’s always a winner. My kids ask for this all the time, and it disappears in minutes — trust me, it’s that good. And the best part? It’s dead simple, even on busy weeknights. Like I said, it’s a cozy classic, and I feel like sharing it with my friends makes it even more special. So, grab your zucchini, because we’re about to make magic in the kitchen!
What is Zucchini Swirl Cake?
This zucchini swirl cake is pretty much what it sounds like — a moist, tender cake with a beautiful swirl of chocolate, cinnamon, or fruit jam running through it. Think of it as a cross between a quick bread and a cozy coffee cake, but with a special twist of shredded zucchini that keeps everything super moist without overpowering the flavor. The name “swirl cake” comes from that little artful swirl of extra flavor running through the batter, making each slice so pretty and inviting. It’s essentially a simple batter, enhanced with grated zucchini, and then layered or marbled with a contrasting filling or topping. I love how accessible it is — no fancy ingredients or techniques, yet it looks and tastes like you put a lot of effort into it. And because zucchini is mild and softens beautifully when baked, it adds moisture and a subtle veggie surprise to an otherwise indulgent treat. Think of it as a hidden gem among quick desserts. It’s perfect for breakfast, a snack, or a light dessert — honestly, it does it all!
Why you’ll love this recipe?
What I love most about this zucchini swirl cake is how versatile and forgiving it is — you really don’t need to be a pastry chef to get perfect results. The flavor? Oh, it’s just incredible. The zucchini keeps the cake moist and tender, while the swirl adds a hint of richness, especially if you pick the right filling. I’ve made this so many times that I know it’s a lifesaver on busy nights when I need something quick but still crave a homemade touch. Plus, it’s super budget-friendly. The ingredients are staples — eggs, flour, sugar, zucchini, chocolate, and a few pantry spices — nothing fancy at all. And the best part? It’s endlessly customizable. Want a dairy-free version? Swap in coconut oil or almond milk. Prefer a fruit swirl? Blueberry jam works beautifully. I even tested this with a tiny splash of vanilla extract, and it made the flavor pop even more. This cake is not just a recipe; it’s a little piece of comfort that I always turn to when I want something sweet but cozy. Honestly, it’s one of those recipes that makes your house smell like a warm bakery, and my family can’t get enough of it. It’s simple, satisfying, and perfect for sharing — whether you’re carving out a slice for yourself or passing it around the dinner table.
How do I make Zucchini Swirl Cake?
Quick Overview
This zucchini swirl cake comes together in just about an hour, total. The batter is simple — a few quick mixes, then swirling in your favorite jam or chocolate spread. Pop it into a preheated oven, and your kitchen will be filled with an irresistible aroma. The secret to the perfect swirl? Don’t overmix — just gently fold the batter and use a toothpick or skewer to create those lovely marbled impressions. It’s perfect for beginners and experienced bakers alike. The beauty is that it requires minimal fuss but looks and tastes like a bakery-level treat. Plus, I love that you can prep everything ahead and just throw it in the oven when you’re ready to bake. Trust me, this one’s a real crowd-pleaser and a guaranteed hit at any gathering or family brunch.
Ingredients
For the Main Batter:
– 2 cups grated zucchini (squeeze out excess moisture)
– 1 ½ cups all-purpose flour (or your favorite gluten-free blend)
– 1 cup granulated sugar
– ½ cup oil (vegetable or coconut works great)
– 3 large eggs
– 1 teaspoon vanilla extract
– 1 teaspoon baking powder
– ½ teaspoon baking soda
– ½ teaspoon salt
– 1 teaspoon cinnamon (optional but highly recommended)
For the Filling (or Swirl):
– ½ cup your favorite jam (strawberry, raspberry, or blueberry are delicious)
– Or ½ cup mini chocolate chips or chopped chocolate (for a gooey effect)
– A sprinkle of cinnamon or nutmeg for extra warmth
For the Glaze (optional but lovely):
– 1 cup powdered sugar
– 1-2 tablespoons milk (dairy or almond)
– A dash of vanilla or citrus zest for extra flavor
– A drizzle of caramel or melted chocolate for decorating
Step-by-Step Instructions
Step 1: Preheat & Prep Pan
Set your oven to 350°F (175°C). Grease your loaf pan or round cake pan well, then line it with parchment paper if you like. This keeps everything super easy to remove without crumbling. I always do this first so I don’t forget — trust me, it’s worth the extra step. While that warms up, grate your zucchini and squeeze out as much excess moisture as you can — damp zucchini can make your batter a bit heavy, and nobody wants that.
Step 2: Mix Dry Ingredients
In a bowl, whisk together the flour, baking powder, baking soda, cinnamon, and salt. Sifting these together helps keep everything light and airy, but if you’re in a rush, just whisk well. This step ensures your cake rises evenly and has a tender crumb.
Step 3: Mix Wet Ingredients
In a separate large bowl, combine the eggs, sugar, oil, and vanilla. Whisk until smooth — I like using a fork at first, then a whisk to really get everything blended. When your zucchini is grated and excess moisture squeezed out, fold it into this wet mixture. It should look moist and slightly shiny — like those cozy summer mornings when everything’s just right.
Step 4: Combine
Add your dry ingredients to the wet, and gently fold until just combined. Overmixing can make the cake dense, so slow and steady wins the race here. Your batter should be thick but scoopable. If it feels too stiff, a splash of milk can loosen it up.
Step 5: Prepare Filling
If you’re using jam, spoon it into a small bowl and give it a stir to loosen it up. For chocolate, chop it into small pieces. You can also mix in a pinch of cinnamon or nutmeg to deepen the flavor. This filling will be layered or swirled through the batter, so keep it ready.
Step 6: Layer & Swirl
Pour about half your batter into the prepared pan. Dollop your jam or chocolate spread over, then cover with the remaining batter. Using a toothpick or skewer, gently swirl the two layers together — no need for perfect lines, just aim for a marbled look with lots of gentle twists. It’s all about that cozy homemade feel. You’ll see little ribbons of color or jam peeking through, which makes each slice so pretty.
Step 7: Bake
Pop it into your preheated oven and bake for about 35-40 minutes. Check for doneness by inserting a toothpick into the center — if it comes out clean, you’re good. If it’s batter-y, give it five more minutes. Oven times can vary, so keep an eye on it after 30 minutes. The top should be golden and a bit crisp around the edges.
Step 8: Cool & Glaze
Let the cake cool in the pan for about 15 minutes. Then, transfer it to a wire rack and wait until it’s just warm or fully cool before adding any glaze. If you’re rushing, a light dusting of powdered sugar works beautifully, but I love a drizzle of vanilla glaze for that bakery feel.
Step 9: Slice & Serve
Use a sharp serrated knife for clean slices and serve on a pretty plate. This cake is great warm with a cup of tea or cooled for leftovers the next day. I swear, the swirl of jam or chocolate not only makes it look cute but adds such a lovely surprise with every bite. Trust me, your family will ask for seconds — maybe even thirds!
What to Serve It With
This zucchini swirl cake is so adaptable that it goes with almost anything. For breakfast, pair it with a strong cup of coffee or a milky latte — it’s a comforting start to any day. I love serving slices alongside fresh berries or a dollop of whipped cream — it kind of elevates it for brunch, especially when friends come over. When I make this as a dessert, I’ll sometimes dress it up with a dusting of powdered sugar or a drizzle of caramel. It’s lovely with a scoop of vanilla ice cream, too, especially if you’ve added chocolate chips. My family loves it as an afternoon snack with a cold glass of milk or a hot cup of herbal tea. Honestly, it’s such a cozy treat, I often crave it on lazy weekends or after a busy day. And if you have kids, you know how it’s a guaranteed hit — especially when they see the beautiful swirl. It’s funny, I make it so often now that I know exactly how to tweak the filling or add extra spices to match whatever mood I’m in. It’s become a kitchen staple, a secret weapon for those “I need something sweet” moments.
Top Tips for Perfecting Your Zucchini Swirl Cake
After making this a dozen times (and messing up a few along the way!), I’ve learned some tricks to get it just right. First, always squeeze out as much moisture from your zucchini as possible — wet batter is sad batter. I’ve found that using a clean dish towel or cheesecloth makes this step quick and mess-free. When mixing the batter, fold gently — overmixing will make your cake dense, and no one wants that. If you want a more dramatic swirl, don’t be shy with the jam or chocolate — just dollop generously and swirl like a pro. Speaking of fillings, I’ve tested applesauce, pumpkin puree, and even peanut butter swirls, and they all work beautifully if you adjust the amount. For baking, I recommend placing your cake on the middle rack and avoiding opening the oven too often — the temperature drop can cause sinking or uneven baking. I’ve also learned that experimenting with different spices, like cloves or cardamom, can totally change the vibe of your cake. As for the glaze, starting with a thick consistency and thinning as needed is key. I’ve made the mistake of pouring glaze that’s too runny and ended up with a mess — patience and a steady hand make all the difference. And don’t forget: the best part about this cake is how forgiving it is — even if the swirl isn’t picture-perfect, it still tastes incredible. I’ve found that a pinch of flaky sea salt on top after glazing makes it taste even better — give it a try!
Storing and Reheating Tips
This cake keeps surprisingly well. Store any leftovers in an airtight container at room temperature for up to two days, covered with a clean towel or foil — it stays moist and delicious that way. For longer storage, pop it in the refrigerator in a sealed container for up to a week. Just bring it to room temp or warm it gently in the microwave for a few seconds before serving. If you want to keep it longer, freezing slices individually wrapped is ideal — I usually slice before freezing, so it’s easy to grab a piece anytime. When reheating, a quick 15-20 seconds in the microwave works wonders. Be careful not to overdo it or it might dry out. If you’ve added glaze, wait until the cake is fully cooled before drizzling, or the glaze might melt into the cake. To keep the flavor fresh, I recommend adding any fresh toppings (like whipped cream or fruit) just before serving — they enhance the look and taste. Honestly, this cake tastes just as good on day two, maybe even better because the flavors have had a little extra time to mingle inside. Plus, the texture stays perfect — moist, tender, and full of that irresistible swirl. It’s the kind of dessert that’s totally worth making ahead, especially for weekend brunches or quick breakfasts.
Frequently Asked Questions
Final Thoughts
This zucchini swirl cake is one of those recipes that feels like a secret handshake — cozy, familiar, and just a little special. It’s so forgiving yet impressive, making it perfect whether you’re baking for yourself, your family, or friends. I love how adaptable it is; you can swap fillings, add spices, or change up the flour to suit your tastes. More than anything, it’s the kind of baking that warms your heart and makes your house smell wonderful. I hope you try it and find as much joy in making it as I have. Every slice tells a little story of comfort and clever ingredient tweaks, and I can’t wait to see how yours turns out! Feel free to leave a comment below or share your variations — I love hearing new ideas and stories from fellow bakers. Happy baking, and remember, the best recipes are those shared with love!
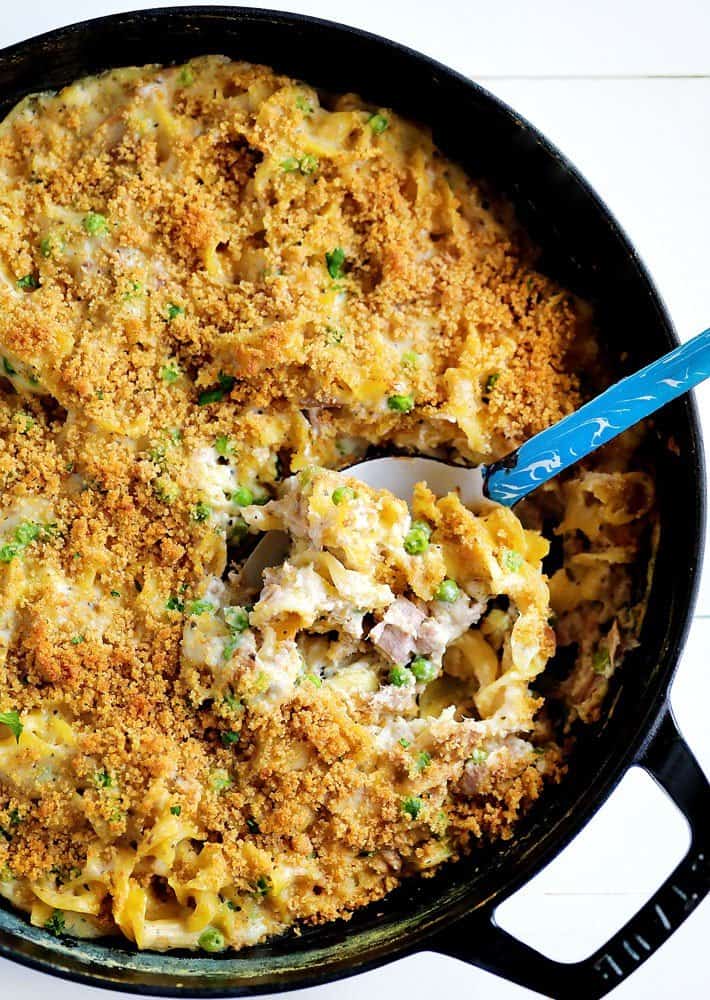
tuna casserole
Ingredients
Method
- Preheat the oven to 350°F.
- Combine bread crumbs and melted butter in a small bowl, set aside.
- Cook the egg noodles al dente in boiling salted water, drain and set aside.
- Cook the peas in boiling water until tender, then drain.
- In a medium saucepan, melt butter over medium heat, whisk in flour then add basil, oregano, thyme, and salt. Cook for 1 minute.
- Gradually whisk in the milk and bring to a simmer, cooking until thickened.
- Remove sauce from heat, stir in parmesan cheese.
- Fold in the cooked noodles, peas, and flaked tuna.
- Transfer mixture to a baking dish, top with breadcrumb mixture, and bake for 20 minutes. Rest for 5 minutes before serving.