
Easy Chocolate Toffee Cookie Bars Delight
Have you ever found yourself wandering into the kitchen late at night, craving something sweet but without the energy—or the time—to whip up a complicated dessert? Well, I’ve got a secret weapon that’s become my go-to comfort for those moments: zucchini lush cake. It’s one of those recipes that tastes way fancier than the effort it takes to make. I remember the first time I tried this — I was skeptical, honestly. I didn’t think zucchini could be the star of a sweet treat. But I tested it out, and oh my goodness, it disappeared in minutes at my house. The smell alone brings everyone running—warm, cinnamon-spiced, with a sweet hint that’s almost nostalgic. And best of all, it’s versatile, affordable, and a total crowd-pleaser. Trust me on this one, it’s a little slice of cozy in every bite. Plus, my kids ask for this all the time, which is honestly the biggest compliment I could get in my kitchen. Stick with me, and I’ll show you how to make this magic happen in your own home—no fancy skills required!.
What is Zucchini Lush Cake?
Think of zucchini lush cake as a gorgeous, moist, layered dessert that looks deceptively simple—and it is! It’s essentially a tender cake infused with grated zucchini, topped with a dreamy cream cheese frosting, and finished with a sprinkle of crushed cookies or nuts. The name “lush” comes from the way each bite feels rich, creamy, and a little indulgent, yet surprisingly light thanks to the zucchini. The idea started as a way to sneak more veggies into dessert—because, let’s be honest, getting kids (and adults) to eat their greens can be a challenge. This recipe takes humble zucchini and transforms it into something luxurious and totally addictive. Think of it as a cross between a carrot cake and a classic cheesecake, but with its own unique personality. It’s perfect when you want a treat that’s both satisfying and still leaves room for you to feel a little virtuous. I swear, once you’ve made this, you’ll be craving it for every special occasion—or even just because it’s Tuesday!
Why you’ll love this recipe?
What I love most about this zucchini lush cake is how effortlessly it combines comfort, creativity, and a little bit of surprise. First off, the flavor is incredible—moist, sweet, with a gentle cinnamon-spiced undertone that dances on your taste buds. And the best part? It’s so simple to make, you’ll wonder why you haven’t been baking this for years. The prep mostly involves grating zucchini (which I always do when I’m multi-tasking—hello, laundry and baking at the same time!), mixing a few batter ingredients, and then layering everything. Plus, it’s budget-friendly—those ingredients are staples in most homes. And here’s a fun tip: I’ve tested this with coconut sugar instead of regular sugar, and it made a beautifully caramelized flavor that I adore. You can also switch up the filling—add chopped walnuts, raisins, or even a swirl of fruit preserves—these little tweaks make it your own. My favorite part? It’s endlessly versatile. Serve it for brunch, a casual family dinner, or a fancy tea party—it’s always the star. Honestly, what I love most about this is the cozy, nostalgic feeling it brings. It’s like a warm hug in dessert form, and once you try it, I bet it’ll become a staple in your home too.
How do I make Zucchini Lush Cake?
Quick Overview
This recipe is as straightforward as it gets—grate zucchini, whip up a simple batter, layer with filling, bake, and top with that luscious cream cheese frosting. The beauty lies in the layering and careful swirls to get that beautiful marbled effect. No complicated steps or fancy ingredients—just good, honest baking. Once you’ve got everything prepped, it’s practically foolproof. The smell of cinnamon and vanilla filling your kitchen as it bakes is enough to make anyone smile. Plus, I’ve found that this cake actually tastes better if you let it sit for a few hours or overnight—so don’t be shy about making it ahead. It’s one of those desserts that tastes even more delicious the next day, when all those flavors have mingled perfectly.
Ingredients
For the Main Batter:
– 2 cups grated zucchini (squeeze out excess moisture for a tender crumb)
– 1 1/2 cups all-purpose flour (or a gluten-free blend, see tips below)
– 1 teaspoon baking powder
– 1/2 teaspoon baking soda
– 1 teaspoon ground cinnamon
– 1/2 teaspoon salt
– 1/2 cup granulated sugar (I sometimes swap half for coconut sugar or honey)
– 1/2 cup brown sugar (for a richer flavor)
– 1/2 cup vegetable oil or melted butter
– 3 large eggs
– 1 teaspoon vanilla extract
For the Filling:
– ½ cup cream cheese, softened
– ¼ cup powdered sugar (or to taste)
– 1 teaspoon vanilla
– Optional: chopped nuts, raisins, or a swirl of fruit preserve
For the Glaze:
– ½ cup powdered sugar
– 1-2 teaspoons milk or lemon juice (add gradually for consistency)
– Optional: a splash of vanilla or almond extract for extra flavor
Step-by-Step Instructions
Step 1: Preheat & Prep Pan
Set your oven to 350°F (175°C). Grease a 9-inch cake pan or line it with parchment paper. I always do this early, so I’m not rushing last minute. If you’re making a layered cake, I recommend using two pans or baking in batches for even layers. Remember, a little butter or non-stick spray goes a long way—this cake can be a little sticky otherwise!
Step 2: Mix Dry Ingredients
In a medium bowl, whisk together the flour, baking powder, baking soda, cinnamon, and salt. Sifting isn’t always necessary, but it helps keep your batter smooth and free of lumps. I learned this the hard way—lumpy batter is no fun. Set this aside for now; you’ll add it to the wet ingredients soon.
Step 3: Mix Wet Ingredients
In a large bowl, whisk together the eggs, oil, sugars, and vanilla until well combined. It should look a little fluffy and pale. Then, fold in the grated zucchini. I’ve tested this with different varieties, and honestly, I think fresh, firm zucchini gives the best texture. Just make sure to squeeze out as much excess moisture as possible—you don’t want a soggy cake.
Step 4: Combine
Add the dry ingredients to the wet in batches, mixing slowly just until combined. Be careful not to overmix—this is the secret to a tender, moist crumb. If you overdo it, the cake can turn dense. It’s okay if there are a few streaks of flour here and there; a gentle fold is all you need.
Step 5: Prepare Filling
In a small bowl, beat the softened cream cheese with powdered sugar and vanilla until smooth. If you want to add chopped nuts or a swirl of preserves, do it now. This filling gives the cake that creamy, slightly tangy surprise inside, kind of like a cheesecake but in cake form.
Step 6: Layer & Swirl
If making a layered cake, pour half of the batter into your prepared pan. Dollop spoonfuls of the cream cheese mixture over the batter and then cover with the remaining batter. Use a toothpick or a skewer to gently swirl the fillings—think of it as creating a marbled effect. Don’t overdo it, or the swirl will disappear! Aim for gentle, figure-eight motions to keep it pretty.
Step 7: Bake
Pop it into your preheated oven. Bake for about 35-40 minutes, or until a toothpick inserted in the center comes out clean. The edges should be golden, and your house will smell heavenly. Keep an eye on the time, as oven temperatures can vary—if the top gets too dark, cover loosely with foil after the first 20 minutes.
Step 8: Cool & Glaze
Allow the cake to cool in the pan for about 15 minutes before transferring to a wire rack. It’s tempting to cut into it right away, but patience makes all the difference—wait until it’s fully cooled to prevent messes. Once cooled, drizzle with your prepared glaze. I like to keep the glaze a little thick so it’s gooey but not runny.
Step 9: Slice & Serve
Use a serrated knife to get clean slices. Serve it at room temperature — it’s so much creamier that way. I love adding a dollop of whipped cream or a few fresh berries on top for extra elegance. Honestly, this cake looks as good as it tastes—beautiful marbling, a tempting layer of frosting, and that irresistible aroma. It’s perfect for sharing, and I promise it’ll become a favorite in your house too.
What to Serve It With
This zucchini lush cake is so versatile that it can be the star of any meal. For breakfast, pair it with a strong cup of coffee and a smear of jam on the side. It’s equally at home as a casual brunch centerpiece, maybe alongside fresh fruit and a pot of tea. When I serve it as dessert, I love adding a sprinkle of chopped nuts or a drizzle of honey—I swear, that crunch just takes it to the next level. And on cozy nights, it’s just perfect on its own with a cup of milk or tea. My family’s favorite way? A big slice with a dollop of whipped cream and some berries. It’s like a little bit of heaven after a busy day. I’ve also made mini muffins out of this batter for potlucks or school snacks—trust me, they’re adorable and just as tasty. No matter how you serve it, this cake brings warmth and sweetness to every occasion.
Top Tips for Perfecting Your Zucchini Lush Cake
I’ve made this countless times, and I’ve picked up a few tricks along the way. First, don’t skip squeezing out the zucchini! Too much moisture can make your cake sink or become dense. I use a clean kitchen towel or cheesecloth to really press out those extra drops—this keeps the crumb tender. Overmixing is another mistake I used to make—I’ve learned to fold gently to keep the batter light. For the swirl, I suggest using a skewer or a chopstick, moving it in slow, gentle strokes to achieve that beautiful marbled look. Ingredients swaps? Absolutely. I’ve tested this with coconut sugar, which gives it a deeper caramel note, and it worked beautifully. If you want to make it gluten-free, use a 1:1 baking blend—just remember to check your baking powder because some brands contain wheat. Baking tips: always check for doneness with a toothpick—every oven varies. I also recommend placing your cake on the middle rack for even baking. For the glaze, I like a thicker consistency—it just sticks beautifully without dripping down the sides. Sometimes, I add a splash of lemon zest or vanilla to the glaze for extra flavor. The key? Taste and taste again! I’ve learned that a little trial and error makes perfecting this recipe so much fun. Trust your nose and your instincts, and don’t forget to enjoy the process. The smell of cinnamon, zucchini, and vanilla melting together is pure magic. Happy baking, and don’t be surprised if you find yourself sneaking another slice—this stuff is addictive!
Storing and Reheating Tips
This cake stays fresh so well—my secret is wrapping it tightly with plastic wrap or storing it in an airtight container. If kept at room temperature, it’s good for about 2 days, but I recommend chilling it if you want to keep it longer. The fridge extends its life to about 4-5 days, and I’ve also frozen slices wrapped in foil or freezer bags. It’s a lifesaver on busy mornings or when company drops by unexpectedly. To reheat, I pop individual slices in the microwave for about 15-20 seconds—just enough to warm through without making it dry. The glaze might crisp up a little in the fridge, so if you want it gooey again, just give it a quick zap. When you’re ready to serve again, a little extra glaze or a dusting of powdered sugar on top makes the presentation even prettier. I prefer to serve it slightly chilled or at room temp—I swear, it tastes totally different depending on the mood. Either way, leftovers rarely last more than a day at my house!
Frequently Asked Questions
Final Thoughts
If you’re craving a dessert that’s cozy, delicious, and a little bit unexpected, this zucchini lush cake is the way to go. It’s become my family’s favorite for lazy weekends, special gatherings, or just those nights when I need a little treat to lift my spirits. The combination of moist zucchini, spiced batter, and velvety frosting creates a perfect harmony of textures and flavors. Honestly, I love how adaptable it is—you can customize the filling, swap the sugar, or even experiment with different toppings. It’s one of those recipes that makes me feel like a little bit of a kitchen magician, and I hope it does the same for you! So go ahead, gather your ingredients, and don’t be surprised if you find yourself sneaking another slice when no one’s looking. Happy baking! And please, share your variations or stories below—I’d love to hear how yours turned out!
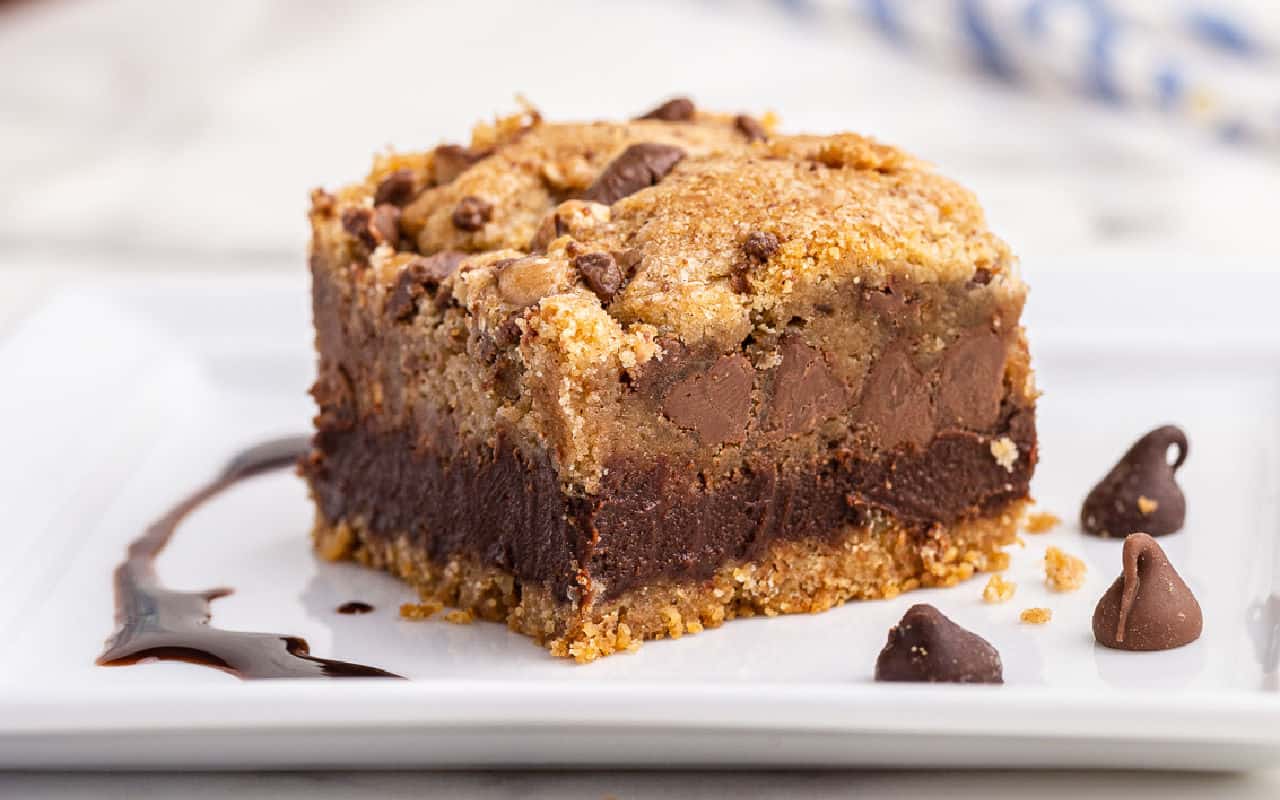
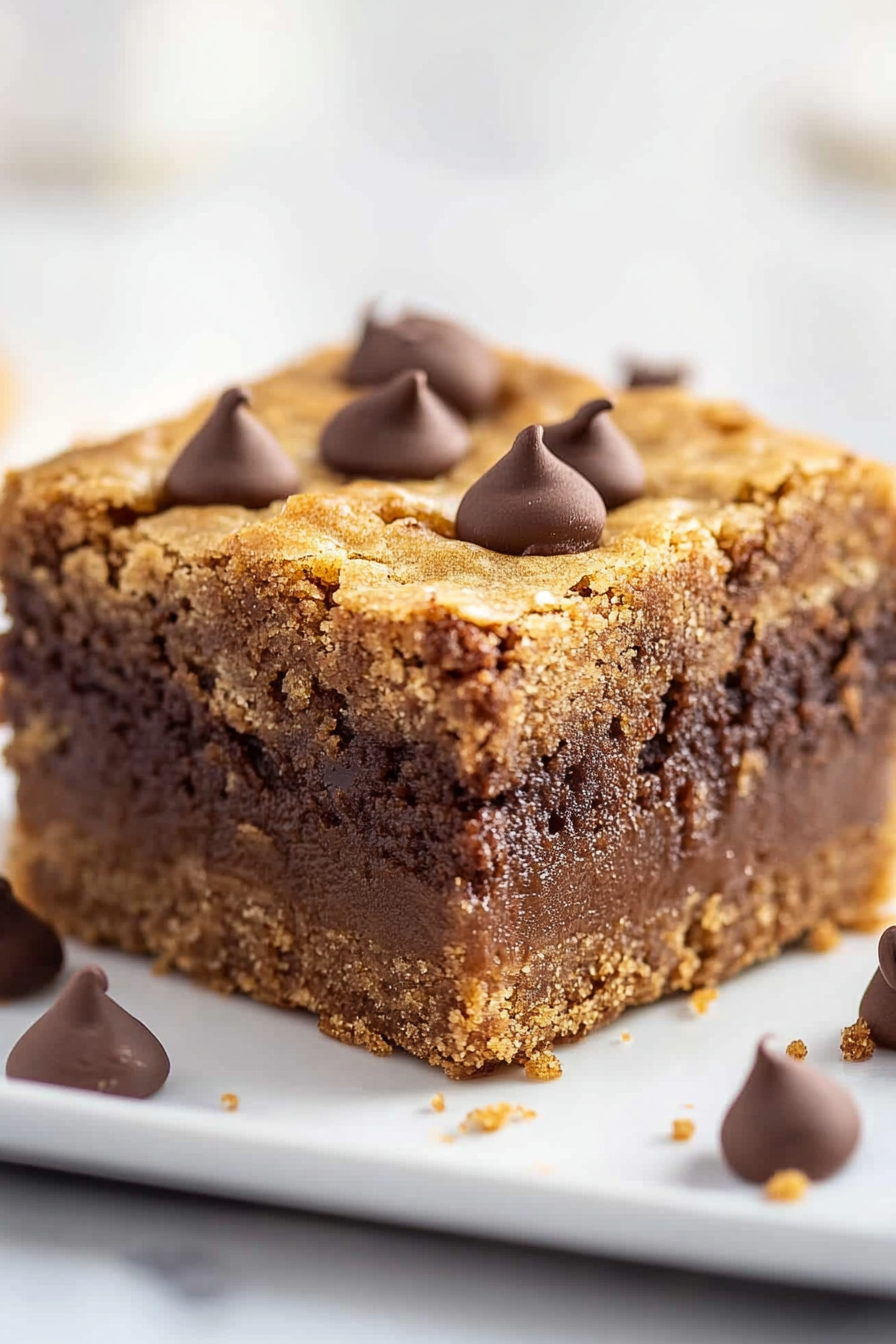
cookie bars
Ingredients
Method
- In a small bowl, mix melted butter with graham cracker crumbs. Press firmly into the bottom of a parchment-lined 13×9 inch baking pan.
- In a small saucepan, combine condensed milk with semi sweet chocolate morsels and butter. Heat over medium heat until smooth, then pour over the crust. Sprinkle with 1/2 cup toffee bits.
- In a large mixing bowl, beat Crisco with brown sugar, milk, and vanilla until smooth. Beat in egg. Add flour, salt, baking soda, and cinnamon. Fold in milk chocolate morsels. Spread over fudge layer and sprinkle with remaining toffee bits.
- Bake at 350°F for about 30-35 minutes. The dough may look slightly undercooked. Allow to cool completely before slicing and serving.

This recipe sounds perfect for those late-night cravings—simple, delicious, and totally doable even when you’re tired. Can’t wait to try it!
Yes! These sound perfect for late-night cravings—so easy and delicious, no complicated steps needed. Definitely trying this!
These look absolutely delicious—perfect for a quick sweet fix! I’ll definitely try them this weekend.