

Easy Buffalo Chicken Breasts Recipe
There’s something about the smell of sweet baked goods that instantly makes my house feel like a warm hug. I remember my grandma’s kitchen, the way she’d flourish a sprinkle of cinnamon on top of whatever she was baking, and the way my kids run in, noses twitching at the scent of something delicious. This zucchini swirl cake, trust me, is one of those recipes that instantly makes the house feel cozy—though it’s more than just comfort food. It’s surprisingly easy, incredibly versatile, and honestly, it’s a sneaky way to get those sneaky zucchinis into everyone’s belly without much fuss. I’ve made this countless times, and it never fails to disappear in minutes at my house. My kids ask for this all the time, especially when they want something a little sweet but don’t want a heavy, greasy cake. The best part? It’s perfect when you’re craving something sweet at 10 pm but don’t want to turn on the oven for a whole cake. This one’s a lifesaver on busy nights—and it’s so good, I’m pretty sure I could eat the whole loaf myself!
What is Zucchini Swirl Cake?
Think of zucchini swirl cake as a happy marriage between a tender, moist vanilla or spice cake and a delightful hidden veggie surprise. It’s essentially a simple cake batter peppered with freshly grated zucchini, creating this lovely moistness inside. The “swirl” part? That’s where you layer a sweet cinnamon-spiced filling—think of it as a surprise center that looks as pretty as it tastes. The name is pretty descriptive: you swirl the filling into the batter before baking, giving each bite a lovely marbled effect. It’s a lot like those classic marble or cinnamon roll breads, but I prefer to think of this as the sneak peek to your garden’s bounty—only in cake form! Whether you call it a zucchini swirl cake or just a sneaky zucchini bread, it’s a fun, lovable treat that makes even zucchini skeptics say, “Wow, that’s good!” and totally forget about the vegetable part.
Why you’ll love this recipe?
What I love most about this zucchini swirl cake is how effortlessly it ticks all the boxes for a perfect, cozy snack or a charming dessert. First, the flavor—decked with a warm hint of cinnamon and vanilla, it’s sweet, tender, and satisfying without feeling overly indulgent. The zucchini keeps the cake *so* moist—seriously, I’ve tested this with almond milk and it actually made it even creamier—plus, it sneaks in a serving of veggies in a totally delicious way. This recipe is also super budget-friendly. Not only are zucchinis often in my garden or at the grocery store for next to nothing, but you probably already have most of the ingredients in your pantry. Plus, the process is straightforward enough that you can whip it up on a weeknight or make it ahead of time for weekend brunch. The swirl part? Oh, it’s just pretty. When you slice into it, those cinnamon ribbons look breathtaking and make your whole table look more special. It’s versatile, too. Serve it warm with a drizzle of icing or a dollop of whipped cream—my kids love it with a scoop of vanilla ice cream on the side. And hey, if you’re feeling adventurous, you can even swap in some apple or pumpkin puree for a seasonal twist. Seriously, what’s not to love?
How do I make Zucchini Swirl Cake?
Quick Overview
This cake comes together faster than you’d think. You start by grating fresh zucchini and squeezing out some excess moisture (because too much moisture can make it a bit dense, learned that the hard way!). Then, you mix up your batter, fold in the zucchini, pour half into a baking pan, spread your cinnamon-sugar filling, and layer the rest on top — finally swirling with a knife to create a marble effect. Pop it in the oven, bake until golden, and then glaze or serve as is. I like to cool it slightly so the swirls hold their shape, but honestly, you can’t go wrong either way. This method keeps everything simple, forgiving, and foolproof—perfect for baker newbies or busy bees like me.
Ingredients
For the Main Batter:
– 2 cups all-purpose flour (I always use unbleached—it just feels better!)
– 1 ½ teaspoons baking powder
– ½ teaspoon baking soda
– ½ teaspoon salt
– 1 teaspoon ground cinnamon
– ½ teaspoon ground nutmeg (optional but recommended for warmth!)
– 1 cup sugar (white, or brown if you love that caramel note)
– ½ cup oil (vegetable or light olive oil—whatever’s in the pantry)
– 3 large eggs
– 1 teaspoon vanilla extract
– 1 ½ cups grated zucchini (about 1 medium zucchini, grated and squeezed dry)
For the Filling:
– ¼ cup brown sugar
– 1 teaspoon cinnamon
– 3 tablespoons softened butter (or coconut oil for a dairy-free version)
– Optional: chopped nuts or dried fruit for extra texture
For the Glaze:
– ½ cup powdered sugar
– 1-2 tablespoons milk (or lemon juice for zing)
– A splash of vanilla or lemon extract (if you want extra flavor)
Step-by-Step Instructions
Step 1: Preheat & Prep Pan
First things first, I always preheat my oven to 350°F (175°C). Then, line a 9-inch loaf pan or cake pan with parchment paper—trust me, a quick spray of non-stick spray helps, too. I like to give the pan a light coating of butter or oil so the cake releases easily after baking. Doing this early means less stress later when you’re eager to see the finished product.
Step 2: Mix Dry Ingredients
In a large bowl, whisk together the flour, baking powder, baking soda, salt, cinnamon, and nutmeg. This step ensures everything’s evenly distributed so your cake bakes uniformly. I’ve learned not to skip this step—it makes a noticeable difference in texture, giving you that tender crumb with just the right rise.
Step 3: Mix Wet Ingredients
In another bowl, combine the sugar and oil. Then whisk in the eggs, one at a time—trust me, it helps everything blend smoothly. Add the vanilla, and then stir in the grated zucchini. Here’s a tip: I always squeeze out any excess moisture from the zucchini using a clean kitchen towel or paper towels—this step prevents a watery batter and gives you that perfect, fluffy crumb.
Step 4: Combine
Pour the wet mixture into the dry ingredients and fold gently until just combined. Be careful not to overmix! Overmixing can make the cake dense, so I stop as soon as the flour disappears. The batter will be thick but pourable—don’t worry if it’s not super smooth. That’s part of what makes this cake so rustic and charming.
Step 5: Prepare Filling
Mix together the brown sugar, cinnamon, and softened butter in a small bowl. If you want to add chopped nuts or dried cranberries, now’s the time. The filling should be crumbly but hold together when pressed—kind of like a streusel.
Step 6: Layer & Swirl
Pour half of the batter into your prepared pan and spread evenly. Dollop on half of the cinnamon-sugar filling, then spoon the remaining batter on top. Scatter the rest of the filling on top and use a butter knife or skewer to swirl gently—creating those pretty marbled ribbons that make each slice look so inviting.
Step 7: Bake
Bake for about 50-60 minutes, or until the top is golden and a toothpick inserted in the center comes out clean. Every oven is different, so I start checking around 45 minutes. If the top is browning too fast, tent it loosely with foil and continue baking. Trust me, patience here means a perfectly moist interior.
Step 8: Cool & Glaze
Let the cake cool in the pan for about 15 minutes, then transfer to a wire rack. While still a little warm, drizzle your glaze over the top. The warmth helps it seep into the cracks and enhances that homemade look. I sometimes add a splash of lemon or vanilla to the glaze for extra zing.
Step 9: Slice & Serve
This cake is best served slightly warm or at room temperature. Use a sharp serrated knife to cut gently and reveal those charming swirls. Pair it with your favorite cup of coffee or tea—my personal favorite is a bold dark roast to balance the sweetness. A dollop of whipped cream or a scoop of vanilla ice cream makes it feel like a special treat, though honestly, it’s perfectly delightful on its own. It’s great for breakfast, dessert, or even an afternoon snack—really, it’s versatile enough for anything.
What to Serve It With
This zucchini swirl cake is such a flexible treat. For breakfast, I like to serve slices with a smear of butter and a hot cup of coffee—nothing fancy, just cozy. It’s also fantastic for brunch alongside fresh fruit, a glass of cold milk, or a spicy chai latte. When I make it for dessert, I love to drizzle a little extra glaze or dust it with powdered sugar—plus, a scoop of vanilla ice cream or a swirl of whipped cream makes it feel extra indulgent. During the fall, I sometimes add chopped apples or a dash of pumpkin spice to the filling—that’s my cozy little secret. And for casual snack times, just warm a slice and dunk it in tea. It’s such a crowd-pleaser, and I swear, the secret’s in that swirl of cinnamon that makes everyone smile.
Top Tips for Perfecting Your Zucchini Swirl Cake
Over the years, I’ve picked up a few tricks that make all the difference with this cake. First, always squeeze the zucchini really well—too much moisture can turn your batter watery and make the cake dense. I use a clean kitchen towel and give it a good twist. Second, don’t overmix when combining your wet and dry ingredients—flour develops gluten quickly, and overmixing can yield a tough cake instead of tender. Third, swirl gently! If you’re too vigorous, you might blend the layers together, losing that gorgeous marble effect. My favorite way is just to zig-zag a knife through the batter, creating a pretty pattern without overpushing. When it comes to ingredient swaps, I’ve tested almond or coconut oil, and honestly, they add a lovely flavor—trust me on this one. If you want gluten-free, swap the all-purpose flour for a cup-for-cup gluten-free blend, but keep an eye on the batter’s consistency. And don’t skip the cooling step—patience here ensures the swirls hold their shape when sliced. Also, playing with the filling can be fun—try adding chopped nuts, dried fruit, or even a dash of cardamom for a different twist. Just keep your ratios consistent for a moist, flavorful cake every time. I’ve learned from mistakes, like not squeezing out enough zucchini or overbaking—so, take your time, enjoy the process, and trust your instincts. This cake is forgiving, and that’s what makes it such a go-to in my kitchen!
Storing and Reheating Tips
Once you’ve baked and glazed your zucchini swirl cake, it’s surprisingly easy to keep it fresh. If you’re serving it within a day or two, just cover it loosely with foil or store in an airtight container at room temperature—this helps keep it from drying out. For longer storage, I like to refrigerate slices in an airtight container—just make sure to bring it back to room temperature before serving for the best texture and flavor. It will stay good for about 3-4 days in the fridge. If you want to freeze it, wrap individual slices tightly in plastic wrap and then put them in a freezer-safe bag. They’ll keep for up to 3 months. To reheat, simply warm slices in the microwave for 20-30 seconds or toast the edges in a toaster oven. The glaze might firm up after refrigerating, so I like to add a quick drizzle of fresh glaze when serving. Honestly, I think it tastes even better the next day—more flavors meld, and the moist zucchini keeps it tender. Just keep an eye on the texture, especially if it’s been in the fridge—a little gentle reheating makes all the difference. Oh, and if you’re making ahead for a gathering, slice it before freezing or refrigerating so serving is a breeze!
Frequently Asked Questions
Final Thoughts
This zucchini swirl cake is one of those recipes that sneaks healthy into a decadent slice of heaven. It’s tender, moist, and just sweet enough to satisfy that craving, plus it’s a fantastic way to use up summer zucchinis—or garden zucchinis gone a little too big. Every time I make it, I feel like I’ve created a little edible hug that everyone in my family loves. Whether it’s a quick breakfast, a weekend brunch centerpiece, or a cozy dessert after dinner, it never disappoints. Plus, the swirl pattern makes it look fancy without any extra effort, so it’s perfect for when you want to impress but don’t have hours to spend in the kitchen. I highly recommend trying different fillings—like swapping cinnamon for cocoa powder or adding chopped nuts—and seeing what you like best. Just trust your instincts, have fun, and embrace those little baking imperfections—they’re part of what makes homemade food so special. Happy baking! I can’t wait to hear how yours turns out—feel free to leave a comment below or share your creative twists!
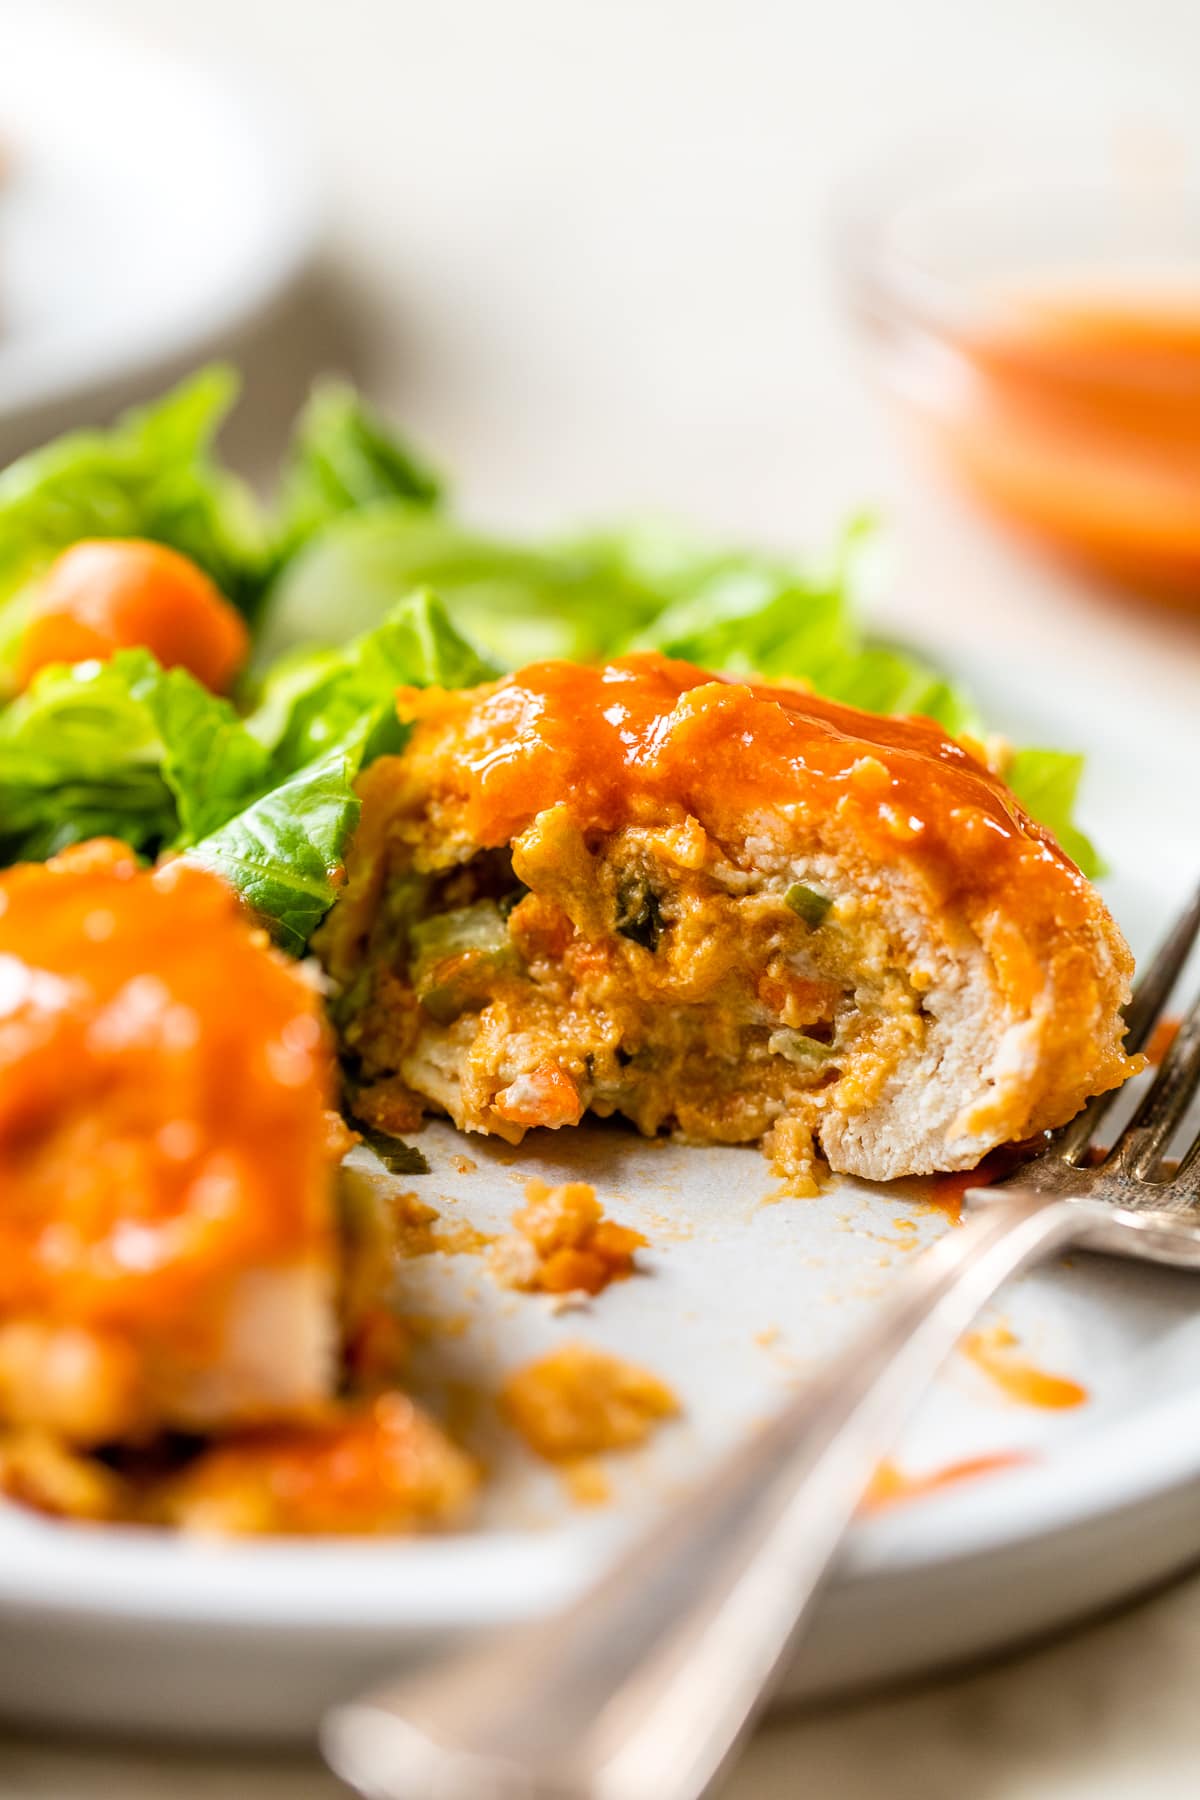
Buffalo chicken
Ingredients
Method
- Preheat the oven to 400°F. Lightly spray a baking dish with oil.
- Mix cheddar, laughing cow cheese, celery, green onion, carrot, salt and pepper in a dish.
- Lay out the chicken cutlets, placing an even amount of mixture in the middle and spread in the center. Roll up each cutlet.
- In one bowl, make a breading station out of crushed Ritz crackers.
- In another bowl, combine mayonnaise, 1 tablespoon of hot sauce, and lemon juice to make a dredging mixture.
- Roll chicken breasts in the mayonnaise mixture, then into cracker crumbs, and place on a lightly greased pan, seam side down.
- Lightly spray the top of the chicken with oil. Bake for 30 minutes.
- While the chicken cooks, melt butter and mix with the remaining hot sauce and garlic powder.
- Drizzle buffalo sauce over the finished chicken breast and serve.


Love this recipe! That first bite of buffalo chicken with a cool dip always hits different.
I love this recipe—so simple and delicious! That memory about grandma’s kitchen always warms my heart.
That sounds amazing—there’s nothing quite like the comfort of homemade baking memories. Your grandma must have been incredible.