
Decadent Chocolate Brownies A Simple Treat
There’s something about a warm, crumbly slice of cheesecake that instantly transports me back to Sunday afternoons at my grandma’s house. The smell of sweet cream cheese mingling with the subtle earthiness of zucchini always feels like a hug. I have this little secret I love sharing — it’s a recipe I’ve perfected over the years, and it’s become a real family favorite. Think of it as a healthier twist on traditional cheesecake, with a gentle vegetable boost that makes everyone feel a tad better about indulging at snack time. My kids ask for this all the time — and honestly, I don’t blame them. It’s crazy how a few simple ingredients can turn into something so decadent yet surprisingly wholesome. This one’s a lifesaver on busy nights when I want to put something together quickly that impresses everyone. Trust me on this — the smell alone brings the whole family rushing to the kitchen, and the way the flavors swirl together is just magic. It’s sweet, moist, and totally addictive—dangerous in the best way possible.
What is Zucchini Cheesecake?
If you’ve never heard of zucchini cheesecake bars, think of them as a happy marriage between a classic cheesecake and a cozy zucchini bread. They’re essentially a dense, sweet bar that combines the tanginess of cream cheese with the moisture and subtle flavor of fresh zucchini. The best part? You don’t need an oven full of water or fancy ingredients. It’s a straightforward recipe — using mostly pantry staples and a handful of fresh zucchini, which I always keep on hand from summer gardens or the farmers’ market. The name might sound fancy, but in reality, it’s just a dessert that’s both a little bit healthy and totally comforting. I love how versatile it is—slice it into squares for dessert, wrap it up for a portable treat, or even serve it at brunch with a dollop of whipped cream. Think of it as the kind of dessert your grandma would make with love, but with a modern twist that makes it perfect for today’s busy lives.
Why you’ll love this recipe?
What I love most about these zucchini cheesecake bars is how they balance indulgence with a sneaky healthy ingredient. The zucchini adds moisture without overpowering the flavor — instead, it makes every bite incredibly tender and moist. The tangy cream cheese filling is just sweet enough to satisfy your craving for something sweet, but it’s not cloying. Plus, the ingredient list is simple and affordable — no fancy or hard-to-find ingredients here. I’ve made this countless times, and it never fails to disappear quickly at my house. It’s perfect when you want a dessert that feels special but is actually pretty quick to whip up. My family asks for this all the time, especially when friends come over — it’s like the secret weapon of desserts. What I love most is how versatile it is. You can jazz it up with a sprinkle of lemon zest, mix in some blueberries, or even swap the sugar for honey or maple syrup. It’s what I call a “trusty standby,” especially good when you have guests but don’t want to spend hours baking. It’s cozy, satisfying, and just a little different from your standard sweet treats.
How do I make Zucchini Cheesecake Bars?
Quick Overview
This recipe comes together in three main parts: preparing the crust, making the filling, and layering everything together before baking. Believe me, it’s so straightforward — I always do this when I need a quick dessert that looks fancy but feels like a hug. You start with a simple crust, blend up your zucchini and cream cheese filling, pour it all into a pan, swirl a few times to create marbled effects, then bake. The magic happens as it bubbles up perfectly and turns a golden shade. The cooling period takes patience, but oh, the reward is worth it. Once cooled, you slice into squares, and you’ve got a moist, flavorful treat that’s just asking to be shared. The smell alone makes the house feel homey — it’s that cozy.
Ingredients
For the Main Batter:
- 2 cups grated zucchini (squeeze out excess moisture, trust me on this—nothing worse than a soggy crust!)
- 8 oz cream cheese, softened (full-fat is best for richness)
- 1/2 cup granulated sugar (or honey if you’re feeling natural)
- 2 large eggs
- 1 teaspoon vanilla extract
- 1 teaspoon lemon zest (optional but adds a lovely brightness)
- 1 1/2 cups all-purpose flour (or try almond flour for a gluten-free version)
- 1 teaspoon baking powder
- Pinch of salt
For the Filling:
- 8 oz cream cheese, softened
- 1/4 cup powdered sugar (or maple syrup for a little extra warmth)
- 1 teaspoon vanilla extract
For the Glaze:
- 1/2 cup powdered sugar
- 1-2 teaspoons lemon juice or milk (adjust to get the right drizzle consistency)
- Optional toppings: lemon zest, fresh berries, chopped nuts
Step-by-Step Instructions
Step 1: Preheat & Prep Pan
Heat your oven to 350°F (175°C). Line a 9×9 inch baking pan with parchment paper — this makes removing the bars later a breeze. Lightly spray with non-stick spray if needed. I always do this so nothing sticks, especially when your filling is super moist.
Step 2: Mix Dry Ingredients
In a medium bowl, whisk together the flour, baking powder, and salt. This step is your foundation, making sure everything bakes evenly. I find that sifting it all together gives a lighter crumb, but a good whisk works just fine.
Step 3: Mix Wet Ingredients
In a large mixing bowl, beat the softened cream cheese, sugar, and vanilla until smooth and fluffy. I usually use a hand mixer or a sturdy whisk — it helps incorporate air and keeps the filling extra creamy. Add in the eggs one at a time, mixing gently so you don’t deflate that lovely fluffiness. Then fold in the grated zucchini — I use a spatula for this to keep the batter light yet well combined.
Step 4: Combine
Gently fold the dry ingredients into the wet mixture, being careful not to overmix. Overmixing can lead to dense bars, and trust me, you want these nice and tender. Once it’s just combined, it’s ready to pour into your prepared pan.
Step 5: Prepare Filling
In a small bowl, mix the softened cream cheese, powdered sugar, and vanilla until smooth. For a fun variation, you could swirl in a teaspoon of fruit jam or even some chocolate chips. My kids love when I add a few blueberries — it’s like a pop of flavor in every bite.
Step 6: Layer & Swirl
Pour the plain batter into the pan, spreading it evenly with a spatula. Drop spoonfuls of the cream cheese mixture on top. Using a toothpick or skewer, swirl the fillings gently to create a marbled pattern—just enough to see a beautiful swirl but not so much that the layers blend completely.
Step 7: Bake
Bake for about 30-35 minutes, or until the edges are golden and a toothpick inserted in the center comes out clean. I always check around the 30-minute mark since oven temperatures can vary. Keep an eye out for a slight jiggle—if it’s still liquidy, it needs a little more time.
Step 8: Cool & Glaze
Allow the bars to cool completely in the pan on a wire rack — I’ve learned this patience gives you clean slices. Once cooled, drizzle your glaze over the top. I like to do a light zigzag for an elegant look, but you can go bold with a thick layer if you prefer. The glaze adds just the right touch of sweetness and makes it look restaurant-worthy.
Step 9: Slice & Serve
Use a sharp knife to cut into squares, wiping it clean between cuts for neat edges. Serve slightly warm or at room temperature, maybe with a dollop of whipped cream or a handful of berries. These are equally good the next day, and believe me, they get more flavorful overnight.
What to Serve It With
Oh, I’ve got a few ideas that turn these zucchini cheesecake bars into a whole experience. For breakfast, they’re wonderful with a strong cup of coffee and some fresh fruit on the side — it’s like a decadent brunch in bite-sized form. During family brunch, I love these paired with a mimosa or sparkling water infused with lemon. As a dessert, they stand up perfectly on their own, but I sometimes add a scoop of vanilla ice cream or a drizzle of extra honey on top. Sometimes, I warm a slice just enough to melt the glaze slightly — so comforting, especially in winter. If you’re after a cozy snack, they’re great with a warm cup of tea or a glass of cold milk. I’ve even served these at kid’s parties — they disappear quickly, and I love how they feel a bit special without all the fuss.
Top Tips for Perfecting Your Zucchini Cheesecake Bars
Over the years, I’ve learned a few tricks that make these bars turn out just right every time. First off, make sure to squeeze out as much moisture from the zucchini as possible — too wet and your crust might get soggy or the bars won’t set properly. I use a clean dish towel to really ring out the zucchini after grating. For the batter, don’t overmix — it’s tempting to get everything perfectly smooth, but overworking the mixture can lead to dense bars. Just fold gently until combined. When swirling the filling on top, use a skewer or a toothpick to create elegant, marbled patterns — don’t go overboard, or it can turn into a muddled mess. Ingredient swaps are fun — I tested this with coconut sugar and almond flour, and it still worked beautifully; just remember that substitutions can slightly alter the texture and sweetness. For baking, I always position the pan in the middle of the oven and check doneness early, because oven springs vary. And as for the glaze, I prefer a thinner drizzle — I mix powdered sugar with a splash of lemon juice or milk until it’s just pourable. If you want a richer flavor, add a pinch of vanilla or lemon zest to the glaze for extra zing. Practice makes perfect, but honestly, I’ve made this so many times, I can almost do it in my sleep now — the secret is patience and tasting as you go. And trust me, every batch will be better because you’re tuning into what your kitchen needs.
Storing and Reheating Tips
These bars are best enjoyed within 2-3 days of baking, but they’re surprisingly resilient. Keep them in an airtight container at room temperature for up to a day, covered with plastic wrap — just make sure they’re not in direct sunlight or too warm. For longer storage, I pop them into the fridge in an airtight container for up to 5 days. They still stay moist and tasty, and I love to warm a slice for about 10 seconds in the microwave to enjoy that freshly-baked feel. Freezing works too — I wrap individual slices tightly in plastic wrap and then store in a freezer-safe bag for up to a month. When you’re ready to eat, thaw in the fridge overnight or warm gently in the microwave. If you’ve added a glaze, I recommend waiting until just before serving to drizzle it — that way, it stays shiny and fresh. My secret tip: if you want the glaze to stay intact during storage, add it just before serving. These bars are forgiving and adaptable, making them perfect for last-minute cravings or when you’re entertaining a crowd.
Frequently Asked Questions
Final Thoughts
This zucchini cheesecake bars recipe is one of those cozy little treasures that I keep coming back to. It’s not overly sweet, it’s moist and tender, and the swirl of cream cheese makes every bite a little indulgence. I love that I can sneak a veggie into dessert without anyone batting an eye — in fact, my kids think it’s a treat they’ve earned! It’s perfect for weekends, potlucks, or even a last-minute gift. Every time I make these, I’m reminded how simple ingredients can create something so memorable. I encourage you to personalize yours—add a squeeze of lemon, sprinkle chopped nuts on top, or fold in some blueberries for extra fun. Most importantly, have fun in the kitchen. It’s exactly that — a place to create, share, and feed the people you love. Happy baking, friends! I can’t wait to hear how yours turns out, and I hope it brings a little warmth and sweetness to your day.
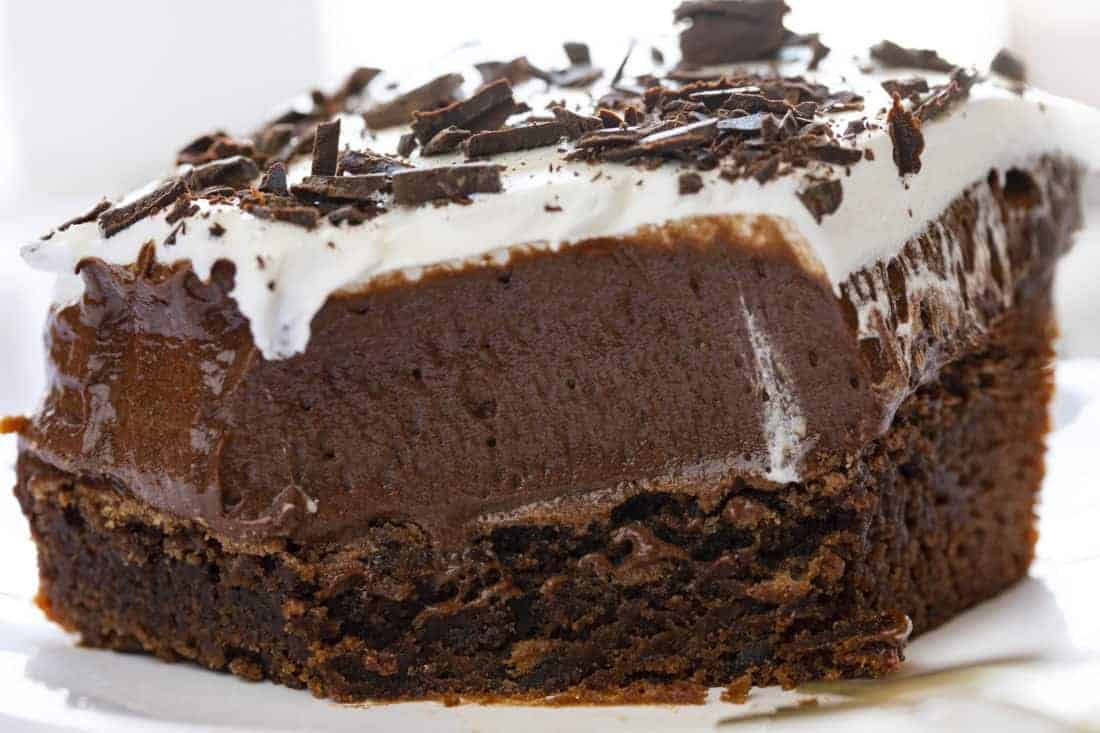
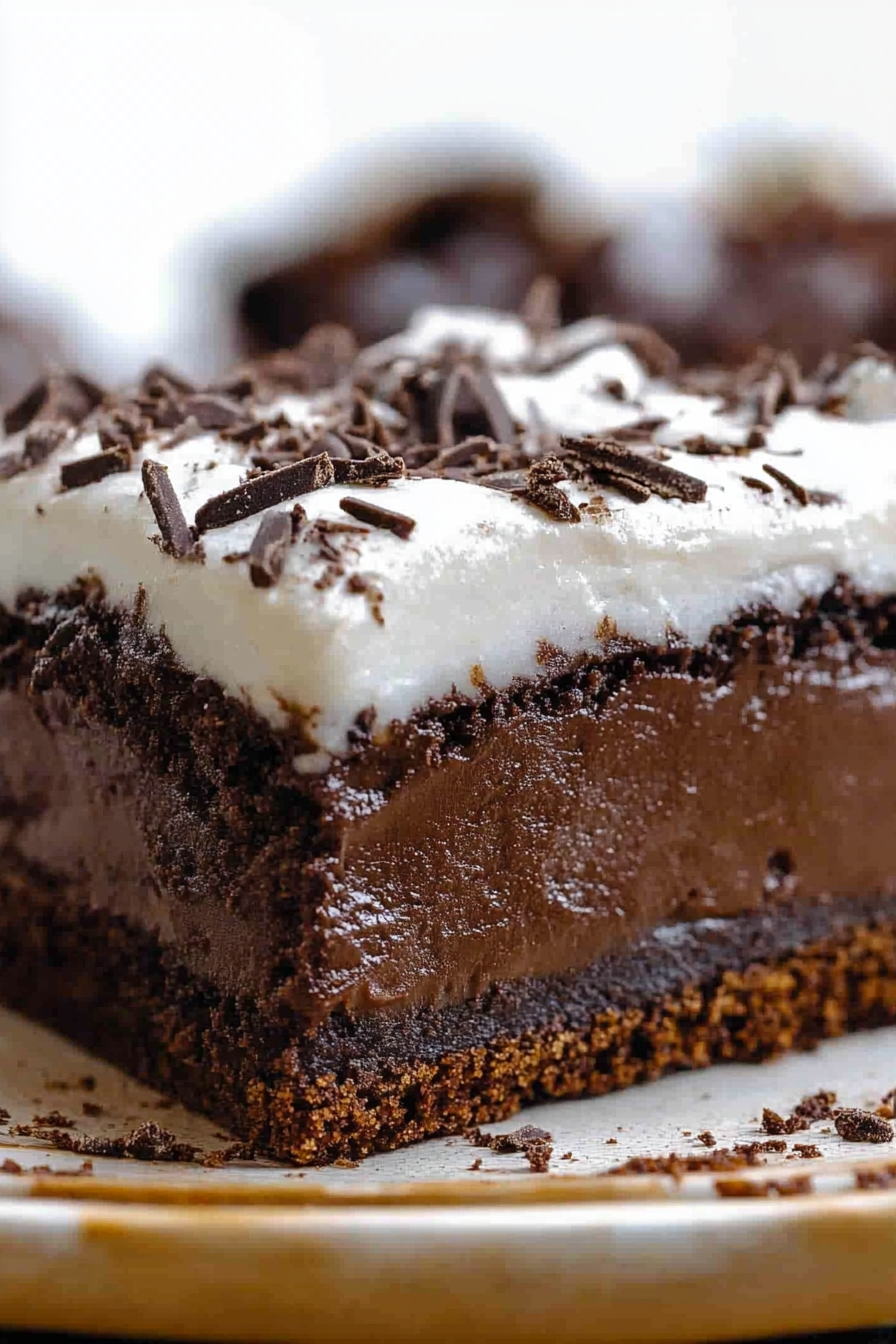
French Silk Brownies
Ingredients
Method
- Preheat oven to 350°F. Prepare a 9x13 baking dish with non-stick spray. Set aside.
- In a large bowl, whisk together flour, cornstarch, cocoa powder, baking powder, and salt.
- In a stand mixer fitted with paddle attachment, beat eggs, sugar, butter, and vanilla until light and fluffy.
- Add dry ingredients to the egg mixture and mix until just combined.
- Pour batter into prepared baking dish and bake for 30-35 minutes. Cool completely.
- Melt chocolate and let cool slightly.
- In a stand mixer, beat butter and granulated sugar until light and fluffy.
- Add melted chocolate, vanilla, and cocoa powder. Mix until smooth.
- Add eggs one at a time, beating well after each addition, until filling is shiny and smooth.
- Whip heavy cream and confectioners' sugar until soft peaks form.
- Spread French silk filling over cooled brownies. Top with whipped cream and refrigerate for at least 4 hours.


I absolutely love this—cheesecake brownies are my weakness! Your grandma sounds like such a special person.
This sounds like such a comforting dessert—my grandma used to make cheesecake too, and it always felt like pure joy.
I absolutely love this! My grandma made the best chocolate brownies too—every bite brings back those cozy Sunday memories.