
How to Roast Green Beans for a Crispy Treat
There’s something about the smell of freshly baked zucchini cake that instantly takes me back to my childhood. Maybe it’s the buttery aroma mingling with the subtle sweetness, or the way my grandma’s kitchen felt like a warm hug. I remember sneaking a piece when no one was looking, feeling proud because I’d helped mix the batter or spread the glaze. This zucchini swirl cake, in my honest opinion, has that same cozy magic. It’s incredibly moist, bursting with flavor, and—bonus—it’s super forgiving for home cooks. I’ve made this countless times, and every time, it disappears in minutes at my house. My kids actually ask for seconds, and my friends request the recipe every time I bring it to a brunch. Trust me on this one, it’s a secret weapon on busy nights or when you want to impress without fussing too much. It’s like a combination of simplicity and indulgence wrapped into one sweet, comforting slice.
What is Zucchini Swirl Cake?
Think of zucchini swirl cake as the lovechild of a classic banana bread and a little bit of coffee cake—without the fuss. It’s essentially a moist, tender cake made with grated zucchini that adds moisture and a sneaky veggie boost. The “swirl” part comes from a luscious cinnamon-spiced filling or streusel that you swirl through the batter before baking, creating beautiful marbled patterns in each slice. The name might sound fancy, but I promise it’s straightforward. It’s a cozy, homey dessert that tastes just like fall meets spring—warm spices, tender crumb, and a hint of fresh zucchini that’s not overpowering but adds a subtle freshness. I always do this when I have a few zucchini sitting on the counter just begging to be used, especially in the summer when farmers’ markets are overflowing. You’ll love how versatile it is—great for breakfast, brunch, or even a sweet snack with your afternoon coffee.
Why you’ll love this recipe?
What I love most about this zucchini swirl cake is how it combines so many things I adore: it’s foolproof, budget-friendly, and downright delicious. The flavor profile is cozy and warm, with cinnamon and a hint of nutmeg, balanced perfectly by the freshness of the zucchini. I always do this when I want something sweet but don’t want to spend hours in the kitchen—this recipe whips up in no time, and clean-up is practically zero. Plus, it’s a crowd-pleaser—kids gobble it up, and adults appreciate the earthy, slightly veggie-twist that makes it more interesting than plain cake. It’s also incredibly flexible. I’ve tested this with almond milk instead of dairy, and it actually made it even creamier. Want to make it healthier? Swap out some sugar for a natural sweetener. The best part? It’s cost-effective—you probably already have most of the ingredients in your pantry or fridge. It’s one of those recipes you turn to when you need comfort, need to impress, or simply want a treat without feeling guilty. Honestly, what I love most is the swirled interior—every slice is a little work of art, and that smile on my family’s face when they see it? Totally priceless.
How do I make Zucchini Swirl Cake?
Quick Overview
This cake is a breeze to make — just mix your dry ingredients, whisk up the wet, fold everything together, layer the cinnamon-sugar filling, swirl it through the batter, and bake. What sets this apart is the cinnamon swirl that you layer on top and gently swirl into the batter—giving each slice a little surprise of spice and sweetness. The trick is not overmixing once you combine everything, which keeps it super tender. The entire process takes about 15 minutes of prep, and then just let your oven work its magic. The smell alone when it’s baking? Pure heaven. It’s perfect for when you want that warm, homemade feel without spending hours fussing over complicated stuff. And trust me, the first time you make it, you’ll want to keep a stash hidden for those moments when only a slice will do.
Ingredients
For the Main Batter:
– 2 cups grated zucchini (about 2 small zucchinis, I always use organic if I can)
– 1 ½ cups all-purpose flour (or gluten-free blend if you prefer)
– 1 teaspoon baking powder
– ½ teaspoon baking soda
– ½ teaspoon salt
– 1 teaspoon ground cinnamon
– ½ teaspoon nutmeg (optional, but I always add a pinch for that cozy aroma)
– 1 cup granulated sugar (or coconut sugar, if you want a warmer color)
– ⅓ cup vegetable oil or melted butter
– 2 large eggs
– 1 teaspoon vanilla extract
For the Filling:
– ⅓ cup brown sugar
– 1 teaspoon cinnamon
– 2 tablespoons all-purpose flour (helps the swirl keep its shape)
– 1 tablespoon butter or coconut oil (melted, for richness)
For the Glaze:
– ½ cup powdered sugar
– 1-2 teaspoons milk or cream (add gradually to get just the right drizzle consistency)
– A splash of vanilla or a pinch of cinnamon for extra flavor
Step-by-Step Instructions
Step 1: Preheat & Prep Pan
Set your oven to 350°F (175°C). Grease your loaf pan or round cake pan with butter or non-stick spray. I like to line mine with parchment for easy removal. While it’s heating up, grate the zucchini reasonably finely using a box grater. Toss the grated zucchini in a paper towel or clean dish towel to squeeze out excess moisture—that way your batter stays nice and tender, not soggy.
Step 2: Mix Dry Ingredients
In a big bowl, whisk together the flour, baking powder, baking soda, salt, cinnamon, and nutmeg. Don’t skip this step — even distribution makes the cake rise evenly and keeps the spices balanced.
Step 3: Mix Wet Ingredients
In another bowl, whisk the eggs, sugar, oil, and vanilla until well combined. The mixture will look a little frothy. Add the grated zucchini into the wet mixture, stirring gently.
Step 4: Combine
Pour the wet ingredients into the dry and fold carefully just until there’s no streak of flour. Don’t overmix — you want it just combined, tender, and airy. Overmixing can make the cake dense, and nobody wants that!
Step 5: Prepare Filling
Mix together the brown sugar, cinnamon, flour, and melted butter. The mixture should be crumbly but hold together when pressed—like a streusel topping. Feel free to add chopped nuts or oats if you want extra crunch.
Step 6: Layer & Swirl
Pour the batter into your prepared pan. Sprinkle the cinnamon filling evenly across the top. Using a knife or skewer, gently swirl the filling into the batter—don’t stir too vigorously. You’re aiming for pretty marbled streaks that will look stunning when baked.
Step 7: Bake
Pop it into the oven and bake for about 45-50 minutes. To test for doneness, insert a toothpick into the center—it should come out clean. Keep an eye on the edges; they should be golden brown. If your oven runs hot, start checking after 40 minutes. Every oven is different, so don’t be surprised if it takes a little less or more time.
Step 8: Cool & Glaze
Let the cake cool in the pan for about 15 minutes, then transfer to a wire rack. Once cooled, drizzle your powdered sugar glaze over the top. I usually do it when the cake is just warm so it soaks in a little, but you can wait until it’s fully cooled if you prefer a cleaner look.
Step 9: Slice & Serve
Slice with a sharp knife, wiping between cuts for neatness. This cake is excellent slightly warm or at room temperature. Serve it with a cup of coffee, tea, or even a tiny dollop of whipped cream if you’re feeling indulgent. It’s lovely on its own or with a scoop of vanilla ice cream on the side.
What to Serve It With
This zucchini swirl cake is so versatile I can’t help but have fun pairing it up with different accompaniments. For breakfast, it pairs beautifully with a robust black coffee or a homemade chai latte. My kids love it in the morning, warmed just a little, with a smear of butter and fresh berries on the side. It’s a hit at brunch — I serve it with a fruit salad and a fancy mimosa if I’m feeling fancy. As a dessert, it’s perfect for after dinner, especially if you add a dollop of whipped cream or a drizzle of caramel sauce. I also love it for a cozy afternoon snack—trust me, a warm slice with a side of tea is pure comfort. Sometimes, I toast leftover slices and spread a bit of cream cheese or ricotta for an easy, satisfying treat. Honestly, this cake just makes everything feel a little more special, whether it’s a lazy weekend or a quick weekday dessert. The kids ask for it all the time, and I, well, I just keep the recipe handy because I know it’ll never disappoint.
Top Tips for Perfecting Your Zucchini Swirl Cake
From years of making this, I’ve picked up some tips that guarantee a perfect slice every time. First, when grating the zucchini, use a box grater on a medium setting—finer than you think, but not so fine that it’s mushy. Squeezing out as much moisture as possible makes all the difference—trust me, a too-wet batter can turn your cake into a soggy mess. When mixing, be gentle; overworking the batter can make it dense. I always fold until just combined, and that tiny bit of patience pays off with a tender crumb. As for the swirl—I like to be generous with the cinnamon filling but avoid overstuffing, or it can sink to the bottom. When swirling, use a swirling motion to create pretty streaks, kind of like marbling art. A quick tip: if you want to boost flavor, toss some chopped nuts or dried fruit into the filling or batter—almonds or cranberries are fantastic. When baking, rotate the pan halfway through if your oven heats unevenly—this ensures an even rise. Lastly, if you want a glossy glaze, double the powdered sugar and add a splash of lemon juice along with the milk. This adds just a hint of tang that brightens the cake. My biggest lesson? Don’t rush the cooling process—let it cool completely before glazing and slicing. Warm cake plus glaze equals a runny mess, and nobody wants that!
Storing and Reheating Tips
This cake keeps surprisingly well, which is great because it’s just as tasty the next day. If you’re serving it the same day, store it covered at room temperature for up to 2 days—just keep it in an airtight container or wrapped tightly with foil. I like to keep it in a cake box or a loosely covered dish; it stays moist and fresh. For longer storage, pop it into the fridge—especially if you’ve added dairy-based glaze or topping—this keeps it fresh for up to 4 days. Just let it come to room temperature before serving for the best flavor and texture. If you want to make it last even longer, freeze slices individually wrapped in plastic wrap and then foil—this way, you can pull out just what you need. To reheat, microwave for about 20-30 seconds or warm slices in a low oven (around 300°F) for 10 minutes. Honestly, I think it’s best enjoyed at room temp, but if you do prefer it warm, a quick zap in the microwave works wonders. One note: if you’ve glazed the cake, wait to add the glaze until you’re ready to serve. That way, it stays shiny and appealing, not soggy or sticky.
Frequently Asked Questions
Final Thoughts
If you’re looking for a baking project that’s cozy, crowd-pleasing, and surprisingly simple, give this zucchini swirl cake a shot. It’s a recipe I turn to when I want something soulful and satisfying without all the fuss. Every slice reminds me of lazy weekend mornings and that wonderful feeling of home—plus, it’s a clever way to get kids to eat their veggies! Once you’ve tried it, you’ll see why I’ve made this so many times: it’s versatile, forgiving, and delicious enough to become a family favorite. So gather those zucchinis, turn on some comforting tunes, and let your kitchen fill up with that warm cinnamon smell. I can’t wait to hear how yours turns out—please let me know if you add your own twist. Happy baking, my friend, and enjoy every bite of this comfort in every slice!
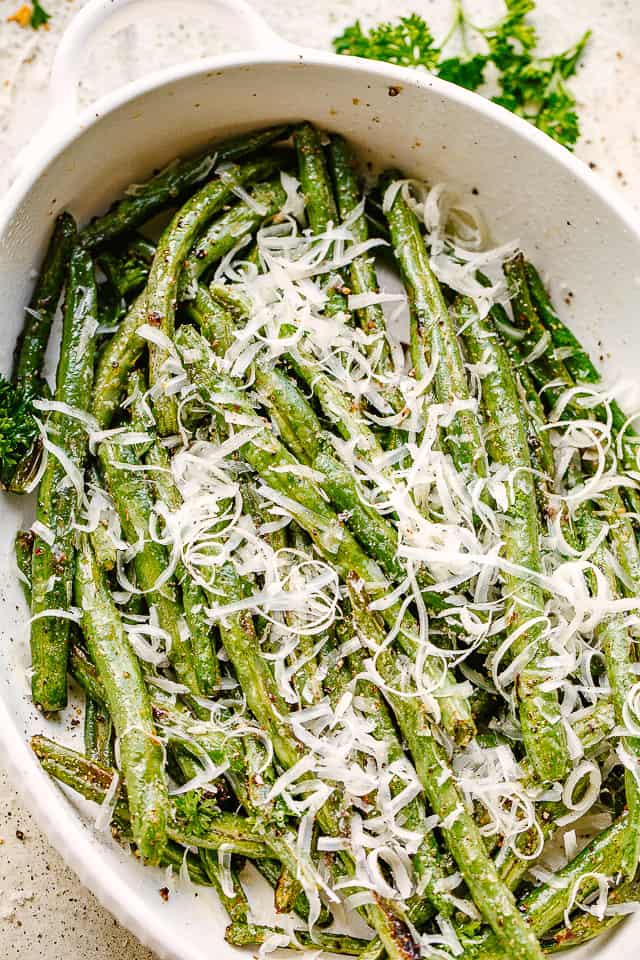
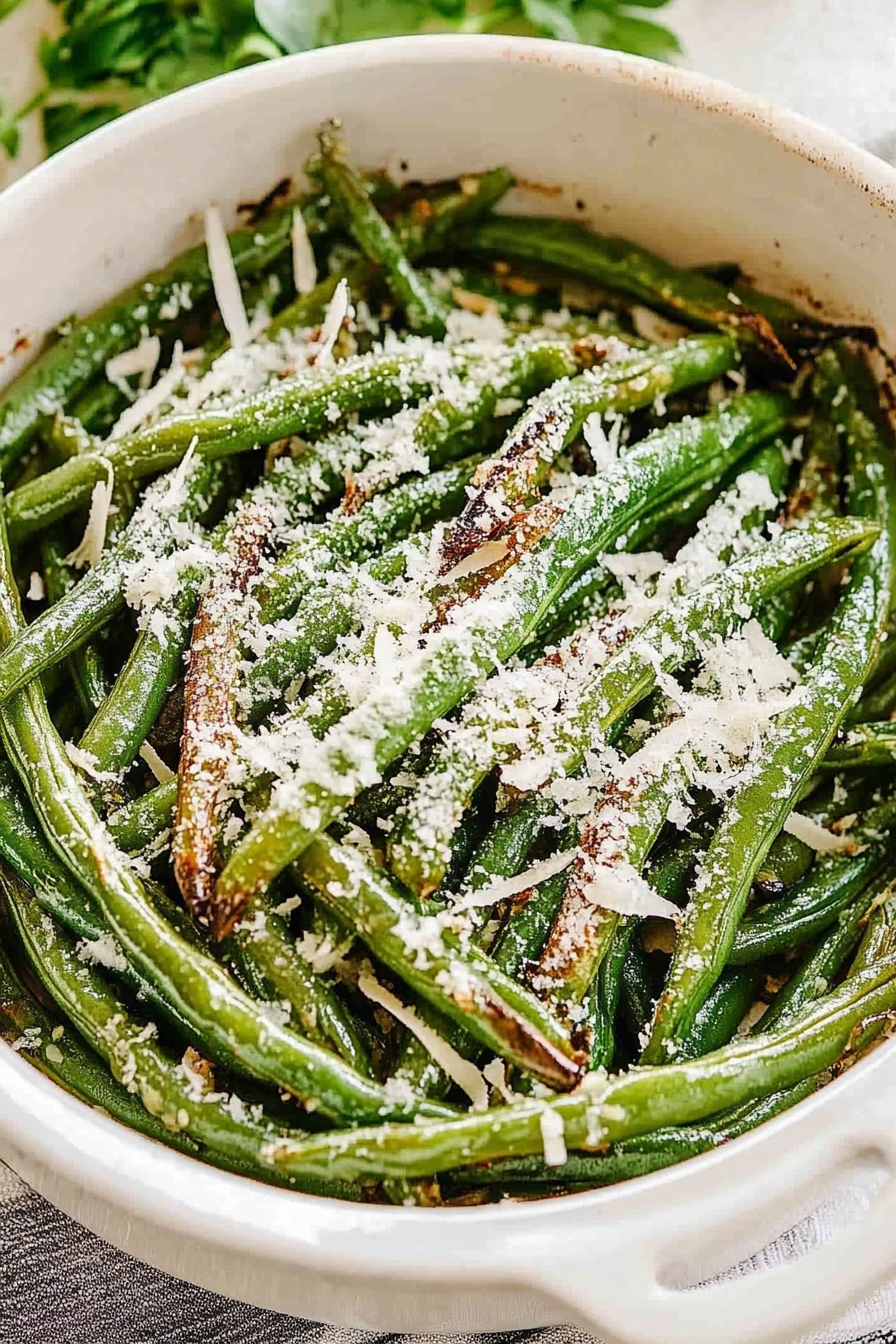
roasted green beans
Ingredients
Method
- Preheat oven to 400°F. Line a baking sheet with parchment paper or foil.
- Place the green beans in a bowl, drizzle with olive oil, and toss with Italian seasoning, salt, and garlic powder until evenly coated.
- Spread the green beans in a single layer on the prepared baking sheet.
- Bake for 18 to 22 minutes, stirring halfway through for even roasting.
- Remove from oven, sprinkle with Parmesan cheese if desired, and serve hot.

This sounds amazing! I love the nostalgic vibe – I’d totally eat this for breakfast. Do they stay crispy after cooling?
Love this! Roasting green beans always turns out so crispy and delicious. I’ll definitely try this method—thanks for the tip!
This sounds amazing! I can already imagine the cozy, comforting vibe of baking this—thanks for sharing such a nostalgic recipe.
Love this recipe—green beans always turn out so crispy and flavorful when roasted this way!
I love how this recipe brings back such warm, nostalgic feelings—the smell of roasted green beans is just as comforting as that zucchini cake for me!