

Simple Roasted Root Veggies for Dinner
You know those afternoons when you’re craving something sweet but don’t want to spend ages in the kitchen? That’s when I pull out my secret weapon—this zucchini banana bread. It’s got that perfect blend of moistness, sweetness, and just enough kick of zucchini to make it feel a little sneaky. I’ve made this a hundred times, tweaking the sweetness, experimenting with add-ins, and I swear, every batch turns out better than the last. The smell alone when it’s baking—oh, it’s like a warm hug from the oven—brings everyone running. My kids ask for this all the time, especially when I tell them we’re “trying something new.” It’s a comfort food that feels a little fancy, yet it’s so easy to whip up last minute. Trust me on this one—you won’t regret keeping a stash of ripe bananas and a fresh zucchini just waiting for their moment to shine. And hey, if you think it’s just a snack, think again—this is *that* good for breakfast, brunch, or even a casual dinner dessert. Let’s get baking!
What is Zucchini Banana Bread?
Think of zucchini banana bread as the lovechild of your classic banana bread and a sneaky vegetable upgrade. It’s essentially a moist, tender loaf that’s bursting with banana flavor, but with the added surprise of shredded zucchini tucked in to boost moisture and a sprinkle of nutrition. The name might sound a little fancy, but really, it’s just a cozy, forgiving loaf that’s perfect for using up ripe bananas and zucchini that’s gotten a little too big for its britches. This dish probably got its start because someone—probably a busy home cook—wanted to make a treat that’s satisfying but also sneaky enough to call “healthy” at least in spirit. And honestly, it’s that perfect balance of sweet, wholesome, and comforting. The best part? It’s a one-bowl wonder—no fancy equipment needed. Just mix, pour, bake, and enjoy a slice that practically melts in your mouth. That’s comfort food, right there.
Why you’ll love this recipe?
What I love most about this zucchini banana bread is how versatile and forgiving it is. I’ve tested it with different types of bananas—overripe, frozen, even a mix of speckled and slightly green—and it always comes out delicious. Plus, that zucchini sneaking into the batter is such a smart way to add moisture without any weird taste, and it’s a sneaky way for your kids to get extra veggies in. The flavor profile is just divine: sweet, banana-y goodness with hints of vanilla and a light, refreshing undertone from the zucchini. This one’s a lifesaver on busy nights when I don’t want to make something complicated, but I still want something homemade and comforting. It’s budget-friendly too—main ingredients are pantry staples, and I sometimes throw in nuts or chocolate chips when I want an extra treat. And if you’re trying to be a little healthier, I tested this with honey instead of sugar, and it turned out just as moist and flavorful. Honestly, I think what makes this recipe special is how adaptable it is—my family’s request for “more bread, Mom!” never seems to stop.
How do you make Zucchini Banana Bread?
Quick Overview
This zucchini banana bread recipe is about mixing simple ingredients in one bowl, adding the shredded zucchini for that extra moisture, and baking it to golden perfection. The process is straightforward—no fancy equipment, no complicated techniques. I always do this when I need a quick sweet fix, and it’s perfect for using up those ripe bananas that are just about to turn brown. The batter comes together in minutes; you just fold everything gently, pour it into a loaf pan, and let the oven do the rest. I love that it doesn’t require chilling or complicated layering—just a rustic, delicious loaf that’s guaranteed to disappear fast. Plus, I swear, this one’s a crowd-pleaser, even for picky eaters, because it’s not overly sweet and has a little wholesome punch from the zucchini.
Ingredients
For the Main Batter:
- 3 ripe bananas, mashed—nothing beats brown, spotty bananas for flavor
- 1 cup shredded zucchini—squeeze out excess moisture, but don’t peel
- 1/3 cup vegetable or olive oil—trust me, it keeps it moist
- 2 large eggs—optional, but they help set the structure
- 1 teaspoon vanilla extract—because vanilla can make everything better
- 1 1/2 cups all-purpose flour—sometimes I swap half with whole wheat for extra fiber
- 1 teaspoon baking soda
- 1/2 teaspoon baking powder
- 1/2 teaspoon salt
- 1/2 cup sugar or honey—depends on how sweet you like it
For the Filling:
- Optional: chocolate chips, walnuts, or blueberries—add these in when you’re feeling fancy
For the Glaze:
- 1/2 cup powdered sugar
- 1-2 teaspoons milk or lemon juice
- Optional: a dash of vanilla or lemon zest
Step-by-Step Instructions
Step 1: Preheat & Prep Pan
First things first, set your oven to 350°F (175°C). Grease a standard loaf pan with butter or non-stick spray and lightly dust with flour—trust me, this makes the loaf slide out so much easier. If you’ve got parchment, do that too! I always do this early so I don’t forget once the batter is ready.
Step 2: Mix Dry Ingredients
In a small bowl, whisk together the flour, baking soda, baking powder, and salt. This step helps everything blend evenly later and prevents clumping. I learned early on that overmixing the dry ingredients can make the bread dense, so just a quick stir is enough.
Step 3: Mix Wet Ingredients
In a bigger bowl, mash the bananas really well—you want no lumps. Add the eggs, oil, vanilla, and sugar (or honey). Whisk until everything’s smooth and fragrant—that’s when the magic begins to happen. I sometimes toss in a splash of yogurt or almond milk for extra creaminess, especially if I want it to be a little lighter.
Step 4: Combine
Pour the dry ingredients into the wet mixture. Fold gently with a spatula—no overmixing! You want just combined, with no streaks of flour. This is the part where I add the shredded zucchini and any extras like chocolate chips or nuts. Mix softly—they’ll be evenly distributed and make each slice a little surprise.
Step 5: Prepare Filling
If you’re adding extras like blueberries or chopped nuts, fold them in at this stage. My kids love dropping in some chocolate chips—they melt slightly in the oven and turn into little pockets of gooey goodness.
Step 6: Layer & Swirl
Pour the batter into your prepared pan. If you like a pretty swirl, I sometimes sprinkle a few extra chips on top and swirl them in a little with a skewer. This step isn’t necessary but makes the loaf cute and a little more fun to serve.
Step 7: Bake
Pop it in the oven for about 50-60 minutes. Check if it’s done by inserting a toothpick in the center—if it comes out clean, you’re all set! I find that my oven sometimes needs a slight temperature adjustment—if the top is browning too fast, I cover it loosely with foil, so it doesn’t burn before it’s cooked through.
Step 8: Cool & Glaze
Cool the loaf in the pan for at least 15 minutes before transferring it to a wire rack. It’s tempting to cut right in, but waiting helps avoid crumbling. Mix up your glaze—powdered sugar with a splash of milk or lemon juice—add zest if you want extra zing. Drizzle this delicately over the cooled loaf for that shiny, sweet finish.
Step 9: Slice & Serve
Use a serrated knife for neat slices, and remember—this bread is best enjoyed fresh but keeps well for 2-3 days in an airtight container. It’s perfect warm with a pat of butter or toasted with a smear of cream cheese. I love serving it cut into thick slices on lazy weekend mornings or packed for a quick snack on the go.
What to Serve It With
Honestly, this zucchini banana bread is so versatile, it pairs with just about anything. For breakfast, I like a big cup of black coffee or a glass of cold milk—nothing fancy, just pure comfort. It’s also lovely alongside a fresh fruit salad or yogurt parfait, especially if you sprinkle some granola on top for crunch.
When it comes to brunch, I sometimes serve slices topped with a dollop of whipped cream or a spoonful of mascarpone, with a dash of cinnamon or a drizzle of honey. It’s an effortless showstopper on a family table or a weekend guests’ spread.
As a delightful dessert, I’ll warm a slice and top it with vanilla ice cream or a caramel drizzle. My kids love when I cut it into smaller squares and serve with a side of sliced strawberries or fresh blueberries. Plus, it’s great as a casual snack—perfect for when friends drop by or when you just need a little treat with your afternoon tea.
Top Tips for Perfecting Your Zucchini Banana Bread
Over the years, I’ve picked up some tricks to make this bread perfectly moist and flavorful every single time. First, make sure to squeeze out excess moisture from the zucchini—I use a clean dish towel and press gently, so it’s moist but not waterlogged. Too much moisture can mess with the bake time or make it soggy.
When mixing, resist the temptation to overdo it. Overmixing develops gluten and makes the bread dense. Gently folding everything together keeps it light and fluffy. If you want a prettier swirl, I recommend dropping some extra chocolate chips and swirling them with a toothpick—just don’t skimp on that step!
I’ve experimented with different sweeteners. Honey and maple syrup add an extra layer of flavor and moisture, but keep in mind—they might slightly alter the baking time. Reduce the oven temperature by 10-15 degrees if you notice browning too fast.
For ingredient swaps, I’ve tried almond flour in half the recipe, and honestly, it turns out great—just add an extra splash of milk because nut flours absorb more liquid. If you prefer no sugar, mashed dates or unsweetened applesauce can replace sweetness. And for gluten-free, a good-quality all-purpose gluten-free flour blend works like a charm, but expect a slightly denser crumb.
The glazing step is where I like to get creative—add lemon zest, a splash of vanilla, or even a cinnamon-spiced icing. Keep the glaze thick enough so it doesn’t run everywhere but thin enough to drizzle easily. I usually do this once the bread is completely cooled—trust me, shiny glaze makes all the difference.
My biggest takeaway? Be patient with baking. Sometimes, you have to cover the loaf if it’s browning too quickly. Always check with a toothpick before pulling it out of the oven—this little trick saves me from under-baked, gooey centers or dry edges. And finally, don’t be afraid to experiment—I’ve added shredded apples, a sprinkle of coconut, or even a swirl of peanut butter—each variation is a new adventure, and they all turn out pretty darn delicious.
Storing and Reheating Tips
This bread stays fresh for about 2-3 days at room temperature if wrapped tightly in foil or stored in an airtight container. Just keep it out of direct sunlight so it doesn’t get soggy. If you want it to last longer, pop it in the fridge—it’s good for about a week, but I recommend warming individual slices in the microwave for about 15 seconds to bring back that cozy, just-baked feel.
For freezing, wrap slices individually in plastic wrap, then stash in a resealable bag. They’ll keep for a month or more. Thaw at room temperature or briefly microwave. I’ve even frozen the whole loaf—thaw overnight in the fridge and warm it up slightly before slicing. As for the glaze, I like to add it fresh when serving, but if you want to save time, a simple dusting of powdered sugar works nicely, too.
Keep in mind: if you add the glaze before freezing, it might get a little sticky when thawed, so I prefer to do the glaze step just before serving for the best presentation and flavor.
Frequently Asked Questions
Final Thoughts
If you ask me, this zucchini banana bread embodies everything good about home baking—simplicity, comforting flavors, and that warm feeling of having made something with love. It’s a recipe I always come back to, especially on those hectic mornings when I need a quick breakfast or a snack to curb the afternoon craving. The fact that it sneaks in some zucchini makes me feel better about indulging a little, and my family totally loves it. Every time I bake this, I get a flurry of “Wow, this is so good!” or “Can I have seconds?” I think that’s the best compliment of all. Whether you make it as it is or add your own twist, I promise, it’ll become a staple in your house too. Happy baking, and I can’t wait to see how your loaf turns out—don’t forget to share your pics and variations! Enjoy every bite!

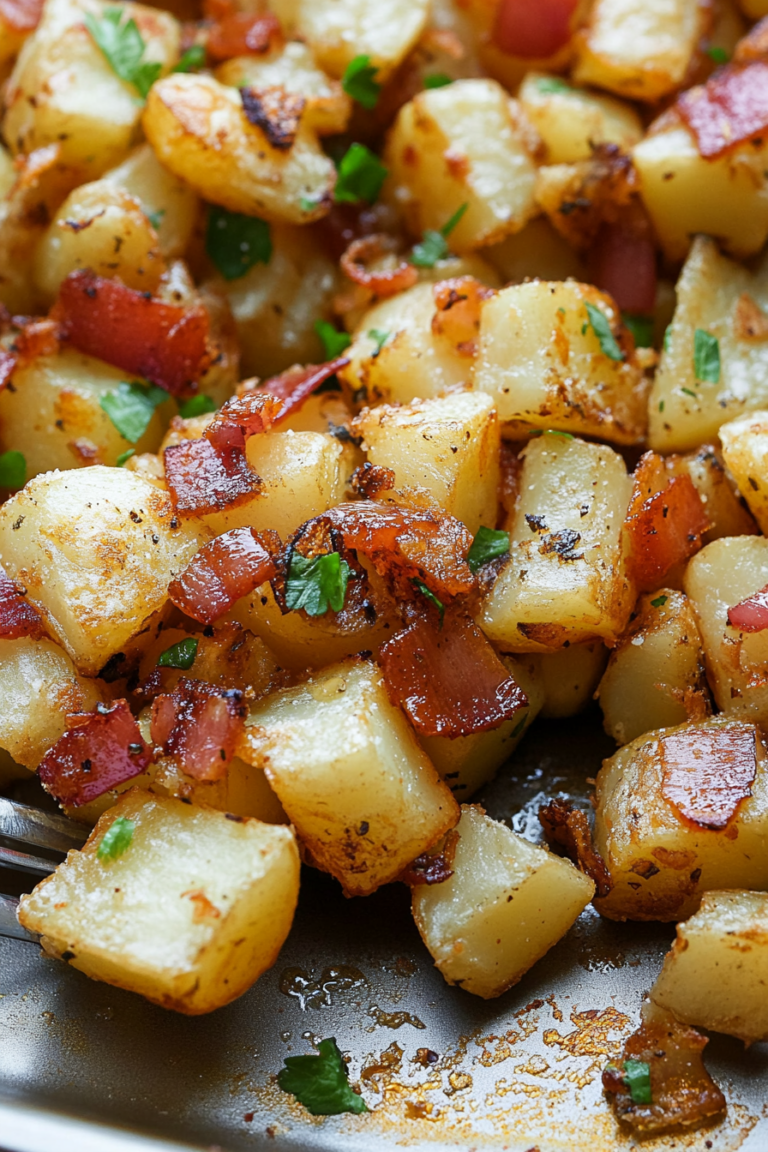
roasted root vegetables
Ingredients
Method
- Preheat the oven to 425 degrees Fahrenheit.
- Peel and chop all root vegetables into uniform 1-inch pieces.
- In a large mixing bowl, toss the chopped vegetables with olive oil, thyme, salt, and black pepper until evenly coated.
- Spread the vegetables evenly on a baking sheet lined with parchment paper.
- Bake for 40 minutes, flipping halfway through, until vegetables are tender and caramelized.
- Remove from oven and serve hot or at room temperature.


Love this recipe! I just tried it and it turned out so moist and flavorful—perfect for those lazy afternoons. Will definitely make it again.
Perfect for those lazy afternoons! I love how easy this recipe is—and the zucchini keeps it moist and healthy.
Perfect timing for this recipe—just what I needed on a lazy Sunday afternoon!
Perfect for those lazy evenings—simple, sweet, and ready in no time! I’ll definitely be trying this soon.
Perfect for busy days—simple, sweet, and ready in no time! Love how easy it is to whip up.