
Easy Cranberry Walnut Swirls Recipe
There’s just something so cozy about a warm slice of coffee cake on a lazy Sunday morning, isn’t there? I remember the first time I baked this zucchini coffee cake with cream cheese swirl — I was actually looking for a way to sneak in that little extra veggie boost for my kids, and somehow, it turned into everyone’s favorite weekend treat. The smell alone hits you at the door and makes the whole house feel extra inviting. It’s sweet enough for dessert but hearty enough for breakfast at the same time. Honestly, I’ve made this more times than I can count, and I still get giddy when I see that golden crust emerge from the oven. Plus, it’s a total lifesaver on busy nights when you want something homemade but don’t want to fuss too much. Believe me, once you try this, it’ll become a go-to for mornings, brunches, or whenever a little slice of comfort is needed. And the best part? It’s surprisingly easy—just a few simple ingredients, some mixing, and magic happens!
What is Moist and Moist Zucchini Coffee Cake with Cream Cheese Swirl?
This recipe is what I like to call a hidden gem — think of it as a classic coffee cake with a healthy twist. The cake itself is moist, tender, and buttery, with the gentle background of grated zucchini adding moisture and a bit of sneaky nutrition. The cream cheese swirl is like a dreamy ribbon running through it, giving each slice that luscious, tangy kick that balances out the sweetness perfectly. The name might sound fancy, but it’s really just a cozy, comforting baked good that’s perfect for breakfast, brunch, or cozy afternoons with a cup of coffee. Think of it as a cross between your favorite zucchini bread and a melt-in-your-mouth coffee cake. It’s essentially a quick crumb cake with a special twist — and I promise, everyone who tries it asks for the recipe.
Why you’ll love this recipe?
What I love most about this zucchini coffee cake with cream cheese swirl is how it manages to be both indulgent and healthy (well, healthier, at least!). The zucchini makes the cake so moist that I always do this when I want a slice to stay fresh for a bit longer — it’s like magic. The flavor? Oh, it’s got that perfect balance of sweetness with just a hint of nuttiness from the zucchini and the richness of melted butter. The cream cheese swirl adds this luscious tang that turns a simple cake into something special. And let’s be honest — it’s super simple to make. No complicated layers or fancy equipment needed. I’ve tested this with almond milk and even coconut oil when I’m feeling a bit more gourmet, and it’s come out just as amazing. Plus, the whole thing comes together in one bowl, making cleanup a breeze. It’s cost-effective too — all the ingredients are pantry staples you likely already have. My kids ask for this all the time, and honestly, I don’t mind because I know it’s packed with sneaky veggies and good vibes. What’s not to love? It’s perfect for mornings when you’re running late or weekends when you want to treat everyone without spending hours in the kitchen. Trust me on this — once you make it, it’s like your new family tradition.
How do I make Zucchini Coffee Cake with Cream Cheese Swirl?
Quick Overview
This cake is a one-bowl wonder that comes together quickly — no fancy techniques, just good old-fashioned mixing. The batter is made by whisking together shredded zucchini with butter, sugar, eggs, and vanilla, then folding in a simple flour mixture. The cream cheese swirl is whipped up in minutes and spread into the batter before adding a crumbly streusel topping. Baking until golden and fragrant, you’ll end up with a breakfast or dessert that’s moist, tender, and packed with flavor. One of my favorite tricks is to squeeze out excess moisture from the zucchini so the cake isn’t too soggy — it’s a small thing but really makes a difference. This recipe is forgiving, flexible, and guaranteed to make your kitchen smell incredible.
Ingredients
For the Main Batter:
– 2 cups shredded zucchini (about 2 small zucchinis, grated and excess moisture squeezed out)
– 1/2 cup softened unsalted butter
– 1 cup granulated sugar
– 2 large eggs
– 1 teaspoon vanilla extract
– 1 1/2 cups all-purpose flour (you can use white or whole wheat for a heartier version)
– 1 teaspoon baking powder
– 1/2 teaspoon baking soda
– 1/4 teaspoon salt
For the Filling:
– 4 oz cream cheese, softened
– 1/4 cup granulated sugar
– 1 teaspoon vanilla extract
For the Streusel Topping:
– 1/2 cup all-purpose flour
– 1/4 cup packed light brown sugar
– 1/4 cup cold unsalted butter, cubed
– 1/2 teaspoon ground cinnamon (optional but recommended for extra warmth)
Step-by-Step Instructions
Step 1: Preheat & Prep Pan
Set your oven to 350°F (175°C). Grease a 9-inch square baking pan or line it with parchment paper — trust me, parchment makes everything easier when you’re ready to serve. I always do this first so I don’t forget — nothing worse than having to scrub stuck cake off a pan! Also, shred the zucchinis and squeeze out as much moisture as you can with a clean tea towel or paper towels. This little step keeps the cake from turning into zucchini soup.
Step 2: Mix Dry Ingredients
In a small bowl, whisk together the flour, baking powder, baking soda, and salt. This ensures all the leavening agents are evenly distributed, so your cake rises perfectly. I find it helpful to do this before combining with wet ingredients — it’s like giving everything a nice, even start.
Step 3: Mix Wet Ingredients
In a larger bowl, cream the softened butter and sugar until light and fluffy. I usually use a whisk or a hand mixer — just enough so it’s smooth. Then add the eggs one at a time, beating after each addition. I throw in the vanilla last and mix until everything is combined. The house smells amazing at this point — like vanilla and sweet butter all in one.
Step 4: Combine
Gently fold in the shredded zucchini. I like to do this in parts so everything gets evenly incorporated without deflating the mixture. Then, add the dry ingredients a little at a time, mixing just until combined. Be careful not to overmix — that’s how you get a dense cake instead of a soft, tender crumb.
Step 5: Prepare Filling
In a small bowl, beat the softened cream cheese with sugar and vanilla until smooth and slightly fluffy. It should be creamy but still thick enough to swirl easily. This step is a game-changer — trust me, it’s what makes that lovely ribbon in each slice.
Step 6: Layer & Swirl
Pour half of the batter into the prepared pan. Spread the cream cheese mixture over the batter gently, trying to avoid it from mixing too much. Pour the remaining batter on top and then use a toothpick or skewer to swirl the cream cheese into the batter, creating pretty marbled patterns. I do gentle zigzags and figure eights — whatever feels natural. This marbling is the soul of this cake.
Step 7: Bake
Mix the streusel ingredients with your fingers or a fork until crumbly, then sprinkle evenly over the top. Bake for about 40-45 minutes. Check for doneness by inserting a toothpick into the center — it should come out clean or with just a few moist crumbs. Every oven is different, so keep an eye on it after 35 minutes. You want that golden-brown crust that smells like cinnamon and baked goodness.
Step 8: Cool & Glaze
Let the cake cool in the pan for at least 15 minutes before transferring it to a wire rack. If the glaze or icing isn’t your thing, just dust it with powdered sugar and serve. If you’re feeling fancy, I drizzle a simple glaze made of powdered sugar and a splash of milk over the top once it’s cooled down. It’s a soft, sweet finish that adds just the right touch of extra sweetness.
Step 9: Slice & Serve
Use a sharp knife to cut into squares or rectangles, wiping the blade between cuts for neat slices. I love serving this warm with a dollop of whipped cream or a scoop of vanilla ice cream — pure comfort. For breakfast, a cup of strong coffee or a milky latte pairs beautifully. This is one of those recipes that somehow gets better after a day or two, if it lasts that long!
What to Serve It With
This zucchini coffee cake is so versatile; it’s like a blank canvas for all your favorite accompaniments. For breakfast, I love pairing it with a hot cup of coffee or a caramel latte — the kind that warms your hands and your heart. My family also enjoys it with fresh fruit on the side, like berries or sliced bananas, which add a burst of freshness. On brunch tables, I like to set it out alongside yogurt, scrambled eggs, and maybe some crispy bacon — it balances sweet and savory perfectly. After dinner? A scoop of vanilla ice cream melts beautifully on a warm slice, making it a decadent dessert. During cozy afternoons, it’s just perfect with a mug of tea or hot chocolate, especially when I want a little something sweet during nap time. I’ve even had friends over for book club and served it a la mode — it disappeared in minutes! My kids ask for this all the time, and I’m not complaining because I know they’re eating a veggie-packed, comforting treat that makes everyone happy.
Top Tips for Perfecting Your Moist Zucchini Coffee Cake with Cream Cheese Swirl
Over the years, I’ve learned a few tricks to make this cake absolutely foolproof. First, squeezing out excess moisture from the zucchini is key; I’ve tested it multiple times and found that wet zucchini makes the cake dense and heavy. I use a clean dish towel or paper towels, and really press out all the water — don’t skip this step! Second, be gentle when folding in the dry ingredients — overmixing is the biggest sin here, and it can turn your cake into a brick. Instead, fold just until the flour disappears.
The swirl pattern can be fun to experiment with — I sometimes make large loops or tight zigzags, depending on how much swirl I want visible. You can also add other flavors like lemon zest or even cocoa powder to the cream cheese for a different twist. When it comes to baking, every oven is a little different, so start checking around the 35-minute mark. The smell alone will tell you it’s almost ready. I learned this trick after making a slightly underbaked cake once, and now I swear by it. For the glaze, I prefer a pour-style that’s on the thinner side; it soaks in just a little and adds that shiny, inviting look. If you want a thicker glaze, add a touch more powdered sugar, but don’t make it so stiff it’s impossible to drizzle.
Honestly, the biggest lesson is to enjoy the process — baking this cake is like hugging a friend. It’s simple, forgiving, and always yields a warm, happy family moment. I’ve tested different alternatives — like swapping applesauce for butter or using coconut flour — and while the texture varies a bit, it’s still delicious. That flexibility is what makes this recipe such a keeper in my kitchen. Give it a try, and I bet it’ll find a special place in your own family’s rotation.
Storing and Reheating Tips
This cake keeps surprisingly well — I’ve stored leftovers in an airtight container at room temperature for up to two days, covering it loosely with foil or a clean towel so it doesn’t dry out. If you want it to stay fresh longer, pop it in the refrigerator for up to five days. Just make sure to cover it well to prevent it from absorbing any fridge odors. When I want to enjoy it later, I pop a slice in the microwave for about 15 seconds or so — it warms up beautifully and the smell makes everyone come running. Freezing is also an option. Wrap individual slices tightly in plastic wrap, then aluminum foil — they stay good for up to three months. When ready to eat, let it thaw at room temp or warm gently in the microwave. I don’t recommend adding the glaze until just before serving, especially if it’s been stored in the fridge. It’s best added fresh for that shiny, sweet finish that makes each slice irresistible.
Frequently Asked Questions
Final Thoughts
This zucchini coffee cake with cream cheese swirl has truly become a staple in my kitchen. It’s comforting, versatile, and a little bit sneaky — sneaky because it’s packed with zucchini but feels like a treat. Every time I bake it, my family gathers around, noses in the air, craving that first warm, fragrant bite. Whether it’s a lazy weekend breakfast, a brunch centerpiece, or an after-dinner dessert, it never disappoints. Plus, it’s so adaptable—you can swap ingredients, add your favorite spices, or try different fillings. I love that it’s a recipe I’ve perfected with love over the years and that I can pass on to friends and family, knowing it’s a winner. So go ahead — grab your zucchinis, crank up that oven, and let the magic happen. I can’t wait to hear how yours turns out! And if you try any fun variations, be sure to share — I love swapping ideas. Happy baking!

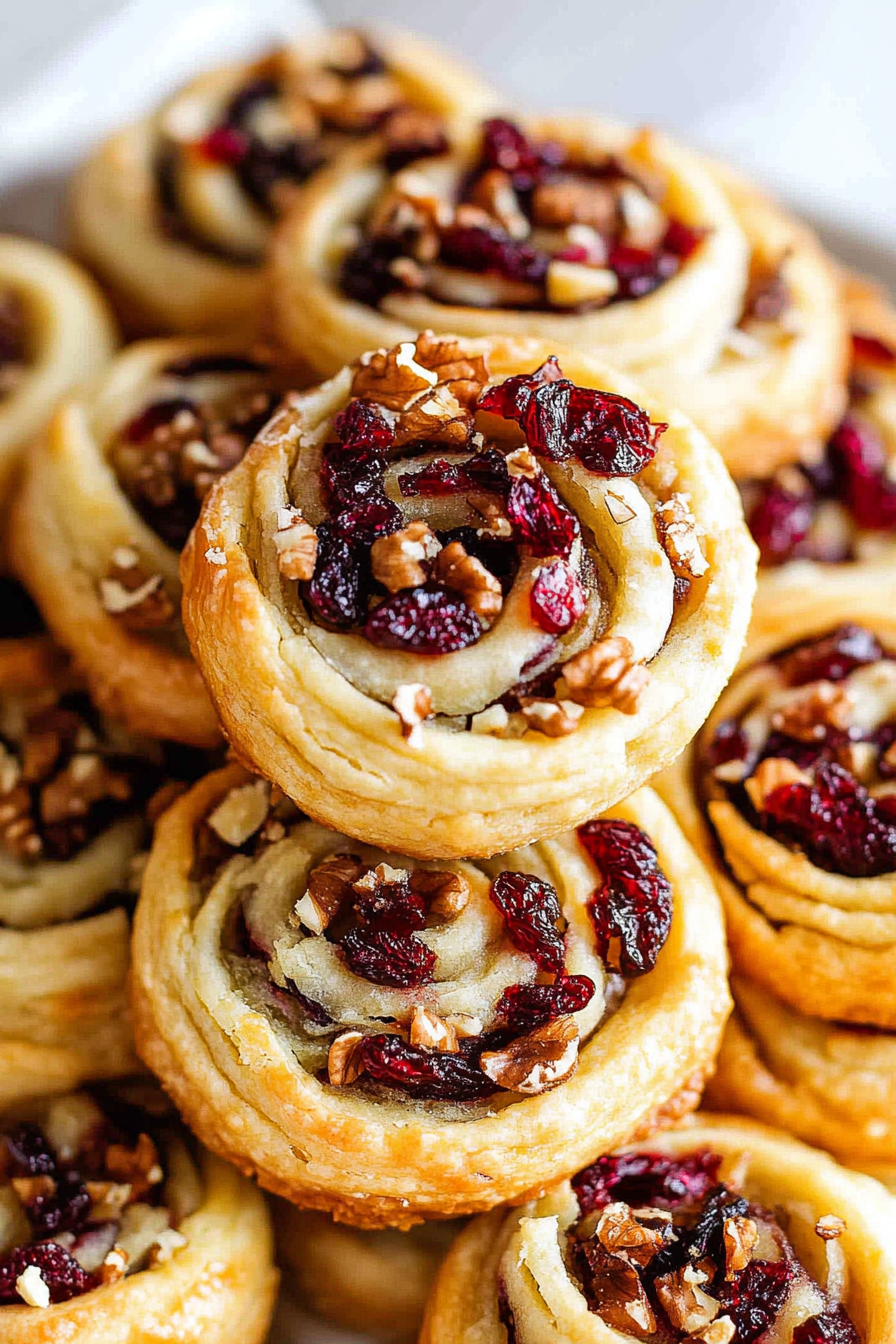
cranberry walnut pinwheels
Ingredients
Method
- Preheat the oven to 400°F. Line a baking sheet with parchment paper.
- In a bowl, mix cranberries, walnuts, sugar, and orange zest until combined.
- Lightly flour a surface and roll out each pie crust into a square. Brush with melted butter.
- Spread the cranberry mixture evenly over the crust, pressing lightly to adhere.
- Roll each square tightly into a log, pinch the edges to seal, and freeze for 20 minutes.
- Combine egg and water, then brush over the logs. Slice into 10 pieces each.
- Place slices cut side up on the prepared baking sheet. Bake for 11-14 minutes until golden.
- Drizzle honey over the baked pinwheels and cool slightly before serving.


This recipe looks absolutely perfect for cozy Sundays! I can already imagine the warm, crumbly goodness with every bite.
This recipe sounds perfect for a cozy weekend—cranberry and walnut swirls are such a great combo!
I just tried this recipe and it’s amazing! The cranberry and walnut swirls are so flavorful—definitely my new go-to for weekend mornings.
I love the cozy feeling of baking on a Sunday morning! This recipe looks perfect for making something sweet and warm at home.
I love this recipe—it looks perfect for a cozy morning! I’ve been meaning to try adding cranberries and walnuts to my coffee cake.