
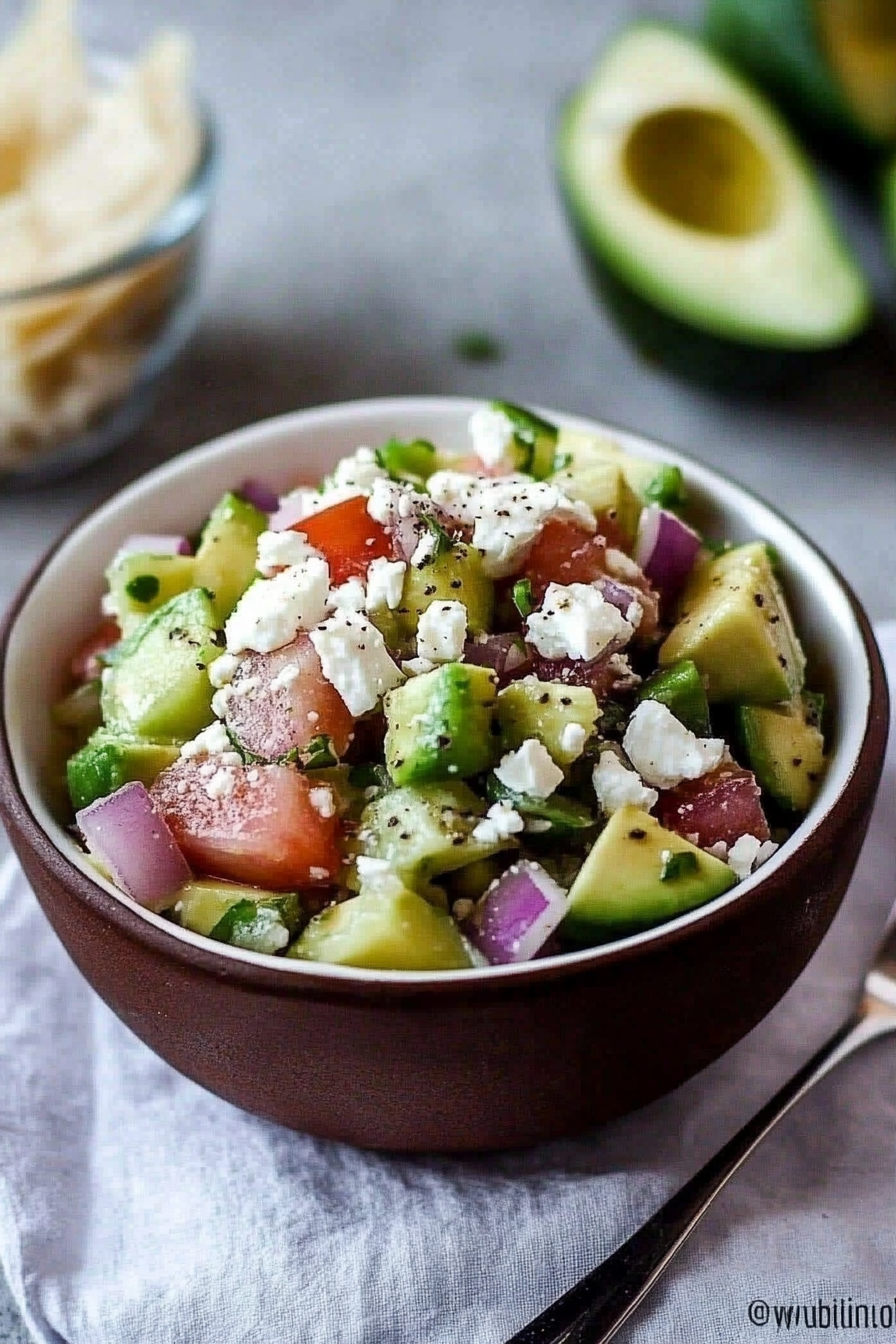
Creamy Avocado Feta Salsa Recipe
There’s something about the smell of a freshly baked coffee cake that instantly makes my entire house feel warm and inviting — it’s like a big, cozy hug. I remember still roasting my grandma’s coffee beans early in the morning while the oven slowly filled the kitchen with that irresistible aroma. Over the years, I’ve tested countless recipes to get that perfect balance: moist, flavorful, not overly sweet, and with just enough crumbly topping and swirl to make it feel special. This zucchini coffee cake is one I keep coming back to because it’s so easy to make, and it never fails to wow everyone at the brunch table or family breakfasts. Bonus? It’s secretly packed with zucchini, which makes it absurdly moist without adding any weird flavor. Trust me, this one’s a lifesaver on busy nights or when you want something homemade that feels fancy but comes together without fuss. I always do this when I want to impress, but also keep things simple. It’s one of those recipes I’ve made so many times I could probably do it with my eyes closed — though I wouldn’t, because I want to savor every step!
What is Moist Zucchini Coffee Cake?
Think of this as a lovely blend between a classic coffee cake and a sneaky way to get some veggies into your day. It’s essentially a tender, buttery cake that’s flavored with hints of lemon and filled with a gooey cream cheese swirl. The zucchini plays the role of a secret ingredient that keeps the cake incredibly moist and soft, without making it taste “green” or anything like that. The name might make you picture a breakfast dish, and that’s exactly what it is — but honestly, it’s so good it can easily be served as dessert, too. The “coffee” part is more about the vibe: perfect with a hot cup of coffee or tea, especially on a lazy weekend. Originally, I think of it as a way to use up leftover zucchini during summer, but now it’s a year-round favorite that my kids ask for all the time. It’s simple enough for a quick morning bake and special enough to serve when guests come over. It’s basically my go-to for when I want a breakfast treat that’s cozy, comforting, and a little bit indulgent.
Why you’ll love this recipe?
What I love most about this zucchini coffee cake is how it strikes that perfect balance of flavors and textures — it’s moist, it’s flavorful, and it’s got that beautiful swirl of cream cheese that melts in your mouth. The lemon glaze on top? Pure magic. It adds just enough brightness to cut through the richness and makes each bite feel fresh and lively. Plus, this recipe is such a win because it’s forgiving and adaptable. I’ve tested it with almond milk when I was out of regular milk, and honestly, it made the cake even creamier — so don’t hesitate to play around a little. It’s also budget-friendly since most of the ingredients are staples you probably already keep in your pantry: flour, sugar, eggs, and zucchini. And the best part? It’s a one-bowl wonder for mixing most of the batter, which means minimal clean-up. This one’s a lifesaver on busy nights when you want something homemade but don’t want to spend hours in the kitchen. My kids ask for this all the time, and honestly, I don’t mind baking it often because the smell alone brings everyone to the kitchen! The versatility is another reason I love it: serve it warm with a drizzle of extra glaze, or cold for a different texture. It’s a keep-it-in-the-fridge kind of recipe — perfect for snacking throughout the week.
How do I make Zucchini Coffee Cake?
Quick Overview
In just a few simple steps, you can have this delightful cake ready to enjoy. First, you’ll prepare your zucchini, grate it, and squeeze out some excess moisture — trust me, this step makes all the difference in keeping the cake tender. Then, you mix a few staple dry ingredients in one bowl, and your wet ingredients — eggs, milk, melted butter, and vanilla — in another. Combine just until smooth, being careful not to overmix. Next, you’ll fold in the zucchini and pour half of the batter into your prepared pan. For the filling, mix cream cheese with a splash of sugar and vanilla, then dollop it onto the batter. Swirl it gently with a knife for that beautiful marbled look. Pour the remaining batter over the top, layer more cream cheese, and swirl again. Baking is straightforward — until a toothpick in the center comes out clean. While it cools, make your lemon glaze, then drizzle over the warm cake. It’s honestly foolproof and so cozy — I promise, once you try it, it’ll become a family favorite too.
Ingredients
For the Main Batter:
- 2 cups all-purpose flour (I prefer unbleached for flavor)
- 1 ½ cups sugar (can cut back if you like less sweetness)
- 1 teaspoon baking powder
- ½ teaspoon baking soda
- ½ teaspoon salt
- 1 teaspoon ground cinnamon (because everything’s better with cinnamon!)
- ¾ cup unsalted butter, melted (or coconut oil for a vegan version)
- 3 large eggs (or flax eggs, if you’re vegan—1 tbsp ground flaxseed + 3 tbsp water per egg)
- 1 cup milk (dairy or almond milk work perfectly)
- 1 teaspoon vanilla extract
For the Filling:
- 4 oz cream cheese, softened
- 2 tablespoons sugar
- ½ teaspoon vanilla extract
For the Glaze:
- 1 cup powdered sugar
- Juice of 1 lemon
- ½ teaspoon lemon zest (optional but highly recommended!)
Step-by-Step Instructions
Step 1: Preheat & Prep Pan
Set your oven to 350°F (180°C) and greased a 9-inch square pan or a round cake pan. I always line mine with parchment paper, just so I can lift the cake out easily later — it’s a tiny thing, but it helps a lot. Keep everything ready before you start — that way, you won’t have to rush through steps as you go!
Step 2: Mix Dry Ingredients
In a big bowl, whisk together the flour, sugar, baking powder, baking soda, salt, and cinnamon. I do this first so the spices and leavening are evenly distributed. It just makes for a fluffier, more consistent cake.
Step 3: Mix Wet Ingredients
In a separate bowl, beat the eggs, then stir in the milk, melted butter, and vanilla. I usually do this with a whisk — it makes it easier to get everything well combined. I like to warm the milk just slightly if I remember, because it helps everything blend smoothly. Keep an eye on the eggs — I’ve learned that adding them one at a time helps prevent lumps.
Step 4: Combine
Pour the wet ingredients into the dry and fold gently with a spatula. The key here is not to overmix — stir just until no streaks remain. Overmixing can make the cake dense, which is the opposite of what we want here. You’ll notice a thick, slightly lumpy batter — that’s perfect.
Step 5: Prepare Filling
In a small bowl, beat the softened cream cheese with sugar and vanilla until smooth. I like to microwave mine for about 10 seconds if it’s too firm. Taste it — if you like it sweeter, add a pinch more sugar. Setting this aside, you’re almost ready to assemble!
Step 6: Layer & Swirl
Pour half of the batter into your prepared pan, smoothing it out gently. Dollop spoonfuls of the cream cheese mixture on top, then use a butter knife or skewer to swirl it into the batter. I love doing a figure-eight pattern — it creates the beautiful marbled effect! Carefully pour the remaining batter over the top and add more dollops of cream cheese, swirling again to incorporate the layers. This marble look makes every slice special.
Step 7: Bake
Slide it into the oven and bake for about 45-50 minutes, or until a toothpick comes out with a few moist crumbs. Sometimes, I cover the top loosely with foil if it’s browning too fast — but honestly, it’s forgiving. When it’s done, let it cool in the pan for at least 15 minutes before transferring to a wire rack. Smells like heaven, doesn’t it?
Step 8: Cool & Glaze
Once slightly cooled, make your lemon glaze by whisking powdered sugar, lemon juice, and zest together. It should be thick but pourable. Drizzle it generously over the warm cake — that warmth helps it seep into every crumb. Let it set for 10 minutes before slicing.
Step 9: Slice & Serve
This cake is best enjoyed slightly warm or at room temperature. Use a sharp knife to cut neat slices, cleaning the blade between cuts for tidy pieces. Serve on a pretty plate, maybe with a dollop of whipped cream or a few fresh berries if you want to make it extra special. Honestly, I think this cake is best enjoyed with a strong cup of coffee or tea, as the flavors really shine. I love having it for brunch or even breakfast — it’s got that comforting homey vibe that’s hard to beat.
What to Serve It With
This zucchini coffee cake is so versatile, I’ve found it works for nearly any meal or occasion. For breakfast, I love slicing it warm and drizzling a little extra glaze over it with my morning coffee — the lemon zest really wakes things up. It’s perfect with a cup of dark roast or a strong chai latte. My family often enjoys it as a weekend brunch centerpiece, served alongside fresh fruit or Greek yogurt for contrast. When I want to turn it into dessert, I’ll dust it lightly with powdered sugar or add a dollop of whipped cream for extra indulgence. Sometimes, I even serve small slices as a cozy snack during movie nights — the kids ask for Seconds every single time! Over the years, I’ve experimented with adding berries into the swirl for a fruity twist or swapping the lemon glaze for a cinnamon sugar topping. Whatever way you decide to enjoy it, this cake never disappoints. I think it’s become a part of our family tradition because it’s just so comforting — and honestly, I love how flexible it is for all seasons.
Top Tips for Perfecting Your Moist Zucchini Coffee Cake
Even after making this dozens of times, I keep learning little tricks to make it even better. Here are my top tips:
- Zucchini Prep: Always grate and then squeeze out excess moisture — I do this using a clean kitchen towel or paper towels. Wet zucchini can make the batter too thin and mess with the texture.
- Mixing Advice: Be gentle when folding in the ingredients. Overmixing can make the cake dense and rubbery. Think light and effortless — like folding laundry.
- Swirl Pattern: For a prettier, more even swirl, dollop the cream cheese mixture in an alternating pattern and drag a skewer or knife through in circles. Practice makes perfect!
- Ingredient Swaps: Want to make it dairy-free? Use coconut oil and dairy-free cream cheese and plant-based milk. It works surprisingly well, and you still get that moist, rich texture.
- Baking Tips: Every oven is different; I recommend starting with 45 minutes and checking frequently. Oven racks matter, too — I always bake on the middle shelf for even heat.
- Glaze Variations: For a different flavor, swap lemon juice for orange or lime. You can also add a splash of vanilla or almond extract to the glaze for a new twist.
Over time, I’ve learned that keeping your ingredients at room temperature helps everything blend more smoothly, especially those eggs and cream cheese. Also, don’t skip the cooling phase before glazing — the warmth helps the glaze spread nicely, but the cake needs a little set so it doesn’t slide right off. Trust me, this is one of those recipes where the little details make a big difference.
Storing and Reheating Tips
This cake keeps surprisingly well. If you have leftovers (though, honestly, they disappear fast at my house!), you can store it in an airtight container at room temperature for up to 2 days — just don’t cover it too tightly, or the moisture will get trapped. For longer storage, wrap slices tightly in plastic wrap and refrigerate for up to 4 days. The flavor actually intensifies after sitting a day or two — that lemon glaze especially looks better once it’s had a chance to set. To reheat, pop a slice in the microwave for about 20 seconds or warm it in a 350°F oven for 10 minutes. If you like it extra cozy, add a little butter or more glaze when serving. Freezing works well too: wrap slices individually in plastic wrap, then foil, and keep for up to 3 months. Thaw at room temperature or gently warm in the oven. For the best presentation, re-glaze after reheating, or sprinkle with powdered sugar for that fresh look. I like to think of this cake as holding onto its cozy charm no matter how you store it — it tastes just as delicious, if not more so, when you come back to it later.
Frequently Asked Questions
Final Thoughts
This zucchini coffee cake is one of those recipes that’s rooted in comfort but classy enough to serve for guests or special mornings. It’s a perfect way to use up garden zucchinis or to enjoy a dessert that feels like a brunch treat — all without complicated techniques or hard-to-find ingredients. I love how the zucchini keeps the crumb impossibly moist and tender, while the lemon glaze adds a fresh zing that cuts through the richness. Over the years, I’ve made little tweaks, like adding berries or switching up the glaze flavor, but honestly, the core recipe remains my favorite. Every time I bake it, I’m reminded of lazy weekend mornings, of breakfast table chatter, and the instant warmth it brings to everyone’s face. Whether you’re baking for family, friends, or just yourself (because you deserve it), I truly think you’ll love how simple and delicious this cake is. Give it a try — I can’t wait to hear how yours turns out! Don’t forget to leave a comment with your favorite variations or tips — sharing recipes is what keeps the kitchen magic alive. Happy baking!
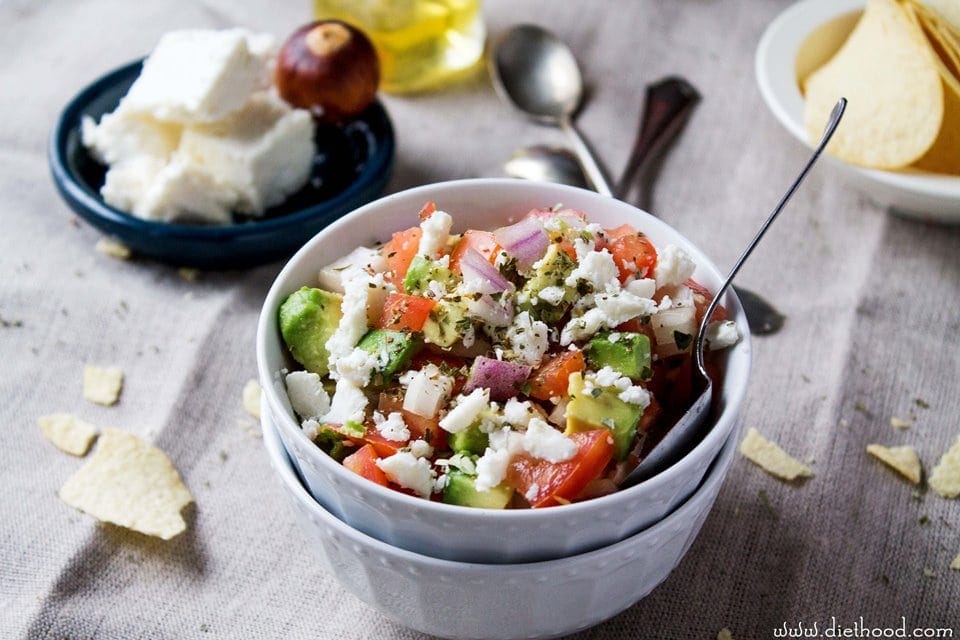
avocado feta salsa
Ingredients
Method
- Combine. In a medium bowl, combine the tomatoes, avocado, onion, garlic, parsley, oregano, oil, vinegar, salt, and pepper. Mix it all together. Give it a taste and add more salt and pepper, if needed.
- Finish and serve. Add feta, and gently mix it in. Serve right away or cover and chill for 2 hours in the fridge.


I love how avocado and feta come together in this salsa—so fresh and flavorful! Perfect for a casual dinner.
I just made this salsa and it’s incredible—so fresh and creamy! Perfect for dipping or adding to grilled fish.
This salsa sounds amazing — creamy avocado and feta in one dish? Yes, please! I’m definitely trying this soon.
I love how this salsa sounds so fresh and flavorful — perfect for a summer appetizer! Can’t wait to try it.
I love this recipe—it looks so fresh and flavorful! I’ve been wanting to try avocado salsa with feta.