
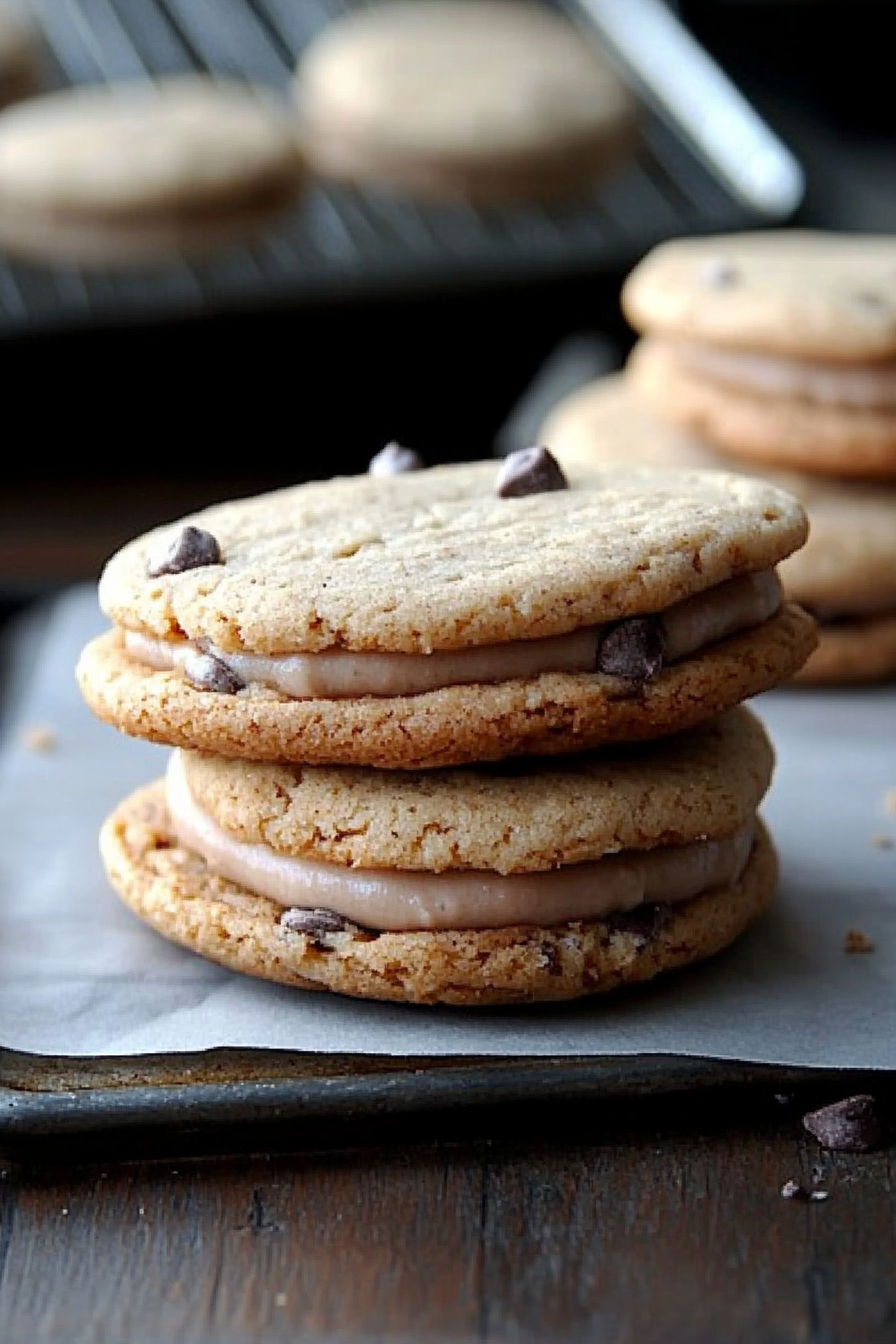
Easy Chocolate Cookie Sandwiches with Nutella
There’s something irresistibly cozy about my grandma’s old kitchen—sunlight streaming through the windows, the smell of cinnamon and fresh baked goods filling the air, you know? I always do this when I want to feel connected to those quiet weekend mornings of my childhood—whipping up a batch of zucchini swirl coffee cake. It’s a treat that’s so comforting, so familiar, yet it’s incredibly simple to make. I’ve tested this recipe so many times, and I swear, the smell alone brings everyone rushing to the kitchen. My kids actually ask for this all the time, especially when I tell them it’s like a warm cinnamon hug with a little surprise of zucchini tucked inside. Trust me, this one’s a lifesaver on busy nights or when you want something homemade but don’t have hours to stand by the stove. It’s moist, flavorful, and looks adorable when you slice into it—perfect for sharing, or just indulging yourself. Let’s get baking, shall we?
What is Zucchini Swirl Coffee Cake?
Think of zucchini swirl coffee cake as the lovechild of your favorite homemade cake and a cinnamon roll. It’s essentially a tender, fluffy cake dotted with a cinnamon-sugar swirl and hidden bits of moist zucchini that keep it irresistibly tender. The name might sound fancy, but it’s super straightforward: the zucchini adds moisture and a touch of nutrition—yes, nutrition!—without overwhelming the sweet, cozy flavors. I got into making this years ago when I was experimenting with ways to sneak more veggies into my kids’ diets without them noticing. Spoiler: they never notice the zucchini! This cake is like a little secret I get to keep, and it’s become a go-to when I want a special breakfast or a quick dessert. It’s versatile enough that you can add nuts, change up the glaze, or even switch the filling to something like apple or berries if you fancy. Really, it’s just a simple, comforting treat wrapped up in a swirl of cinnamon and love.
Why you’ll love this recipe?
What I love most about this zucchini swirl coffee cake is how it balances rich flavor with casual ease. The moment you pop it in the oven, the smell hits you—cinnamon, a hint of vanilla, and that fresh zucchini aroma, all mingling into absolute comfort. It’s surprisingly easy to make; I promise, even if you’re new to baking, you can totally nail this. Plus, it’s budget-friendly—most ingredients are pantry staples, and the zucchini is a sneaky vegetable that basically pays for itself in moistness and flavor. The best part? It’s endlessly versatile. My family loves it as breakfast, but I’ve also served it as a sweet afternoon snack, and it disappears in minutes. My friends, kids, and husband all ask for seconds when I make this. This recipe’s kind of a family secret, and I’ve tweaked it over the years to get that perfect, tender crumb with just the right swirl of cinnamon. What I love most about this is how adaptable it is—you can add a splash of orange zest, swap the glaze for cream cheese frosting, or toss in some chopped nuts for crunch. Honestly, once you try making this, you’ll see: it’s one of those recipes that quickly becomes a kitchen staple.
How do I make Zucchini Swirl Coffee Cake?
Quick Overview
This zucchini swirl coffee cake is a classic that’s made all in one bowl—easy, quick, and surprisingly forgiving. You start by preparing a lightly sweet, tender batter, then swirl in cinnamon sugar and a generous handful of shredded zucchini. After layering everything in your baking pan, it’s into the oven for about 40 minutes—so cozy! The magic is in the swirl and the moistness of the zucchini. I always suggest grating the zucchini and then squeezing out some excess moisture; it makes a huge difference in keeping the cake nice and light. Once baked and cooled slightly, you drizzle on a simple glaze, and voilà—delicious, warm slices ready to eat. Honestly, what makes this recipe special is how it combines the familiar warmth of cinnamon with a surprising veggie twist, making it a hit at breakfast tables and dessert cravings alike.
Ingredients
For the Main Batter:
– 2 cups all-purpose flour (I like unbleached for better flavor)
– 1 cup granulated sugar
– 1 teaspoon baking powder
– 1/2 teaspoon baking soda
– 1/2 teaspoon salt
– 1 teaspoon ground cinnamon
– 1/2 cup vegetable oil (or melted butter for richer flavor)
– 3 large eggs (You can try with flax eggs for a vegan version, works pretty well!)
– 1 teaspoon vanilla extract
– 1 cup finely grated zucchini, excess moisture squeezed out
For the Filling:
– 1/2 cup brown sugar
– 2 teaspoons ground cinnamon
– 2 tablespoons melted butter (or coconut oil)
– 1/2 cup chopped nuts (walnuts or pecans work beautifully — optional)
For the Glaze:
– 1 cup powdered sugar
– 2-3 teaspoons milk (dairy or plant-based)
– 1/2 teaspoon vanilla extract
– A drizzle of honey or maple syrup for extra sweetness (if you like)
Step-by-Step Instructions
Step 1: Preheat & Prep Pan
Preheat your oven to 350°F (175°C). Grease a 9-inch square or round baking pan—trust me, lining it with parchment makes this a breeze—and set aside. I always do this first so I don’t forget later. If you want a more rustic look, you can also use a bundt pan, just reduce the baking time slightly and keep an eye on it.
Step 2: Mix Dry Ingredients
In a large bowl, whisk together the flour, sugar, baking powder, baking soda, salt, and cinnamon. This step ensures that everything’s evenly distributed and avoids clumps—plus, it’s the perfect place to infuse that warm cinnamon aroma right from the start.
Step 3: Mix Wet Ingredients
In another bowl, whisk the eggs, oil, vanilla, and a pinch of salt. I like to make sure the eggs are at room temperature; it mixes better. Then add the grated zucchini, mixing until well combined. I tested this with different zucchini sizes, and finely grating makes the swirl smoother and the cake more uniform.
Step 4: Combine
Pour the wet mixture into the dry ingredients. Using a gentle folding motion, mix until just combined—don’t overmix, or the cake might turn dense. It’s okay if a few streaks of flour remain, that’s what gives it the homemade charm. Overmixing is my biggest baking mistake—learned that after a few tries!
Step 5: Prepare Filling
Mix the brown sugar, cinnamon, and melted butter in a small bowl. If you’re adding nuts, stir them in here too. This filling will be layered into your batter to create that gorgeous swirl.
Step 6: Layer & Swirl
Pour half the batter into your prepared pan, spreading it evenly. Sprinkle half the cinnamon sugar mixture on top, then add the rest of the batter. Finish with remaining cinnamon sugar, then use a toothpick or skewer to swirl through the batter gently—creating a beautiful marbled effect. The goal is to get that lovely ribbon of cinnamon mixture just beneath the surface.
Step 7: Bake
Pop it into the oven and bake for about 40-45 minutes. You’ll know it’s done when a toothpick inserted in the center comes out clean. I always check around the 40-minute mark—every oven is different. The top should be golden, and the smell? Pure heaven.
Step 8: Cool & Glaze
Let the cake cool in the pan for at least 15 minutes before transferring it to a wire rack. Once it’s just warm or cooled completely, drizzle your homemade glaze over the top. I usually wait until it’s almost room temperature because the glaze sets beautifully and doesn’t slide off too fast.
Step 9: Slice & Serve
Slice with a serrated knife for clean edges, and serve with a cup of coffee or a glass of cold milk. The moist crumb and cinnamon swirl make each bite feel like a cozy hug. If you want to get fancy, sprinkle some extra cinnamon or chopped nuts on top!
What to Serve It With
This cake is pretty much the ultimate anytime treat—breakfast, brunch, or a sweet snack. I love pairing it with a strong cup of black coffee or a chai latte to complement the cinnamon. If I’m baking this for brunch, I’ll add a few fresh berries or a dollop of whipped cream; it makes the presentation look extra special. My kids love it as an after-school snack—warm slices with a little butter melting into the crumb are a total hit. On a cozy Sunday morning, I serve it alongside scrambled eggs and crispy bacon for a complete breakfast. When I serve it as a dessert, I like to dollop some whipped cream or vanilla Greek yogurt on the side, adding a little extra creaminess to balance the spices. Family traditions are full of this cake during chilly fall mornings or holiday mornings when I want something homemade without the fuss. The versatility is what keeps me coming back—no matter how often I make this, it always feels like a little gift.
Top Tips for Perfecting Your Zucchini Swirl Coffee Cake
Everyone has their own little tricks, and I’ve picked up quite a few over the years. Here are some lessons I’d love to share:
- Zucchini Prep: Always grate and then squeeze out the excess moisture. Otherwise, you end up with a soggy cake. I use a clean dish towel or cheesecloth to wring out as much water as possible—trust me, it keeps the texture perfect.
- Mixing Advice: Don’t overmix once you combine wet and dry ingredients. Stir just until incorporated. Overmixing develops gluten, which can make your cake dense instead of light and fluffy.
- Swirl Customization: Use a skewer or toothpick to create beautiful swirl patterns—try zig-zags or gentle circular motions. The visual impact makes all the difference, especially when you slice it open.
- Ingredient Swaps: Coconut oil works beautifully too—adds a subtle tropical flavor. For a lower-sugar version, reduce the sugar slightly or substitute natural sweeteners like honey or maple syrup, but keep in mind it might affect the crumb.
- Baking Tips: Every oven is different. Keep an eye on the cake after 40 minutes. If it browns too quickly, tent with foil. Use a toothpick test for doneness—these are your best friends in baking!
- Glaze Variations: For a tangy twist, mix in a bit of cream cheese into your glaze. Or switch to a lemon glaze by adding zest and juice—brightens up the whole thing and adds a fresh kick.
Honestly, the more I’ve played with this recipe, the more I love it. It’s forgiving, adaptable, and pretty foolproof once you get the basics down. And the best part? It always makes my house smell incredible, and I get to share a slice and a warm smile with someone I love.
Storing and Reheating Tips
This cake stays moist and tender for days if stored properly. I usually wrap it tightly in plastic wrap or keep it in an airtight container at room temperature for up to 2 days. If I want it to last longer, I pop it in the refrigerator—just remember to bring it back to room temperature or warm it slightly before serving, to rehydrate that lovely crumb.
If you’ve got leftovers or made it ahead of time, freezing slices wrapped individually in plastic is perfect—just defrost at room temp or give it a quick warm-up in the microwave. I don’t recommend refrigerating for more than a week, as the zucchini can sometimes affect texture over time. And if you plan to add the glaze later, hold off until serving to keep it fresh and shiny. Trust me, the glaze makes a big difference when fresh and luscious. I’ve learned to add small batches at a time so it doesn’t get too thick or runny. Experiment with slightly different amounts of milk or powdered sugar to achieve your perfect drizzle thickness.
Frequently Asked Questions
Final Thoughts
If you’re looking for a way to make your baking more personal and cozy, give this zucchini swirl coffee cake a try. It’s one of those recipes that feels like a warm hug—moist, flavorful, and a little bit sneaky with that veggie twist. Over the years, I’ve made it for friends, family, and just for myself when I need a reminder of how sweet simple pleasures can be. This cake, with its tender crumb and cinnamon swirl, is a testament to how the most humble ingredients can come together to create something truly special. Baking it feels nostalgic and rewarding, and I hope you’ll find your own little moments of joy in making it. Don’t forget to share it with loved ones—nothing beats a slice of homemade love. Happy baking, and I can’t wait to hear how yours turns out!
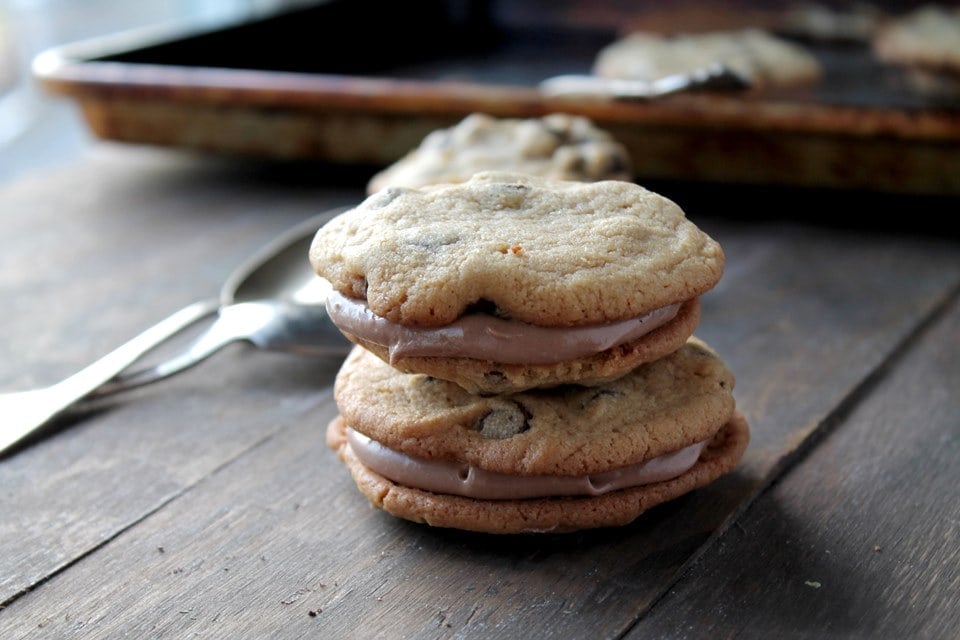
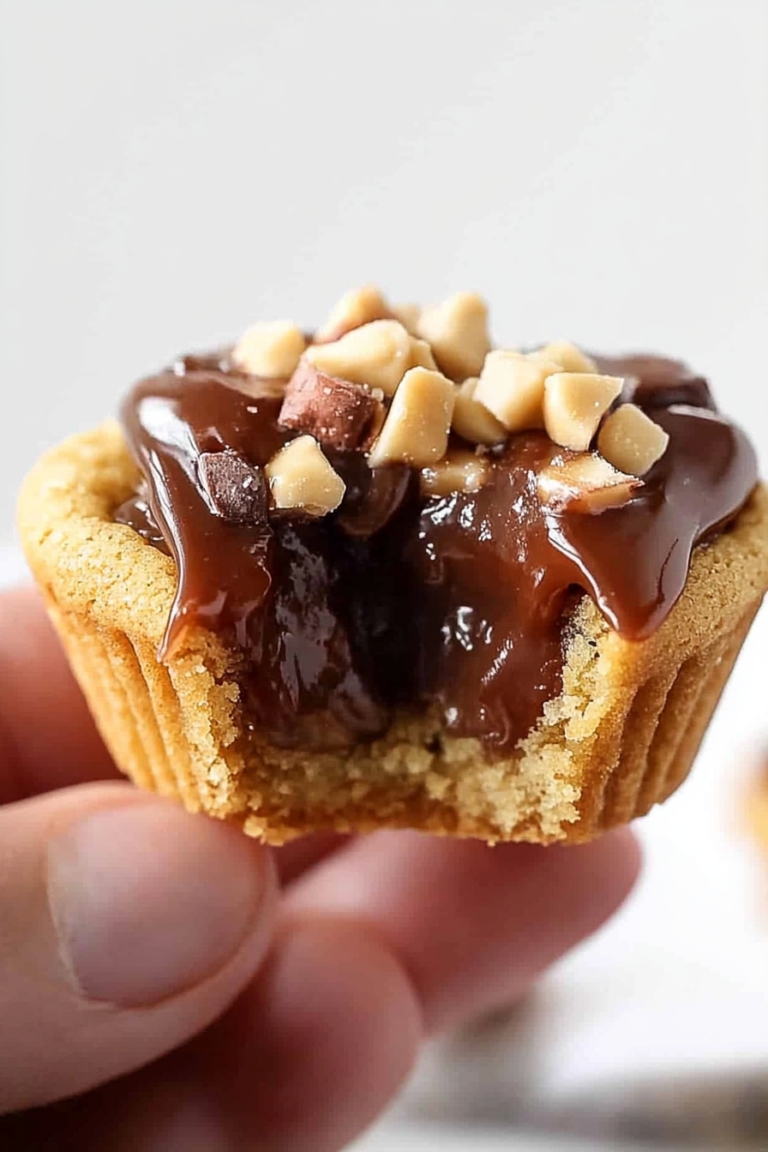
cookie sandwiches
Ingredients
Method
- Preheat oven to 350 degrees F.
- Line 3 baking sheets with parchment paper.
- Sift together flour and baking soda and set aside.
- Cream together butter, sugar, and brown sugar until fluffy.
- Add salt, vanilla, and eggs; beat until well combined.
- Gradually add dry mixture; mix well.
- Stir in chocolate chips.
- Drop rounded tablespoons of dough onto prepared sheets, 2 inches apart.
- Bake for 8-10 minutes until golden around edges.
- Cool on baking sheet for 2 minutes, then transfer to wire rack to cool completely.
- While cookies are cooling, prepare the filling by beating cream cheese and powdered sugar until smooth.
- Mix in melted white chocolate chips and Nutella until well combined.
- Refrigerate filling for 10 minutes before assembling.
- Spread filling on flat side of one cookie, then top with a second cookie.
- Refrigerate assembled sandwiches for 20 minutes to stiffen the filling.
- Serve at room temperature.

This sounds so comforting—like a warm hug in cookie form! I’ve never made these, but they look absolutely delicious.
I love this! My grandma used to bake cookies just like this—those little memories make every bite taste even better. 🍪
I love this recipe—it brings back such warm memories of baking with my grandma too! The combo of chocolate and Nutella is perfect.
I love this recipe! My grandma used to bake chocolate cookies too, and it brings back such warm memories.
I totally get it—those little homemade treats just hit different, don’t they? Nutella and cookies are a match made in cozy heaven!