

Zesty Chicken Pasta How to Make It
There’s something about the smell of baking zucchini bread—warm, spicy, and just a little sweet—that instantly transports me back to my childhood kitchen. I still remember my grandma’s tiny oven humming away as she pulled out a loaf, and the first whiff of cinnamon filling the air. It’s funny how a simple bread can carry so many memories, isn’t it? Nowadays, I make this zucchini bread whenever I need a comforting treat or a quick breakfast, and let me tell you, it’s become a household favorite. My kids ask for it all the time, and honestly, I don’t mind—especially when I sneak in those hidden zucchinis! This recipe is a lifesaver on busy nights or when friends pop over unexpectedly. The best part? It’s so easy to whip up, and the cinnamon swirl makes every slice feel like a special indulgence. Trust me, once you make this a couple of times, it’ll be right there in your regular rotation, too.
What is Zucchini bread with cinnamon swirl?
Think of zucchini bread with cinnamon swirl as the lovechild of a cozy muffin and a fragrant coffee cake. It’s essentially a moist, tender loaf packed with grated zucchini, which keeps it super soft and subtly nutritious. The swirls of cinnamon and sugar run through the batter like flavor little rivers, giving each slice a warm, spicy kick. The name itself is pretty straightforward—it’s bread made with zucchini, but the cinnamon’s the star that elevates it from simple to spectacular. It’s a perfect way to sneak in those vegetables without anyone noticing, yet it feels like a true treat. Plus, the texture is so good—somewhere between bread and cake, moist but not dense, and with that delightful cinnamon swirl you’ll crave. Think of it as a comforting hug in baked form—something I always reach for when I want to indulge in a homemade comfort food that doesn’t feel overly guilty.
Why you’ll love this recipe?
What I love most about this zucchini bread with cinnamon swirl is how versatile and forgiving it is. It’s one of those recipes that feel like a warm hug on a busy morning or a lazy weekend afternoon. The flavor? Incredible. The zucchini keeps it unbelievably moist, while the cinnamon swirl adds that beautiful layer of deep, cozy spice. And let’s not forget how budget-friendly it is—most of the ingredients are common pantry staples, and you probably have everything you need right now. Plus, this bread is pretty much foolproof; I’ve made it with different flour blends, almond milk, or even a splash of vanilla, and it always turns out amazing. It’s perfect sliced thick for breakfast, toasted with a smear of butter, or even sliced thin and served as dessert with a drizzle of honey or a dollop of whipped cream. Honestly, what I love most about this is how it feels like a little bit of homemade magic—something I’ve made countless times and that never fails to make my house smell incredible. My kids actually ask for seconds, and I always do this when I need a little comfort or a quick snack. Plus, it’s great for sharing—there’s nothing quite like a slice of warm zucchini bread to make someone’s day better.
How do you make Zucchini bread with cinnamon swirl?
Quick Overview
This zucchini bread with cinnamon swirl comes together quickly—no complicated steps, just a simple mixing bowl and a loaf pan. It starts with shredding zucchini (which I always do by hand—it’s satisfying), then mixing it into a moist batter spiced with cinnamon, vanilla, and a touch of nutmeg. Once the batter is ready, I pour half into the loaf pan, sprinkle on a cinnamon-sugar mixture, then layer the rest of the batter on top. A quick swirl with a skewer or knife creates those lovely cinnamon streaks. Pop it in a preheated oven, bake until golden, and you’re practically at the finish line. The aroma alone will have everyone in the house wandering to the kitchen!
Ingredients
For the Main Batter:
– 2 cups grated zucchini (about 2 medium zucchinis)
– 1 ½ cups all-purpose flour (or gluten-free flour blend)
– 1 teaspoon baking powder
– ½ teaspoon baking soda
– 1 teaspoon ground cinnamon
– ¼ teaspoon nutmeg
– ½ teaspoon salt
– ½ cup granulated sugar
– ½ cup light brown sugar (packed)
– ½ cup vegetable oil (or melted coconut oil for extra flavor)
– 3 large eggs
– 1 teaspoon vanilla extract
For the Filling:
– ¼ cup granulated sugar
– 1 ½ teaspoons ground cinnamon
– A pinch of salt (if you like it a bit more flavorful)
For the Glaze:
– ½ cup powdered sugar
– 1-2 teaspoons milk or cream
– A tiny splash of vanilla (optional)
*(You can also skip the glaze or swap it with simple honey or maple syrup for less fuss)*
Step-by-Step Instructions
Step 1: Preheat & Prep Pan
Set your oven to 350°F (175°C). Grease a standard 9×5-inch loaf pan generously with butter or non-stick spray, then dust it lightly with flour or line it with parchment paper. Trust me, this makes all the difference when you’re trying to remove the bread without crumbling it.
Step 2: Mix Dry Ingredients
In a large bowl, whisk together the flour, baking powder, baking soda, cinnamon, nutmeg, salt, and sugars. This step ensures even distribution of spices and leavening agents. I’ve learned that dry ingredients should be well combined—otherwise, you might find uneven pockets of baking soda or cinnamon in your bread.
Step 3: Mix Wet Ingredients
In a separate bowl, beat the eggs, then add the oil and vanilla. Mix until smooth. I like to do this in a large mixing jug or bowl, so I can easily pour everything at once later. The eggs should be at room temperature for best results, but honestly, I’ve made this with cold eggs and it still works fine—just mix a little longer.
Step 4: Combine
Pour the wet into the dry ingredients—gently folding with a spatula or spoon just until combined. Overmixing can make the bread dense, so just stir enough for everything to come together. The batter will be thick and a little lumpy—perfectly okay!
Step 5: Prepare Filling
Mix the sugar, cinnamon, and a pinch of salt in a small bowl. Set aside. This cinnamon-sugar mixture will give your bread that irresistible swirl—trust me, it’s worth the extra minute.
Step 6: Layer & Swirl
Spread half of the batter into your prepared loaf pan. Sprinkle half of the cinnamon-sugar mixture evenly over the batter, then add the remaining batter on top. Use a knife or skewer to gently swirl through the batter—creating those beautiful cinnamon ribbons. It’s a little messy, but I promise, it’s fun to see the marbled effect emerge!
Step 7: Bake
Pop the loaf into the oven and bake for 50-60 minutes, or until a toothpick inserted in the center comes out clean. Honestly, every oven is different, so start checking around the 50-minute mark. If the top gets too brown but the center’s not cooked yet, cover loosely with foil.
Step 8: Cool & Glaze
Let the bread cool in the pan for about 10 minutes before transferring it to a wire rack. If you’re glazing, mix the powdered sugar with milk and vanilla until smooth, then drizzle it over the cooled loaf. The glaze adds a little extra sweetness and a glossy finish—looks pretty and tastes delicious.
Step 9: Slice & Serve
Once fully cooled, slice thickly and serve. Warm or at room temp, with a pat of butter or a shmear of cream cheese. This bread is also delightful toasted the next day. You can store leftovers wrapped tightly in foil or a sandwich bag, and it keeps beautifully in the fridge for a few days. Reheat slices gently in the toaster or oven for a fresh-from-the-oven feel.
What to Serve It With
This zucchini bread with cinnamon swirl plays well with everything—breakfast, brunch, or even as a cozy dessert. For breakfast, pair it with a hot cup of coffee or tea, and maybe a smear of homemade jam or honey. I love serving it sliced thick, toasted gently, and topped with a pat of butter melting into all those cinnamon pockets. It’s also fantastic as part of a brunch spread alongside fresh fruit, Greek yogurt, and scrambled eggs. My family loves it as an afternoon snack, with a glass of cold milk or a mug of spiced chai. And at the end of a meal, a slice with a drizzle of honey or a dollop of whipped cream really elevates it to dessert status. I’ve even taken slices to potlucks—it’s always the first to disappear—and the best compliment? My kids ask for it for breakfast even on weekends.
Top Tips for Perfecting Your Zucchini Bread with Cinnamon Swirl
After making this countless times, I’ve picked up a few tricks to make it really shine. First, squeezing out excess moisture from the zucchini is key. I do this by placing grated zucchini in a clean kitchen towel and giving it a good squeeze—no one wants soggy bread! A common mistake is to overmix once the wet ingredients hit the dry; just fold until it looks barely combined—that’s when the texture stays light and fluffy. For the cinnamon swirl, I like using a little less sugar when I want a more subtle spice, but if you’re a cinnamon enthusiast, double down! To ensure even distribution of the swirl, sprinkle the cinnamon mixture evenly, then swirl gently but thoroughly—I’ve learned that rushing this step can lead to uneven patterns. If you don’t have all-purpose flour, you can try a gluten-free blend, but keep in mind it might affect the texture slightly. When baking, I always put the loaf on the middle rack and check for doneness a little early if your oven runs hot. The toothpick test is foolproof—if it comes out moist but not wet, you’re good! For glazing, I found that drizzling while the bread is still slightly warm helps it set beautifully—so don’t wait too long. And finally, if you want to get fancy, add chopped nuts or chocolate chips to the batter—my family loves it with a handful of walnuts or a sprinkle of mini chocolate chips—it’s like a little celebration in every bite.
Storing and Reheating Tips
This loaf keeps surprisingly well, especially if stored properly. I like to wrap it tightly in plastic wrap or foil and keep it at room temperature for up to two days—after that, it’s best to move it to the fridge. If you’re planning to enjoy it a little later, wrapped leftovers will stay fresh for about 4-5 days in the fridge. Reheating is simple: just pop a slice in the toaster or warm it briefly in the oven at 300°F (150°C) for about 5 minutes. The smell throughout your house when it’s warming up is almost as good as fresh-baked!
For longer storage, this bread freezes beautifully. Wrap it well in plastic wrap, then foil, and store for up to 3 months. Thaw at room temperature or reheat gently in the oven. I’ve tested this with slices and whole loaves, and it keeps almost as soft as when freshly baked upon reheating. A quick tip—if you’re freezing with glaze, add it only when serving, so it stays shiny and fresh.
Frequently Asked Questions
Final Thoughts
This zucchini bread with cinnamon swirl has become my go-to when I want something warm, comforting, and slightly wholesome. Its moist texture, fragrant cinnamon ribbon, and tender crumb make it stand out from plain bread. I love how versatile it is—perfect for breakfast, an afternoon snack, or even a cozy dessert. Plus, it’s a great way to get the kids to eat their veggies without a fuss! Each time I make it, I find myself taking a deep breath as the smell fills the house—there’s truly nothing quite like it. If you give it a try, I’d love to hear how yours turns out. Feel free to experiment with add-ins like nuts or chocolate chips—sometimes, a little twist makes it even more special. Happy baking, friends! And remember, food made with love always tastes better.
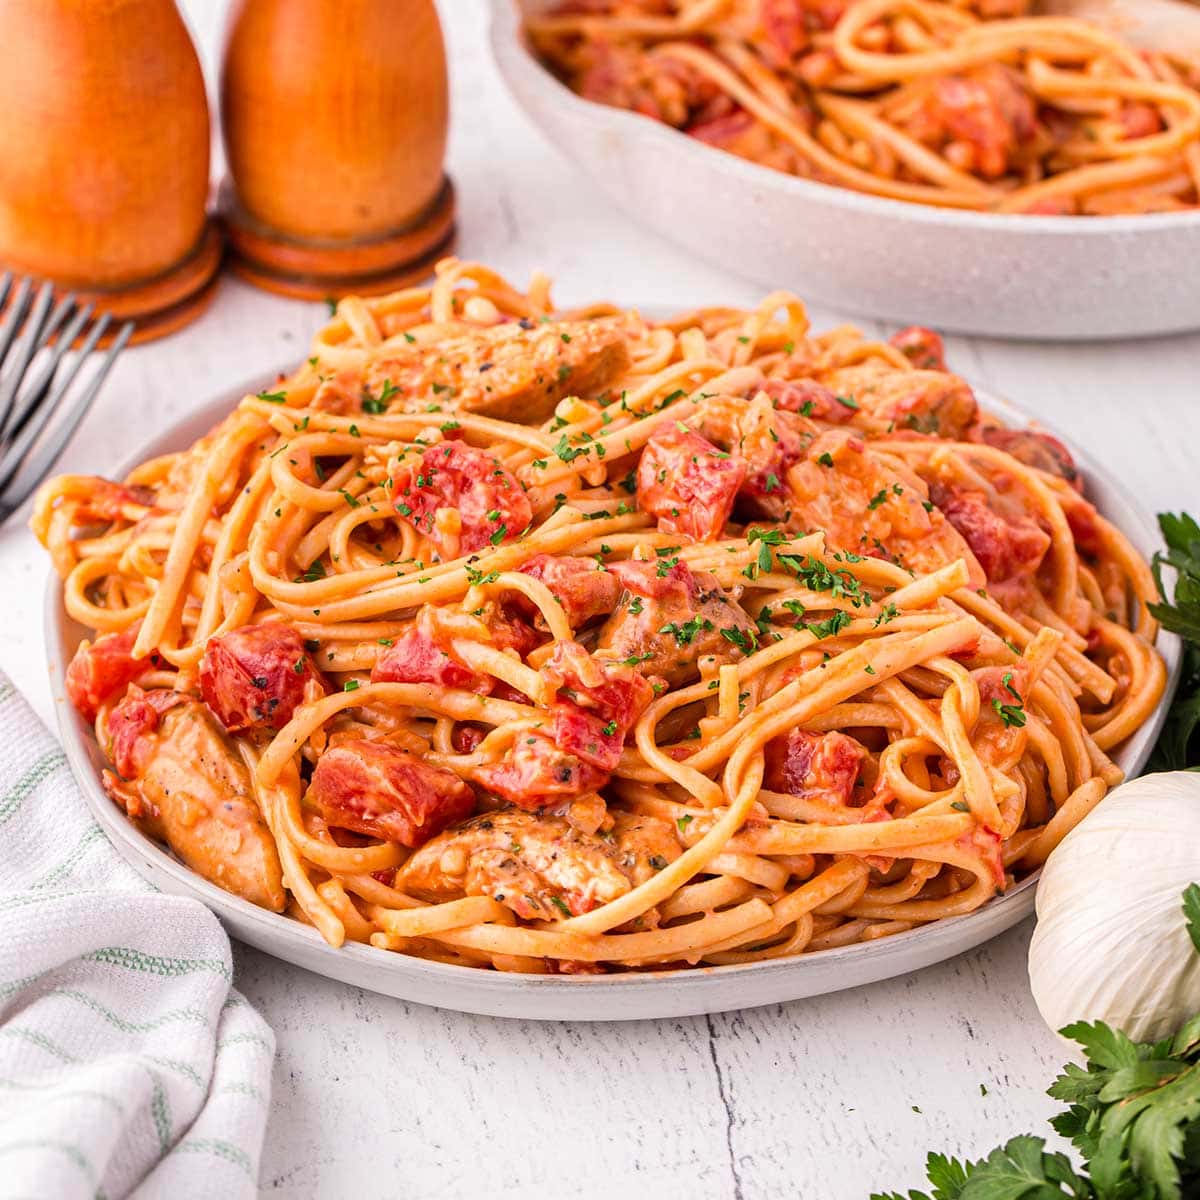
spicy chicken pasta
Ingredients
Method
- Cook the linguine pasta according to the manufacturer's directions and reserve ½ cup of pasta water. Set aside.
- In a small bowl, mix Italian seasoning and chili powder.
- Gently sprinkle and press seasoning mixture onto each side of the chicken breasts.
- In a large skillet over medium heat, melt the butter and cook the chicken breasts for about 5 minutes each side until internal temperature reaches 165°F. Slice into 1-inch strips and set aside.
- Return to the skillet on medium heat, pour in chicken stock, scrape any bits from the bottom, add minced onion, and cook until translucent, about 3 minutes.
- Add minced garlic, cook for about 2 minutes until fragrant.
- Pour in fire roasted tomatoes and tomato paste. Stir frequently until well combined.
- Add salt and chili flakes, stir well.
- Stir in heavy cream and bring to a simmer, cook for 2-3 minutes until heated through and slightly thickened.
- Turn off heat. Add cooked pasta to the skillet, mix well. If needed, add reserved pasta water to thin the sauce.
- Serve topped with sliced chicken, optional parmesan cheese, basil, and parsley.


This recipe sounds amazing—zesty chicken pasta is perfect for a cozy dinner! Can’t wait to try it.
I love that nostalgic scent! It really does bring back such warm memories. Great post—thanks for sharing!