
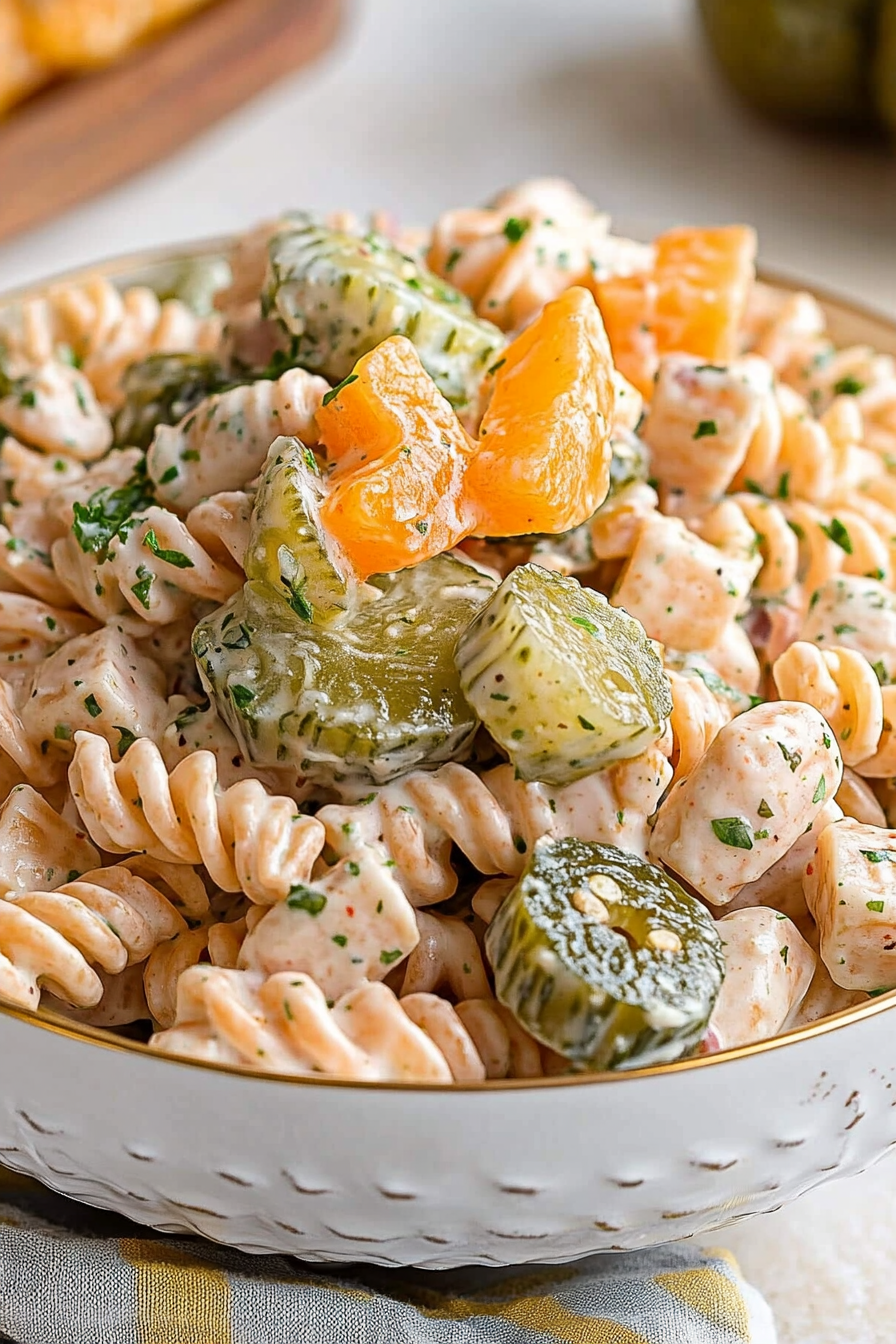
Tangy Pickle Pasta Salad Recipe
If you’ve ever reached for a slice of something sweet late at night, only to be disappointed by how heavy or overly rich it can be, let me tell you — this zucchini swirl cake is a game-changer. I first made it on a whim, thinking, “Well, I have some zucchinis… why not?” I was pretty skeptical at first—classic “what’s the point of sneaking vegetables into cake” thought. But once I took that first bite, I knew I’d stumbled onto something special. It’s incredibly moist, with just the right hint of sweetness, and the swirls of flavor make every piece feel like a little masterpiece. Honestly, this one’s a lifesaver on busy nights or when I want something sweet but don’t want to go all-out baking a hefty cake. My kids ask for this all the time—yep, it’s that good—and I love how sneaky and delicious it is. Plus, I’ve tested it with almond milk instead of regular milk, and trust me — it makes it even creamier. It’s like a cozy hug you can eat, everyone in the family loves it, and I always do this when I want a treat without the guilt.
What is Zucchini Swirl Cake?
This zucchini swirl cake is basically a friendly, down-to-earth quickbread meets a layered dessert kind of situation. Think of it as a beautiful marbled loaf that’s soft, tender, and packed with hidden veggies—no one will ever guess! Its origins are totally humble—it’s a cozy family recipe I fiddled with over the years, trying to make something both wholesome and irresistible. The “swirl” part? It’s just swirled with a sweet cinnamon-spiced filling that resembles a cinnamon roll but in cake form. It’s essentially a sneaky way to get more veggies in and satisfy that sweet tooth at the same time. Think of it as a cross between carrot cake and a coffee cake, but with zucchini instead of carrots. It’s a versatile treat you can enjoy anytime — breakfast, brunch, afternoon snack, or even as a quick dessert. The best part? It’s so easy that even my busy mornings feel a little more special when I make this.
Why you’ll love this recipe?
Honestly, what I love most about this is that it’s truly foolproof—every time I make it, it turns out just right. The flavor? Oh wow, it’s just sweet enough with a hint of cinnamon and that buttery aroma that fills up the kitchen. The zucchini keeps everything super moist, so even a day or two later, it stays tender as if it’s fresh from the oven. I always do this when I want to bake something that feels fancy but isn’t complicated—this feels like a little baking magic in every bite. Plus, it’s cost-effective since zucchini are so cheap and in season right now. And versatility? You bet. You can add nuts, swap out the filling’s flavor—orange zest, chopped walnuts, a dash of nutmeg—whatever you like. My friends have even tested it with gluten-free flours, and it still comes out moist and lovely. It’s perfect in the morning with coffee, a quick lunchbox treat, or a cozy weekend brunch for friends. Honestly, what makes this stand out is how you feel when you’re slicing it—like sharing a little piece of comfort with your loved ones.
How do I make Zucchini Swirl Cake?
Quick Overview
Making this cake is a breeze—promise. You’ll start by grating the zucchini and squeezing out some moisture (don’t skip this step; it’s key to a tender crumb). Mix your dry ingredients—flour, baking powder, cinnamon—and set them aside. Whisk together your wet ingredients—eggs, sugar, butter, and milk (or almond milk). Fold everything together without overmixing, then pour half the batter into your pan. Spread your cinnamon-sugar filling over, then layer the rest of the batter on top. Use a knife or skewer to swirl the layers into a pretty marbled effect. Bake until a toothpick comes out clean—it’s that simple. Cool, glaze if you want, then slice and enjoy. This method is so straightforward, you’ll find yourself making it again and again—and with good reason!
Ingredients
For the Main Batter:
– 2 cups all-purpose flour (or gluten-free blend if needed), sifted
– 1 teaspoon baking powder
– 1 teaspoon ground cinnamon
– ¼ teaspoon salt
– ½ cup unsalted butter, softened (or coconut oil for dairy-free)
– 1 cup granulated sugar (or coconut sugar for a healthier twist)
– 2 large eggs
– ½ cup milk or almond milk
– 1 teaspoon vanilla extract
– 1 cup grated zucchini (about 1 small zucchini)
For the Filling:
– ¼ cup brown sugar
– 1 teaspoon ground cinnamon
– 2 tablespoons softened butter
– Optional: chopped nuts or chocolate chips
For the Glaze:
– ½ cup powdered sugar
– 1-2 teaspoons milk or lemon juice
– A splash of vanilla (optional)
Step-by-Step Instructions
Step 1: Preheat & Prep Pan
Set your oven to 350°F (175°C). Grease a loaf pan with butter or cooking spray and line it with parchment paper if you like for easy removal. Now’s a good time to grate the zucchini—aim for about 1 cup—and sprinkle a pinch of salt on it. I always do this first so I can squeeze out excess moisture while I gather my other ingredients. Wet zucchini can make your cake lighter and more tender—trust me, it’s worth the extra minute.
Step 2: Mix Dry Ingredients
In a medium bowl, whisk together the flour, baking powder, cinnamon, and salt. This ensures everything is evenly distributed and prevents clumps. I’ve made the mistake of forgetting this step and had uneven pockets of baking powder or cinnamon—lesson learned.
Step 3: Mix Wet Ingredients
In a large bowl, cream together the softened butter and sugar until fluffy—this is where your aroma starts building. Add eggs one at a time, mixing well after each. Stir in vanilla and milk. The mixture should look smooth, and the sugar should have mostly dissolved. If your eggs are cold, it might take a little longer—no worries, just give it a few extra seconds.
Step 4: Combine
Gradually fold the dry ingredients into the wet, mixing gently until just combined. Don’t overmix here—or your cake might turn out dense. Just fold until the streaks of flour disappear. It’s okay if there are a few lumps—that keeps it tender.
Step 5: Prepare Filling
Mix the brown sugar, cinnamon, and softened butter together until crumbly. This will be your swirl. For a more indulgent touch, toss in some chopped nuts or chocolate chips—you decide! I always keep some chopped walnuts handy, but chopped dark chocolate is a cozy addition too.
Step 6: Layer & Swirl
Pour half of the batter into the pan. Spread the cinnamon-sugar filling evenly over. Then add the remaining batter on top and gently spread it out. Now, grab a butter knife or a toothpick and swirl through the batter—go slowly to get pretty marbled streaks. This part is my kid’s favorite—they love watching the swirl turn out perfect.
Step 7: Bake
Pop it in the oven and bake for about 45-50 minutes, or until a toothpick inserted in the center comes out clean. Ovens vary, so start checking around 45 minutes. If it browns too quickly on top but isn’t done inside, tent it with foil and finish baking. Your house will smell divine—like cinnamon and fresh baked goodness.
Step 8: Cool & Glaze
Once baked, let it cool in the pan for about 15 minutes. Transfer to a wire rack and let it cool completely before glazing. Mix powdered sugar with a splash of milk or lemon juice until you get a smooth drizzle-ready consistency. I love a little lemon juice—adds a bright contrast to the sweet and cinnamon.
Step 9: Slice & Serve
Use a serrated knife for neat slices. This cake is lovely warm or at room temperature. I like serving it with a cup of hot coffee or tea—perfect for a cozy morning or lazy weekend brunch. Bonus: leftovers slice up beautifully for packed lunches or quick snacks.
What to Serve It With
Honestly, this cake is like a blank slate—you can dress it up or keep it simple. For breakfast, it pairs wonders with a warm mug of coffee—think cinnamon-laced aroma waking up your senses. A dollop of Greek yogurt or a splash of cream on the side takes it to another level. During brunch, serve slices with fresh berries and a dusting of powdered sugar, or add a little whipped cream for that brunch-party vibe. If you’re using this as an after-dinner treat, a drizzle of caramel or a scoop of vanilla ice cream makes it feel extra special. For a cozy snack, I often just cut a thick slice, slather it with butter, and sit on the porch watching the sunset. It’s comfort food at its best, with a little veggie sneaked in—score!
Top Tips for Perfecting Your Zucchini Swirl Cake
After making this dozens of times, I’ve picked up a few tricks. First, worry less about the zucchini’s moisture; just squeeze out as much as you can after grating—this is the secret to a light crumb. I’ve tested it with almond milk, and honestly, it made the cake even richer and creamier without losing flavor. When mixing, gentle folding is key—overmixing can make the texture dense, and no one wants that.
For the swirl pattern, I recommend a slow, circular motion with a knife—a lazy figure-eight works beautifully. Want to customize the filling? Play around with spices—nutmeg, cardamom, or even a splash of orange zest. My biggest tip? Keep an eye on the baking time because ovens differ, and a dry toothpick can fool you. I’ve found that tenting the top with foil if it gets too dark keeps it from burning while the inside finishes baking.
Glaze variations are fun—try adding a splash of bourbon or vanilla for extra flair. If you want a no-glaze approach, sprinkle with a little extra cinnamon or finish with a dusting of cocoa powder. And don’t forget to let it cool completely before slicing—you’ll get cleaner pieces and a better presentation. Little things like that can make all the difference, and trust me, after a few tries, you’ll feel like a pro at this.
Storing and Reheating Tips
This cake stays moist and delicious for several days—really, I’ve kept it for up to 4 days without any trouble. Store it in an airtight container at room temp for 1-2 days, covered loosely with foil or a paper towel. If you need it to last longer, fridge it—wrapped tightly—to keep it fresh. I prefer eating it within two days because the flavors really shine fresh, but it’s still good for a day or two longer if sealed properly.
Want to freeze it? Wrap it well in plastic wrap, then foil. It’ll last up to 3 months. Thaw overnight in the fridge, then bring to room temp before slicing. As for reheating, I pop slices in the microwave for 15 seconds—just enough to warm the center without drying out—and that melts the glaze a little, making every bite deliciously gooey. If you don’t glaze it, just warm it gently to rekindle that fresh-out-of-the-oven smell. Remember, don’t overheat—trust me, that’s how you get dry, crumbly leftovers.
Frequently Asked Questions
Final Thoughts
This zucchini swirl cake is truly one of those recipes that sneaks comfort and health into the same bite. It’s easy, forgiving, and endlessly customizable—perfect for when you want something sweet but don’t want to feel weighed down afterward. Plus, cooking it always reminds me of my grandmother’s kitchen—warm, inviting, and filled with the smell of cinnamon and fresh baked happiness. I’ve tested it with different oils, flours, and fillings, and it never fails to bring a smile. Honestly, I think you and your family will love it as much as we do. So go ahead, give it a try—relax, have fun, and let that batter be your canvas. Happy baking!
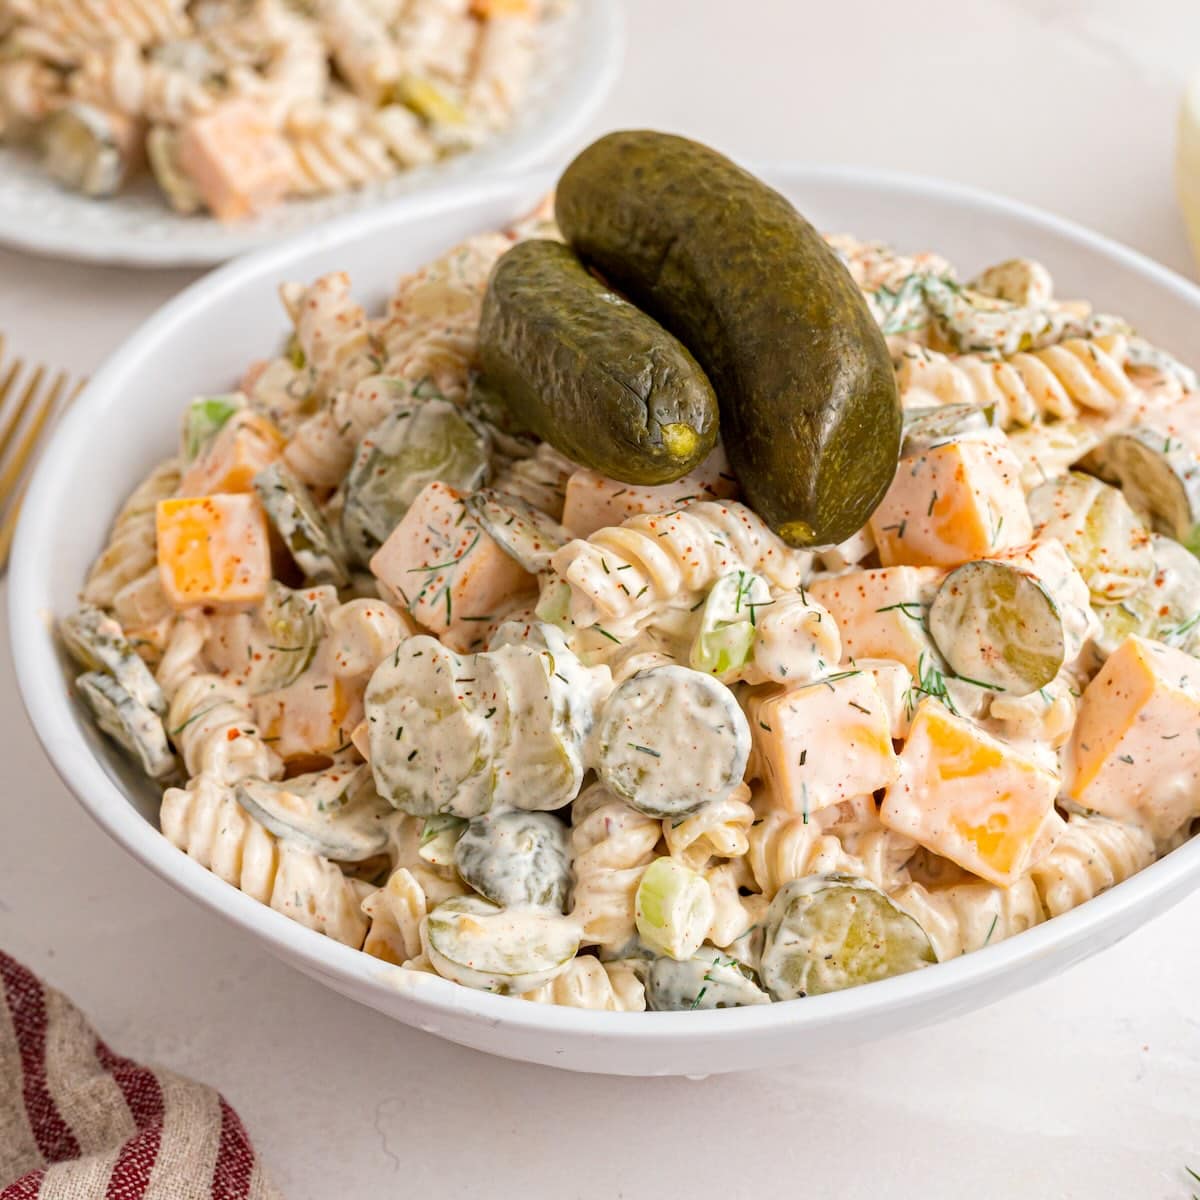
pickle pasta salad
Ingredients
Method
- Bring a large pot of water to a boil. Add the rotini and cook until al dente, about 8-10 minutes. Drain and rinse with cold water to stop cooking.
- In a large bowl, combine sliced pickles, diced cheddar, chopped onion, green onion, and 2 tablespoons of chopped dill. Mix well.
- In a separate bowl, whisk together mayonnaise, sour cream, dill pickle juice, onion powder, salt, pepper, and chipotle powder to make the dressing.
- Add the cooled pasta to the bowl with the pickles and cheese. Pour the dressing over the mixture and stir until evenly coated.
- Cover and refrigerate for at least 1 hour before serving to allow flavors to meld.

I love this recipe idea—tangy pickles in pasta salad sound refreshing! Have you tried adding dill or mustard for extra flavor?
I love this recipe—perfect balance of tang and crunch! Finally a pasta salad that satisfies my late-night cravings without feeling heavy.
I totally get that craving for something tangy instead of heavy—this sounds perfect for satisfying it in a light way!