
Honeycomb Pasta Cake How to Make It
There’s something about summer mornings when my garden is bursting with fresh zucchini that always makes me reach for my favorite chocolate chip zucchini bread recipe. But honestly, as much as I love a loaf, there’s a cozy specialness to a slice of zucchini cake—moist, tender, and just the right amount of sweet. It’s the kind of dessert (or breakfast, I won’t judge) that always feels like a warm hug from old friends. I’ve made this cake countless times—sometimes quick with a simple dusting of powdered sugar, other times dressed up with a glossy glaze—and each version seems to disappear in minutes at my house. My kids ask for this all the time, and truthfully, I do too. It’s surprisingly easy, and I promise, it’s a little magic how those tiny green specks bake into the fluffiest batter. Plus, it’s an excellent way to sneak in veggies without anything feeling heavy or health-focused. This zucchini cake is one of those recipes I keep close because it always saves me on busy nights when dessert has to be both quick and a little special. Trust me on this—your kitchen will smell incredible, and everyone will be asking for seconds!
What is a Moist Zucchini Cake with Creamy Glaze?
This moist zucchini cake with creamy glaze is like a warm, comforting hug wrapped in gentle layers of tender sponge and sweet topping. Think of it as a mature, slightly elegant cousin of your standard carrot cake—only here, zucchini takes center stage, adding moisture and a subtle sweetness without overpowering. The concept is simple: grate fresh zucchini into a flavorful batter, which keeps the cake extra moist without any fuss. The name comes straight from the texture—moist and soft, yet with a hearty, veggie-friendly twist. It’s essentially a sneaky way to get kids (and grown-ups) to enjoy a slice of cake that’s not too sweet or heavy, all while feeling pretty indulgent. The glaze adds just the right finishing touch—silky, slightly sweet, and with a hint of vanilla or lemon. It’s like the cherry on top of your homemade dessert. This cake is perfect for gatherings, afternoon coffee, or even a cozy weekend treat—simple enough for a weekday and elegant enough to serve to friends.
Why you’ll love this recipe?
What I love most about this zucchini cake is how effortlessly delicious it is. The flavor is subtly sweet with just a hint of earthiness from the zucchini—something that makes each bite interesting, yet comforting. It’s a real crowd-pleaser, and honestly, I’ve tested it with a few tweaks (like swapping in almond milk or honey), and it always turns out fantastic. It’s also incredibly simple to make—no complicated techniques or fancy equipment needed. Just a trusty bowl, a box grater, and a whisk, and you’re good to go. Budget-wise, it’s a win because most of the ingredients are pantry staples—flour, sugar, spices, and zucchini—and if you’re like me, you probably have these items right now! Plus, this recipe is super versatile. You can dress it up with nuts, swirl in some chocolate chips, or keep it classic with just the glaze. What I love most about this is that it’s a one-bowl wonder that’s perfect for those nights when you need something sweet but don’t want to spend hours in the kitchen. And honestly, the smell alone is enough to make everyone gather around the oven!
How do I make Zucchini cake with cream?
Quick Overview
This cake starts with grating fresh zucchini and mixing it into a simple batter with flour, sugar, eggs, and warm spices. The batter comes together quickly—no need for fancy equipment or long waits. You pour it into a prepared cake pan, swirl in your preferred filling or add-ins if you like, and bake until golden. After cooling a bit, a silky glaze is drizzled over the top, giving it a little shine and extra sweetness. It’s all about keeping things straightforward: moist, tender, and topped with something that feels like a treat. Best of all, the cake stays beautifully moist for days, and the glaze makes it look fancy without much effort. This is a recipe you’ll want to keep in your back pocket for those busy weeknights or cozy weekends when baking feels like a warm hug. Trust me, it’s a go-to that everyone will love!
Ingredients
For the Main Batter:
– 2 cups grated zucchini (about 2 medium zucchinis)
– 1 ½ cups all-purpose flour (I like unbleached for extra flavor)
– ¾ cup granulated sugar
– ½ teaspoon baking powder
– ½ teaspoon baking soda
– 1 teaspoon ground cinnamon
– 1 teaspoon vanilla extract
– 3 large eggs
– ½ cup vegetable oil (or melted butter if you prefer a richer taste)
– Pinch of salt
For the Filling (optional):
– ½ cup chopped walnuts or pecans
– ¼ cup chocolate chips (if you’re feeling indulgent!)
– Or swirl of fruit jam for a fruity twist
For the Glaze:
– 1 cup powdered sugar
– 2 tablespoons milk or cream
– ½ teaspoon vanilla extract
– Lemon zest (optional for a bright flavor)
Step-by-Step Instructions
Step 1: Preheat & Prep Pan
Start by preheating your oven to 350°F (175°C). Grease a 9-inch round cake pan or line it with parchment paper—this prevents sticking and keeps your cake looking perfect. I always do this first because it makes everything so much easier later. If you’re adding any special fillings or swirl patterns, prepare those now too.
Step 2: Mix Dry Ingredients
In a large bowl, whisk together the flour, sugar, baking powder, baking soda, cinnamon, and salt. It’s like giving your dry ingredients a nice warm hug—this step ensures everything’s evenly distributed and prevents clumps. I’ve learned the hard way that skipping this can lead to uneven rises or pockets of flour—trust me, do this well!
Step 3: Mix Wet Ingredients
In another bowl, beat the eggs with the oil and vanilla until well combined. Stir in the grated zucchini. I usually squeeze out or pat the zucchini dry after grating—moisture can make the batter a bit too loose if you skip this. I’ve tested this with a splash of almond milk once and it made it even creamier, but honestly, the zucchini’s enough moisture on its own.
Step 4: Combine
Pour the wet mixture into the bowl of dry ingredients. Gently fold everything together just until combined—don’t overmix! Overmixing makes the cake dense, and nobody wants that. The batter should be thick but moist, with a few tiny lumps—perfect. If you’re adding chocolate chips or nuts, fold them in now.
Step 5: Prepare Filling
If you’re using any fillings like jams, chopped nuts, or chocolate, prep them now. I like swirling a dollop of raspberry jam into the batter for a pretty marbled effect. For nuts, chop them finely and sprinkle on top or mix into the batter. Play around with what makes you happy—I’ve experimented with all kinds of mix-ins, and each adds its own fun twist.
Step 6: Layer & Swirl
Pour the batter into your prepared pan. If you’re adding fillings, spoon or drizzle them on top before baking. For a swirled effect, swirl a butter knife or toothpick through the batter to create pretty marbling. Something about the visual pattern makes every slice feel special. I’ve learned that not over-agitating the batter keeps the swirl neat and attractive.
Step 7: Bake
Pop the cake into the oven and bake for about 30-35 minutes. Test for doneness by inserting a toothpick in the center—if it comes out clean, you’re golden. Ovens can vary, so start checking at 30 minutes. I’ve had perfectly baked cakes in exactly 32 minutes, but sometimes they need a couple extra minutes, especially if I’m adding extra fillings.
Step 8: Cool & Glaze
Let the cake cool in the pan for about 10 minutes, then transfer it to a wire rack. This step is important—cooling allows the moisture to settle and prevents the glaze from melting instantly. Mix up your glaze: I usually whisk powdered sugar with milk and vanilla until smooth. If it’s too thick, add a touch more milk; if too runny, more powdered sugar. Drizzle generously over the cooled cake—the glaze will set just enough to hold a little shine.
Step 9: Slice & Serve
Use a sharp serrated knife to get clean slices. This cake is best served at room temp, and I love pairing it with a mug of black coffee or a glass of cold milk. My kids ask for extra, and honestly, I think it’s better the next day—if it lasts that long. I often keep leftovers in an airtight container for a couple of days, and it stays moist and delicious.
What to Serve It With
Honestly, this cake is so versatile, it can be anything from breakfast to dessert. For a weekend brunch, I love serving a big slice with a dollop of yogurt or a splash of cream, alongside some fresh berries. The sweetness level is just right, but if you want to make it more decadent, a scoop of vanilla ice cream or a drizzle of caramel takes it to the next level. At a dinner party, I sometimes dress it up with sliced strawberries or lemon zest on top—so simple but fancy enough to impress. My family’s favorite way? Just a mug of strong coffee and a warm slice straight from the pan. That smell alone—mmm!—brings everyone to the table. It’s perfect for a cozy afternoon snack too, especially when you’ve got some leftover zucchini from the garden. This cake has become a staple in my kitchen because it’s reliable, tasty, and just a little bit special each time.
Top Tips for Perfecting Your Moist Zucchini Cake with Creamy Glaze
Over the years, I’ve picked up a few tricks that make all the difference in making this cake totally foolproof. First, when grating zucchini, I always sprinkle a little salt on it, then let it sit for about 10 minutes before squeezing out excess moisture. The less water, the better the texture—trust me, a soggy mess is no fun. Also, I’ve made this with different flours—gluten-free blends work beautifully, just reduce the liquid a tad to keep the batter thick. When folding in fillings like nuts or chocolate chips, don’t overstir or you risk losing that lovely marbled look—gentle is key. For the swirl pattern, I use a skewer or toothpick to create gentle lines, but you can also go abstract if you prefer. I’ve tested with honey instead of sugar, and it works well—just note that it adds a slightly different sweetness level. Baking at a slightly lower temperature for a longer time can also yield a more even crumb if your oven runs hot. Lastly, make your glaze just before serving—if you make it too early, it may thicken up or thin out. Adjust with a splash of milk or powdered sugar until you get that perfect silky consistency. Every time I test a new tweak, I learn something new—like how a touch of lemon zest in the glaze adds a fresh brightness that balances the sweetness. That’s what makes this recipe special: it’s flexible enough to adapt but also so reliably delicious that I always come back to it.
Storing and Reheating Tips
This cake keeps really well, which is a blessing. If you’ll be eating it within a day or two, cover it loosely with a clean towel or store in an airtight container at room temperature. It stays moist and tender that way, and the flavors deepen just a bit overnight. If you want to keep it longer, pop it into the fridge—just be sure to cover it well so it doesn’t dry out. The fridge is good for up to 3 days, and I find that reheating slices in the microwave for about 10 seconds makes them taste just as fresh—and the glaze doesn’t crack or get gummy. For longer storage, I recommend wrapping the whole cake tightly in plastic wrap and foil, then freezing for up to 3 months. When ready to enjoy, let it thaw at room temp for a few hours—adding the glaze after thawing gives that fresh, shiny look. As for the glaze—if it’s gotten thick in storage, stir in a splash of milk or water until smooth before drizzling again. Honestly, I always say a little patience makes the cake taste even better the next day, especially once all those flavors have had time to mingle.
Frequently Asked Questions
Final Thoughts
This moist zucchini cake with creamy glaze is honestly one of those recipes I find myself going back to again and again. It’s humble enough for everyday, but the extra touches—like that shiny glaze and optional fillings—make it feel special. I love how it surprises people; most assume it’s complicated, but it’s truly a one-bowl wonder that I’ve perfected over years of baking. Every time I serve it, I get smiles and requests for the recipe—proof that comfort food doesn’t have to be complicated. It’s perfect for making ahead, adaptable with add-ins, and always brings a warm, familiar aroma to my kitchen. If you enjoy baking with a splash of nostalgia and a lot of love, I promise this cake will become part of your rotation too. Go ahead, give it a try—happy baking! And I’d love to hear how yours turns out—please leave a comment below or share your own twists on this favorite. Happy baking!
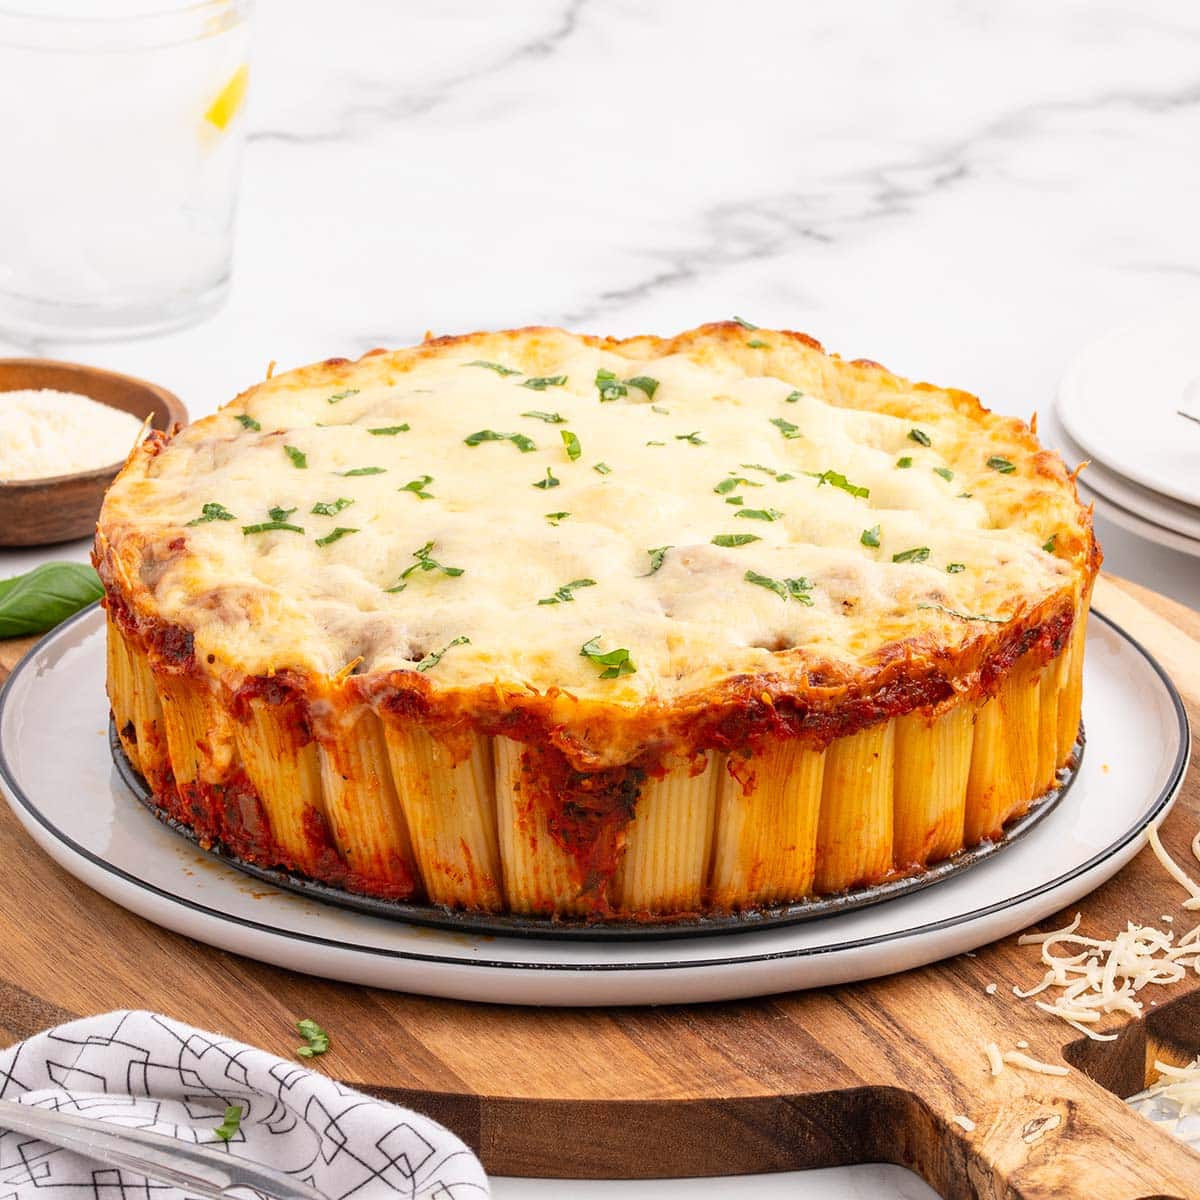
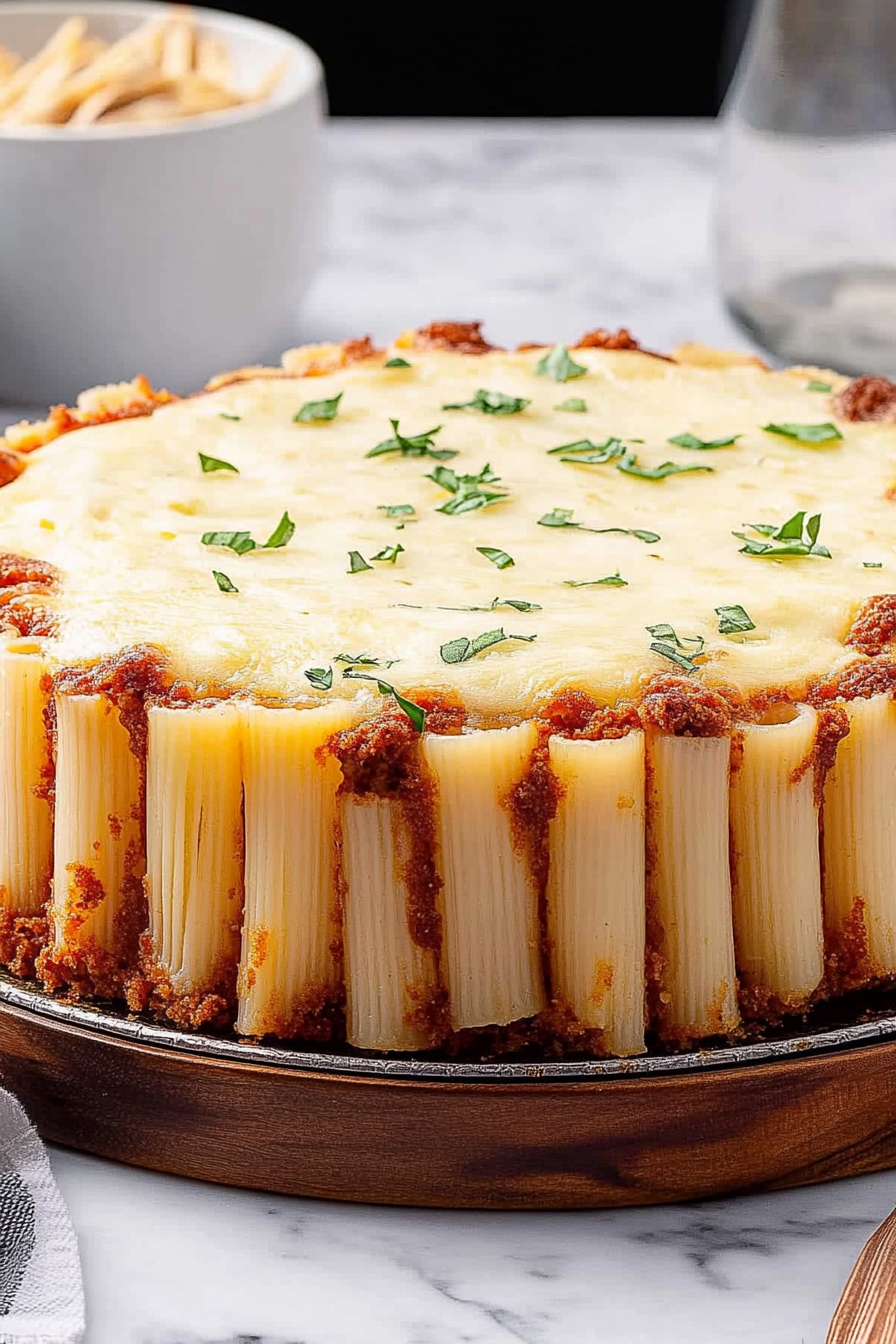
Honeycomb Pasta Cake
Ingredients
Method
- Preheat oven to 375°F. Spray a 9-inch springform pan with olive oil cooking spray on the sides and bottom. Place the pan on a large sheet tray. Set aside.
- Cook the rigatoni pasta according to package directions until al dente. Drain and return to the pot. Add olive oil and toss to coat. Allow to cool for 3-4 minutes.
- Place the cooked rigatoni standing straight up in the springform pan until they resemble a honeycomb pattern.
- Gently spoon 1 cup of marinara sauce over the openings of the rigatoni, easing the sauce into the noodles.
- Sprinkle 1 cup of shredded mozzarella into the open spaces of the noodles, dispersing evenly.
- Sprinkle grated parmesan cheese over the surface, then top with Italian seasoning.
- Spread remaining marinara sauce over the pasta, then add remaining mozzarella to cover the top.
- Cover with foil and bake for 15 minutes. Remove foil and bake an additional 15-20 minutes until golden and bubbly.
- Cool slightly, then run a knife around the edges and remove the outer ring of the springform pan.
- Garnish with chopped fresh basil, then slice and serve.
This recipe looks amazing—zucchini and chocolate chip? I’ve got to try this! Perfect for using up summer veggies.
I love how this recipe turns zucchini into something indulgent—so clever! Have you ever tried adding cinnamon?
That looks delicious! I love how creative this recipe is—turning zucchini into a chocolatey treat sounds like the perfect summer hack.