
Easy PB&J Cheesecake Bars Delight
There’s something about the smell of baked good wafting through the kitchen that instantly makes me feel at home. I remember my grandma’s house when she’d bake this cinnamon swirl coffee cake on sunday mornings, and I’d be waiting eagerly by the oven, nose pressed against the window. Over the years, I’ve tinkered with her recipe, swapping ingredients and perfecting it until now, I honestly can’t imagine a weekend without it. It’s sweet, tender, with a hint of nuttiness from the zucchini, and that glorious cinnamon swirl running through it—every bite feels like a warm hug. This recipe is a real crowd-pleaser, but what I love most about it is how simple it is to whip up, even when I’m low on time or ingredients. Plus, it’s incredibly versatile—I’ve made it with almond milk and even added chopped nuts for extra crunch. Trust me on this one, this zucchini coffee cake has become a family favorite, and I think you’ll love it just as much as we do! Recently, I tested this with a dollop of cream cheese frosting on top, and honestly, it took it to the next level. Absolutely divine!
What is Zucchini Coffee Cake?
Think of this cake as a cozy, moist treat that combines the humble zucchini—yes, zucchini!—with a classic cinnamon sugar swirl. It’s essentially a breakfast cake, a snack cake, or even a lovely dessert all rolled into one. The name might sound a bit unusual, but I promise, you won’t taste the veggies; instead, they add moisture and a sneaky veggie boost for the kids. It’s kind of like a more sophisticated banana bread, but with that irresistible cinnamon swirl that makes every slice feel special. If you’re like me, you probably have a few zucchinis hanging around in your veggie drawer, and instead of the usual zucchini fritters, I suggest giving this cake a try. The idea came from my desire to use up the garden’s bounty while creating something warm and sweet that pairs perfectly with a cup of coffee or tea. It’s a comforting recipe that’s become part of our weekend tradition, and I love that it’s something I can make into a quick breakfast or a casual afternoon treat.
Why you’ll love this recipe?
What I love most about this zucchini coffee cake is how it hits all the right notes: flavor, ease, and versatility. The flavor—oh, the flavor! The tender crumb is infused with warm spices, and the cinnamon swirl is sweet and aromatic, giving every bite a touch of magic. I’ve tested this with different types of sweeteners too—honey, maple syrup, even coconut sugar—and honestly, it’s always delicious. The best part? It’s so simple to make. No fancy equipment required; just a mixing bowl, a whisk, and a spatula. Plus, it’s budget-friendly since the ingredients are pantry staples—flour, sugar, zucchini, cinnamon, and a little oil or melted butter. This one’s a lifesaver on busy nights or when I want to surprise my kids with a homemade treat. And because it’s versatile, I’ve played around with add-ins like chopped nuts, chocolate chips, or even a crumb topping. It’s perfect when you’re craving something sweet at 10 p.m. but don’t want to turn on the oven for a full cake, or when you want to impress guests with a rustic yet refined dessert. Everyone who tries it asks for the recipe, especially after ages of making it—they say it’s like a cozy hug you can eat, warm or at room temp. I love that it’s not overly fancy but still feels special, especially with that cinnamon swirl peeking out from each slice. Honestly, I think what makes this so special is that it’s forgiving—overmixing isn’t a big deal, and you can adapt it to what you have on hand. It’s the kind of recipe I keep bookmarked because I know I can rely on it to turn out perfectly every time.
How do I make Zucchini Coffee Cake?
Quick Overview
This zucchini coffee cake is a breeze to make. You start by greasing your baking dish, then mix the dry ingredients while simultaneously whisking together the wet. The grated zucchini gets folded into the batter, giving the cake a moist, almost silky texture. Then, you prepare a cinnamon sugar mixture for that signature swirl. After layering the batter and sprinkling the cinnamon swirl in, you bake it in a preheated oven until it’s golden, fragrant, and a toothpick comes out clean. The smell alone will have everyone rushing to the kitchen. Once it’s out, I like to let it cool just enough so the glaze (if I’m using one) doesn’t slide right off. It’s a straightforward, heartwarming process—no complicated techniques, just good, honest baking that’s almost impossible to mess up.
Ingredients
For the Main Batter:
• 2 cups all-purpose flour (or a blend of whole wheat for extra fiber)
• 1 cup granulated sugar (or coconut sugar for a hint of caramel flavor)
• 1 teaspoon baking powder
• ½ teaspoon baking soda
• ½ teaspoon salt
• 1 teaspoon cinnamon
• ½ cup vegetable oil or melted butter
• 2 large eggs (or flax eggs for vegan version)
• 1 teaspoon vanilla extract
• 1 cup grated zucchini (squeeze out excess moisture)*
For the Filling:
• ¼ cup brown sugar (or coconut sugar)
• 1 tablespoon ground cinnamon
• 2 tablespoons unsalted butter (melted) or coconut oil
• Optional: chopped nuts or chocolate chips
For the Glaze:
• ½ cup powdered sugar
• 1-2 teaspoons milk (dairy or plant-based)
• ½ teaspoon vanilla extract
• A pinch of cinnamon (optional)
Step-by-Step Instructions
Step 1: Preheat & Prep Pan
Set your oven to 350°F (175°C). Grease your baking dish—either a 9-inch square or round cake pan—with butter or non-stick spray. I always line mine with parchment paper for easy lifting and cleaning. This step is simple but makes all the difference when it comes to getting that perfect clean slice without breaking apart.
Step 2: Mix Dry Ingredients
In a large bowl, whisk together the flour, sugar, baking powder, baking soda, salt, and cinnamon. Sifting isn’t necessary, but I’ve learned that whisking well ensures everything gets evenly distributed—trust me, it prevents the batter from tasting overly salty or bland in spots.
Step 3: Mix Wet Ingredients
In a separate bowl, beat the eggs, then add the oil (or melted butter), vanilla, and grated zucchini. I always do this in a big measuring cup or small bowl first—it’s way neater. The zucchini should be grated fine, and I always squeeze out the excess moisture with my hands or a clean towel. An overly wet zucchini can make the batter too loose, so step lightly with that.
Step 4: Combine
Pour the wet mixture into the dry ingredients and fold gently with a spatula until just combined. It’s tempting to overmix, but I’ve learned to stop when there’s just a few streaks of flour—overmixing can make the cake dense instead of fluffy.
Step 5: Prepare Filling
Mix the brown sugar, cinnamon, and melted butter until crumbly. If you’re adding nuts or chocolate chips, fold them into this mixture or sprinkle them on top later. I like to keep this simple, but you can also add a handful of chopped pecans or walnuts for extra crunch.
Step 6: Layer & Swirl
Spread half the batter in your prepared pan, then sprinkle evenly with the cinnamon sugar mixture. Cover with the remaining batter and gently swirl a toothpick or skewer through the layers to create a marbled effect. It’s fun to experiment with patterns here—sometimes I go for a figure-eight swirl, other times just a gentle zigzag.
Step 7: Bake
Pop it into the oven for 35-40 minutes. Keep an eye out—it should be golden on top and a toothpick inserted into the center should come out clean. If it’s browning too quickly on top, tent with foil halfway through baking. Every oven is different, so start checking at 35 minutes—better safe than overbaked!
Step 8: Cool & Glaze
Allow the cake to cool in the pan for about 10 minutes, then transfer to a wire rack. Drizzle the glaze over slightly warm cake. If you like a thicker glaze, add a little more powdered sugar. I love adding a splash of cinnamon to my glaze for an extra aromatic punch.
Step 9: Slice & Serve
Once cooled completely, slice into squares or rectangles. I like serving this slightly warm—adding a scoop of vanilla ice cream or a dollop of whipped cream on top makes it even better. It’s great with an extra dusting of cinnamon or a sprinkle of chopped nuts for presentation. Honestly, it disappears in minutes at my house, and I always get asked for the recipe!
What to Serve It With
Besides enjoying this cozy zucchini coffee cake straight from the pan, there are so many ways to serve it depending on the occasion. In the mornings, I like to pair it with a strong cup of coffee—think dark roast or a lightly spiced chai latte. The cake’s gentle sweetness balances perfectly with a hot beverage, and the kids love it with a splash of milk.
For brunch, I serve slices stacked on a pretty plate, with fresh berries on the side or a drizzle of honey. It’s a lovely centerpiece when hosting friends or family—very rustic chic! A dollop of whipped cream or a smear of cream cheese frosting (yes, I’ve done that!) takes it to the next level.
As a dessert, it’s unbeatable served warm with a scoop of vanilla ice cream or a dusting of powdered sugar. The cinnamon swirl and moist crumb are just so comforting after dinner. And, honestly, it’s the perfect snack when I need something sweet but don’t want to turn on the oven late at night.
Top Tips for Perfecting Your Zucchini Coffee Cake
Over the years, I’ve picked up a few tricks that really make this recipe shine. First, always squeeze out as much moisture as possible from the zucchini—I’ve made the mistake of skipping this step, and it made my batter way too loose. Using a gentle squeeze or even a clean towel helps remove excess water. You want just enough zucchini to keep the cake moist but not watery.
When mixing the wet and dry ingredients, fold delicately. I had a tendency to overmix at first, and the texture was dense instead of tender. Now I fold until just combined—trust me, the difference shows.
For the cinnamon swirl, I like to sprinkle it evenly and swirl gently, but you can also set aside some of the batter and alternate layers for a more dramatic marbling effect. Experimenting is part of the fun!
As for ingredient swaps, I’ve tried using honey in the batter, which added a lovely caramel flavor, and almond milk instead of regular milk—I tested this with a splash of vanilla extract, and honestly, it made the whole thing even creamier and richer.
Baking times can vary, so keep an eye on it. The toothpick test is your best friend here—bit of an art, but once you get it, you’ll know exactly when it’s done. If you find it’s browning too fast, tent with foil, and it’ll finish baking perfectly.
For the glaze, I love experimenting with flavors—adding a bit of lemon zest or a splash of bourbon can bring a new dimension. Keep the glaze slightly thick but pourable—if it’s too runny, it won’t stay on the slices well. I’ve learned these tricks after many, many attempts, and honestly, the cake gets easier each time.
Storing and Reheating Tips
This cake actually gets better the next day—firm but still moist. You can store it at room temperature, covered with foil or a cake dome, for up to two days. Just keep in mind that if it’s warm or humid, it’s best to refrigerate after the first day. Wrap it tightly in plastic wrap or store in an airtight container to keep it fresh.
In the fridge, it’ll last about 4-5 days. I recommend bringing it back to room temperature or giving it a quick warm-up in the microwave (about 15-20 seconds) before serving. It softens up and the flavors really shine.
If you want to freeze it, wrap it well in plastic wrap and then foil—this prevents freezer burn. It keeps well for up to a month. To reheat, I pop a slice in the microwave for about 20 seconds; the warmth makes it taste just baked. You can also warm slices in a low oven, covered with foil, for about 10-15 minutes.
Frequently Asked Questions
Final Thoughts
This zucchini coffee cake is more than just a way to use up zucchinis—it’s a celebration of simple, wholesome ingredients transformed into something that feels indulgent and cozy. Over the years, it’s become our go-to for lazy Sunday mornings, quick snacks, or even unexpected guests. Every time I bake it, I’m reminded of those early mornings with my grandma, the smell filling the house, and the happiness that comes with sharing something homemade. Honestly, the combination of moist zucchini, warm spices, and that cinnamon swirl makes each slice feel like a little piece of comfort. It’s forgiving, adaptable, and almost foolproof—trust me, I’ve made it so many times and never had a disappointing result. I hope you try this and find as much joy in making it as I do. Feel free to add your own twists—more nuts, different spices, or even a sweet glaze—and make it your own. Can’t wait to hear how yours turns out! And don’t forget to leave a comment, share your variations, and let me know how your baking adventure goes. Happy baking!
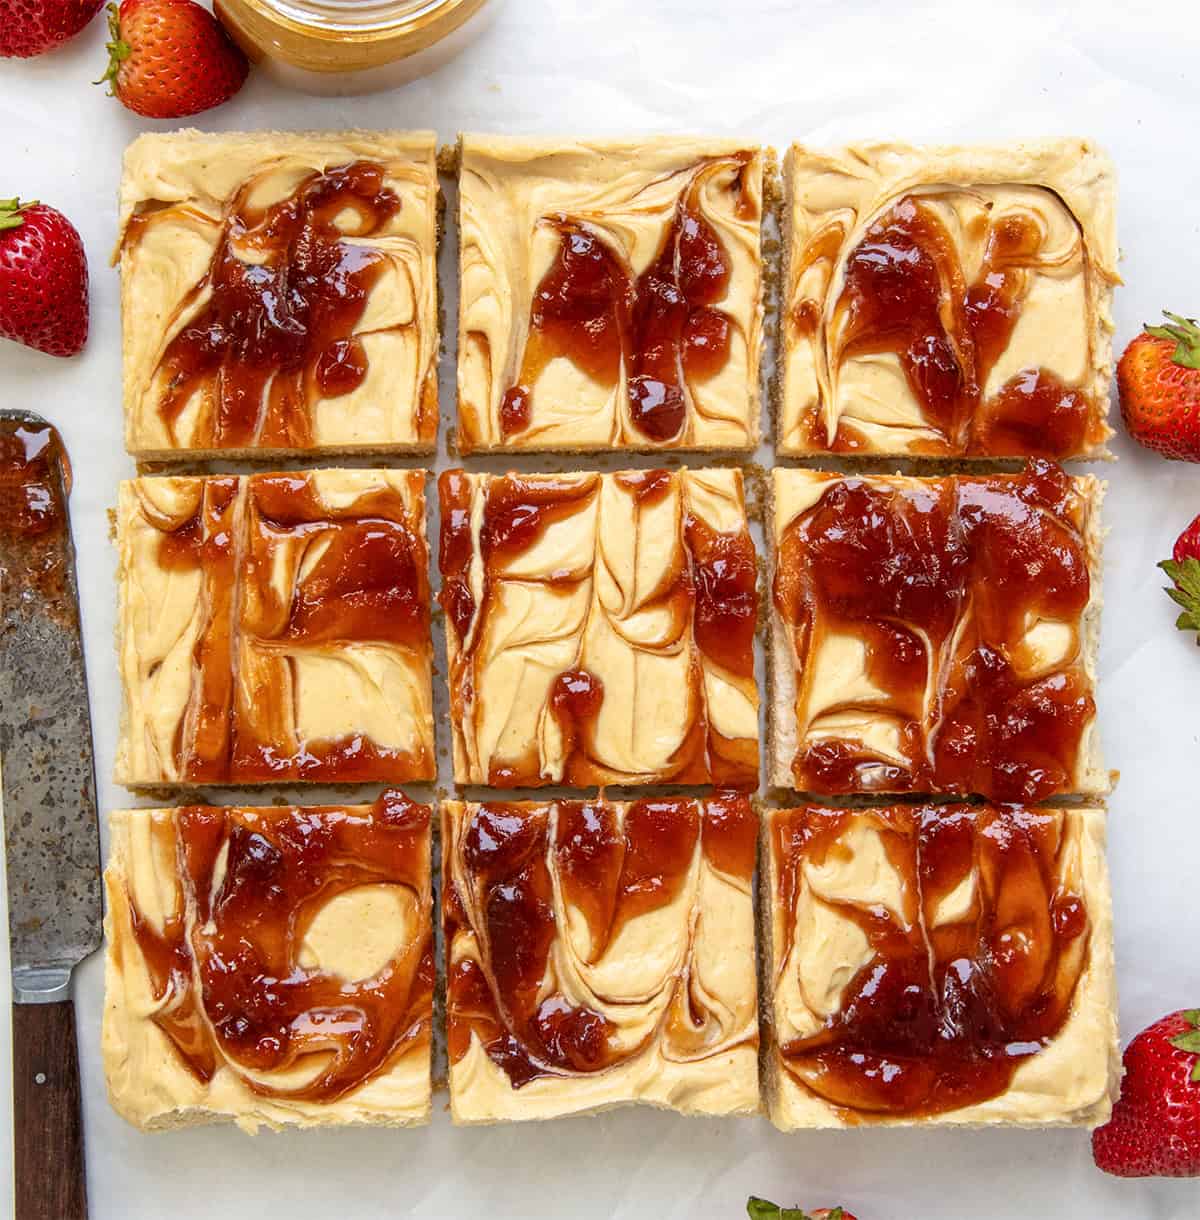
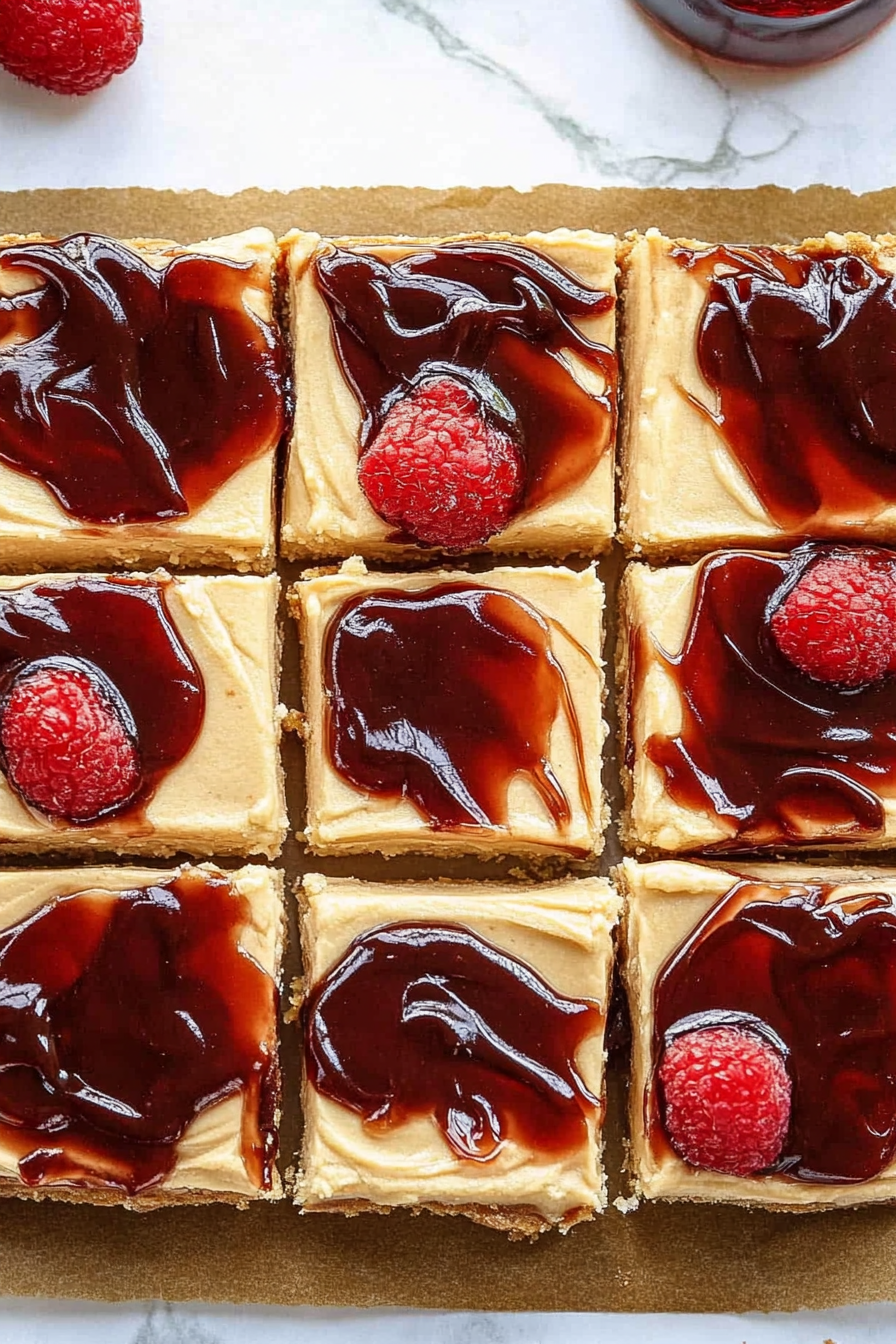
peanut butter jelly cheesecake
Ingredients
Method
- Line a 9×9-inch baking dish with parchment paper, including up the sides, leaving an overhang for easy removal. Set aside.
- In a medium bowl, combine graham cracker crumbs, granulated sugar, and melted butter. Stir until the mixture is evenly moistened and resembles wet sand.
- Press the mixture firmly into the bottom of the prepared pan using your hands or the bottom of a measuring cup. Transfer to the refrigerator to chill while you prepare the filling.
- In a large mixing bowl using a hand mixer, beat the cream cheese and granulated sugar together until smooth and creamy with no lumps.
- Add peanut butter and vanilla extract. Mix until fully incorporated.
- Add the sour cream and blend on low speed until just combined. Set aside.
- In a separate mixing bowl, pour in the cold heavy cream. Begin whipping on low speed, then gradually increase to medium speed as it starts to thicken.
- Once the cream thickens slightly, slowly add the confectioners’ sugar. Continue beating until stiff peaks form.
- Using a rubber spatula, gently fold the whipped cream into the peanut butter mixture. Continue folding until the mixture is smooth and no streaks of white remain.
- Pour the cheesecake filling over the chilled crust. Use a spoon to smooth the top evenly.
- Spoon small dollops of strawberry jam over the top. Use a butter knife to gently swirl the jam into the cheesecake, creating a marbled effect.
- Refrigerate the cheesecake for at least 6 hours, or ideally overnight, until fully set and firm.
- Once chilled and set, lift the cheesecake from the pan using the parchment paper overhang. Cut into bars and serve chilled.

I love how baking brings back such warm memories! Your cheesecake bars sound absolutely delicious.
Love how baking brings back such warm memories! The cinnamon swirl must’ve been amazing—this cheesecake bar combo sounds perfect.