
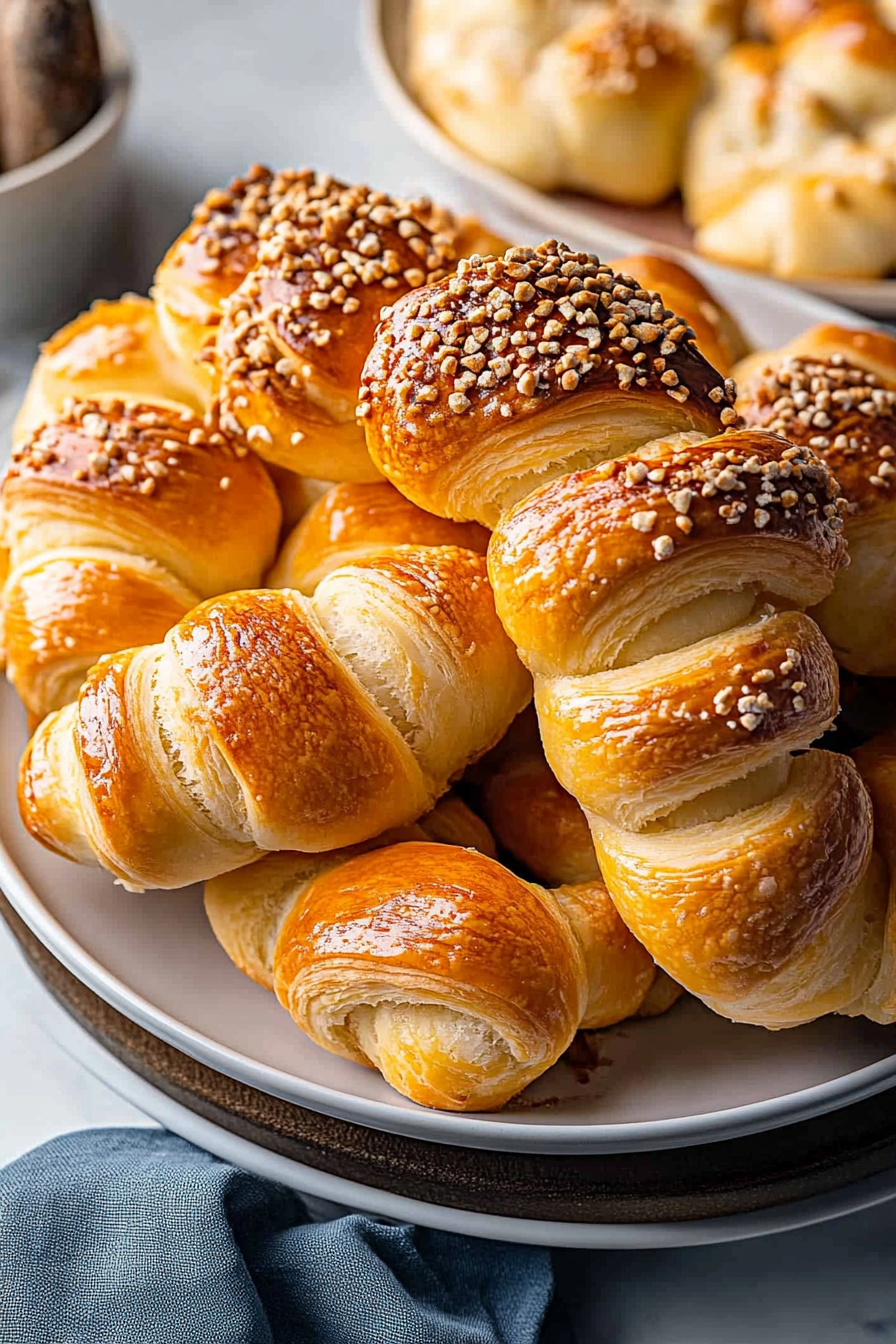
Easy Kiflice Pastries with Sesame Seeds
Honestly, I have a soft spot for sneaking vegetables into desserts. Growing up, my grandma always did this with carrots and zucchini, and let me tell you, it’s a game-changer. I remember the first time I tasted a moist, tender slice of zucchini cake and thinking, “Wait, is there really zucchini in this? But it’s so delicious!” That moment unlocked a whole new world for me—especially when I realized how versatile zucchini can be. This particular recipe? It’s one of those tricks I pull out when I want something cozy, sweet, and a little different. My kids ask for this all the time, especially when they see the colorful confetti swirls in each slice. It’s truly a crowd-pleaser, even for those who might normally turn their noses up at veggies in baked goods. And trust me, you’ll love how easy it is to whip up—this one’s a lifesaver on busy nights or when you wanna impress without fussing too much. Plus, it’s a great way to clean out that zucchini stash from summer. Let’s get baking!
What is Zucchini Nut Confetti Cake?
This cake is basically a moist, tender treat packed with shredded zucchini and colorful confetti sprinkles—think of it as a hybrid between a quick bread and a fun layer cake. Its name is a little playful, because the bright sprinkles mixed throughout give it a confetti look, making it perfect for celebrations or just to brighten up a regular afternoon. It’s essentially a celebration of textures and flavors—somewhat like a carrot cake but with zucchini doing all the quiet work in the background. The zucchini adds moisture and subtle flavor without overpowering, and that splash of crunch from nuts makes every bite satisfying. It’s friendly enough for beginner bakers but sophisticated enough to stand out on your dessert table. Think of it as the secret weapon in your baking arsenal, especially if you love sneaking veggies into sweet treats without anyone suspecting a thing.
Why you’ll love this recipe?
What I love most about this zucchini nut confetti cake is how it combines comfort with a bit of a wow factor. The flavor? Moist, rich, with just the right hint of sweetness—like a gentle hug, but with personality. The confetti sprinkles make each slice fun and lively, and I promise, once you serve it, everyone will be asking for the recipe. Plus, it’s really simple to make. You just toss the ingredients together, add the fun stuff, and bake. No complicated frosting or tricky layering—though if you want, you can always add cream cheese frosting on top or a drizzle of lemon glaze for extra zip. It’s budget-friendly, too; most of the ingredients are staples in my pantry. And versatility? Oh, big time. You can swap out the nuts with chocolate chips if you like, or use coconut instead for a tropical vibe. What I love most is how forgiving it is—overmixing isn’t a crime here, and even if your batter looks a little messy, it’ll still come out delicious. My family always asks for this when I want to add a sweet surprise to our afternoon coffee. It’s downright addictive—moist, textured, colorful, and just the right amount of sweet.
How do you make Zucchini Nut Confetti Cake?
Quick Overview
This cake is as easy as tossing everything into a big bowl, mixing it gently, and then pouring it into a pan. The secret to its moist texture is the shredded zucchini, which keeps it tender without making it soggy. The confetti sprinkles are folded right into the batter, creating cheerful bursts of color in every bite. After baking, I like to let it cool just enough before drizzling it with glaze or dusting with powdered sugar. It’s a straightforward process—no fancy techniques, just good old-fashioned baking with a touch of playful flair. The end result is a beautifully textured, moist cake that feels both special and homey. Plus, once you’ve made it a few times, you’ll see how forgiving it is—perfect for when you want something sweet but don’t want to spend hours in the kitchen.
Ingredients
For the Main Batter:
- 2 cups shredded zucchini (about 2 medium zucchinis, grated and excess moisture squeezed out)
- 1 1/2 cups all-purpose flour (or a gluten-free blend if that’s your jam)
- 1/2 teaspoon baking powder
- 1/2 teaspoon baking soda
- 1/4 teaspoon salt
- 1 teaspoon ground cinnamon (for that warm cozy flavor)
- 1/2 cup granulated sugar
- 1/2 cup packed light brown sugar
- 1/2 cup vegetable oil or melted coconut oil (I tested with almond milk once, and it was even creamier!)
- 3 large eggs (or flax eggs for a vegan version)
- 1 teaspoon vanilla extract
For the Filling:
- 1/2 cup chopped walnuts or pecans
- Optional: 1/4 cup mini chocolate chips for extra decadence
For the Glaze:
- 1 cup powdered sugar
- 2-3 tablespoons milk or plant-based milk (adjust for desired drizzle consistency)
- Optional: a squeeze of lemon juice or vanilla extract for flavor variation
Step-by-Step Instructions
Step 1: Preheat & Prep Pan
Set your oven to 350°F (175°C). Grease a 9-inch round cake pan or line it with parchment paper. I always do this first to save myself from sticking troubles later. If you like, throw a light dusting of flour or sugar on the pan for extra non-stick magic. Let’s get everything ready while the oven warms up—that way, the batter doesn’t sit around getting sad.
Step 2: Mix Dry Ingredients
In a large mixing bowl, whisk together the flour, baking powder, baking soda, salt, and cinnamon. I find that blending these first helps the leavening do its job evenly. Plus, it avoids clumps when you add wet ingredients later. This step takes just a minute but makes a big difference in the final texture—light, fluffy, and even.
Step 3: Mix Wet Ingredients
In a separate bowl, whisk together the eggs, sugars, oil, and vanilla until smooth. I usually do this by hand—it’s quick and feels satisfying. The mixture should be a little frothy and light. If you’re using almond milk or other plant-based options, make sure it’s at room temperature so everything combines smoothly.
Step 4: Combine
Pour the wet mixture into the dry ingredients and gently fold together. Do not overmix—just until everything is moist. Overmixing can make the cake dense, and no one wants that! It’s okay if you see a few streaks of flour; just fold gently and stop. The batter will be thick but pourable.
Step 5: Prepare Filling
In a small bowl, toss chopped nuts and optional chocolate chips. I like adding a little sprinkle of cinnamon to the nuts for extra warmth, but that’s totally optional. This burst of crunch and flavor makes every bite special. If your batter is a little thick, you can fold in some extra chopped zucchini or a splash of milk.
Step 6: Layer & Swirl
Pour half of the batter into the pan, smooth it out, then sprinkle on half of the nut mixture (and mini chips if using). Add the remaining batter on top, and gently swirl with a toothpick or skewer to create pretty marbled confetti effects. This swirling is what makes it so fun to look at—kind of like a rainbow in cake form.
Step 7: Bake
Pop into the oven and bake for about 40-45 minutes. Test the doneness by inserting a toothpick—the center should come out clean. Every oven is a little different, so start checking around 38 minutes. The smell alone fills the house with warm cinnamon and toasted nuts, which is enough to make everyone come running.
Step 8: Cool & Glaze
Once baked, let the cake cool in the pan for about 15 minutes before transferring it to a wire rack. It’s tempting to dig in right away, but patience pays off—cooling helps set the texture. When it’s just barely warm, drizzle it with your prepared glaze or dust with powdered sugar. The glaze adds a shiny, sweet touch that’s irresistible.
Step 9: Slice & Serve
Use a sharp knife and gentle sawing motion to cut clean slices. Serve it slightly warm or at room temperature, and pair with coffee or tea. I love serving this with a dollop of whipped cream or even a scoop of vanilla ice cream on the side. The confetti look will wow everyone, and the flavors are just comforting enough for any occasion.
What to Serve It With
This cake is such a versatile little wonder. For breakfast, I love pairing it with a robust black coffee or a frothy latte—something to wake you up with that spicy cinnamon vibe. It’s perfect for brunch too; serve slices with fresh fruit and a splash of cream. My family enjoys it as a dessert after dinner, especially with a scoop of vanilla or caramel ice cream melting over the warm edges. When I want something simple and cozy as a snack, I just cut a thick slice and enjoy it with a glass of cold milk or a herbal tea. This cake’s bright colors and tender crumb make it a hit wherever it goes, and the subtle zucchini flavor keeps it feeling wholesome even when it’s dressed up with confetti and glaze. It’s become a little tradition in my house—baking this on lazy weekends, eagerly waiting for the smell to fill the kitchen, then sharing slices around the table. Truly, it’s a hug in cake form.
Top Tips for Perfecting Your Zucchini Nut Confetti Cake
I’ve made this cake countless times, and over the years, I’ve picked up a few tricks that make all the difference. First off, squeezing out the excess moisture from the zucchini is a must—no one wants a soggy cake! I always use a clean kitchen towel to press out as much water as possible, which keeps things moist but not mushy. Also, I learned that folding in the nuts and sprinkles gently is key—overaggressive mixing can crush the crunch and turn your confetti into a muddy mess. If you want a more pronounced swirl pattern, try layering the batter and swirling it more deliberately with a skewer or spoon—it looks beautiful and adds surprise pops of color. For ingredient swaps, I’ve tried coconut oil and plant-based milks, and honestly, the texture was just as good—if not better, in some cases. When baking, I always position my rack in the middle of the oven—baking too high or too low can affect rise and browning. Don’t forget to test with a toothpick! When it comes out clean, your cake is perfect. For the glaze, if you want it less sweet, just add a touch less powdered sugar or dilute with a little extra milk. And if you want an extra zing, a squeeze of lemon in the glaze brightens everything up.
One mistake I used to make was waiting too long to glaze; I learned that applying the glaze while the cake is still warm helps it soak in a little and stick better. Also, don’t be afraid to experiment with add-ins—dried cranberries, different nuts, or even a splash of bourbon in the glaze can totally change the flavor profile. The key is to keep it fun and not stress if things don’t go perfectly—the imperfect, cozy look actually makes it more charming. Remember, this is more than a recipe; it’s about creating something heartfelt and a little playful in your kitchen. Trust me, once you get the hang of it, this cake will become a staple for gatherings, lazy weekends, or when you just need a cozy slice of happiness.
Storing and Reheating Tips
This cake keeps well for a few days, which is a real plus. If you’re planning to eat it within a day or two, just cover it with a clean towel or store in an airtight container at room temperature—no need to refrigerate unless it’s super hot outside. I find that refrigerating can sometimes dry it out, so I prefer room temp if you’re serving it within 48 hours. For longer storage, wrap the cake tightly with plastic wrap or foil and freeze for up to 3 months. To reheat, let it come to room temperature, or give it a quick 10-15 second zap in the microwave for that just-baked feel. When it was freshly baked, I recommend adding the glaze last-minute if you froze or stored it, so it stays shiny and fresh. When serving leftovers, I like to warm slices slightly in the microwave and add a drizzle of honey or extra glaze to really make it shine. The texture stays tender, and the flavors remain beautifully balanced. Trust me, this cake defies being stored because each slice hits just right even days later—like rediscovering a hidden treasure.
Frequently Asked Questions
Final Thoughts
If you haven’t tried a zucchini confetti cake before, I promise it’s one of those recipes that sneakily wins hearts. It’s nostalgic, playful, and somehow feels like a warm hug—perfect for when you want something sweet but also wholesome. I love how the zucchini keeps it incredibly moist, and those colorful sprinkles make every slice look like a celebration, even on a regular Tuesday. Over the years, I’ve played with a few variations—adding coconut, swapping nuts for chocolate chips, or swapping almond flour—and each time, it’s been a hit. It’s become a bit of a family tradition to bake this on lazy weekends, and I always get a smile when the first slice disappears in minutes. If you’re looking for a cake that’s comforting, versatile, and just a little bit unexpected, give this a try. I bet it’ll become a new favorite in your house, too. Happy baking, and I can’t wait to hear how yours turns out—don’t forget to share your photos or tweaks in the comments!
kiflice pastries
Ingredients
Method
- Activate the yeast. In a bowl, stir together yeast, sugar, and water. Set it in a warm place to activate, until it gets thick and foamy, about 15 to 20 minutes.
- Combine the other ingredients. In the meantime, add flour to your mixer's bowl. Make a well in the middle, and add warm milk, vegetable oil, salt, and eggs. Don't mix until you've added in the prepared yeast.
- Mix in the yeast mixture. Pour the yeast mixture into the flour mixture. Using a large spoon, mix it all together to combine.
- Knead the dough. Then, attach the dough hook to your stand mixer and finish kneading for about 2 to 3 minutes, or until the dough starts to separate from the bowl. If the dough is too dry, add a tablespoon of milk, if it's too wet add more flour, 1 tablespoon at a time. The dough shouldn't be too sticky, but you also don't want it to be dry.
- Shape the dough into a ball. Spray a large mixing bowl with cooking spray and sprinkle it with a bit of flour to prevent sticking. Transfer the prepared dough to the oiled bowl, and fold the dough into a ball. Add a little more flour to the bowl and a sprinkle of flour on top of the dough ball.
- Rise. Cover with plastic wrap and let rise for 30 minutes. It's best (and faster) to let the dough rise in a warmer spot.
- Make the filling. Combine the feta cheese and ricotta cheese in a bowl; set aside for later.
- Preheat. Preheat the oven to 400ºF.
- Divide and shape the dough. Turn the dough over to a flour-dusted work area and fold it on all sides; then, cut it in half. Cut each half in 3 parts so you have a total of 6 pieces. Fold all the pieces into small balls. Keep them covered.
- Roll out the dough. Take a ball of dough and lightly punch it down to spread and then roll it out into a round circle the size of about a medium pizza. Make sure to flour your work area often so the dough does not stick.
- Slice. Cut the dough into 8 to 12 slices, depending on the dough’s diameter or how big you want your rolls.
- Fill the rolls. Add ½ to 1 tablespoon of the ricotta/feta cheese mixture to each slice. Place the filling at the top of the slice, right in the center. Keep the filling modest—if you overfill, it’ll likely ooze out while baking.
- Roll them up. Pull the sides of the widest part at the top and tuck them inward, right over the filling, and continue to roll. Repeat with the rest of the dough.
- Bake. Transfer the rolls to baking sheets and place a pat of butter on top of each roll. Bake for 5 minutes at 400ºF. Meanwhile, combine the eggs and water in a small bowl and beat to combine. Remove the kifli from the oven and brush with the egg glaze. Sprinkle with sesame seeds and continue to bake for 11 to 13 more minutes or until golden.
- Finish and serve. Once the kifli are out of the oven, you can top them with a small pat of butter (totally optional, but so good!). Transfer them to a wire rack to cool slightly. They're best enjoyed fresh, but they also store well for days.


This is such a comforting memory—my grandma did the same with carrot cake! Love that sneaky veggie twist in desserts.
I love this idea! My grandma used to sneak grated carrots into her cakes too—so delicious and such a clever trick.