
Delightful Mint Cheesecake Recipe
There’s something about the smell of freshly baked bread or cake wafting through the house—that warm, cozy feeling that pulls everyone into the kitchen. I remember helping my grandma in her tiny oven-filled kitchen, the air filled with the aroma of something sweet and comforting. Recently, I stumbled upon an old family recipe for zucchini sweet loaf, and honestly, it’s become my go-to when I want something homemade, satisfying, and a little nostalgic. It’s somehow like a cross between a moist bread and a tender cake—perfect for breakfast, a snack, or even a quick dessert. My kids ask for this all the time, and I love that I can sneak in some vegetables without them even noticing. Plus, it’s incredibly easy to make—no fancy equipment needed, just good ingredients, a little patience, and a lot of love. Trust me, this one’s a lifesaver on busy nights or lazy weekends when you want to treat everyone without all the fuss.
What is Zucchini Sweet Loaf?
Think of zucchini sweet loaf as a cozy, handheld hug—soft, fragrant, with just enough sweetness to satisfy your sweet tooth. It’s essentially a bread that leans into cake territory, with grated zucchini adding moisture and a touch of nutrition. The name might sound a bit funny, but it’s rooted in a simple concept: using zucchini—which grows abundantly in late summer—to create something comforting and edible all year round. It’s classic in the sense that it’s based on simple ingredients like flour, sugar, eggs, and a little oil, but the addition of zucchini makes it incredibly moist and tender. I love calling it a “secret ingredient” loaf because, honestly, most people don’t realize zucchini is in there until they’re mid-bite and asking for seconds. It’s like a little hidden treasure of flavor and texture.
Why you’ll love this recipe?
What I love most about this zucchini sweet loaf is how versatile and forgiving it is. If you’re like me, you probably have most of these ingredients sitting in your pantry or fridge already. No fancy mix-ins required—just good ol’ everyday staples. The flavor? Oh, it’s beautifully balanced—sweet enough to satisfy your dessert cravings but not so sugary that it’s overwhelming. The scent alone is enough to bring everyone into the kitchen—think warm vanilla, a whiff of cinnamon, and that hint of zucchini lurking quietly inside. Plus, it’s super simple: I always do this when I need a quick bake for a brunch or a cozy afternoon snack. It’s budget-friendly too—costs less than a fancy bakery loaf, yet tastes just as comforting. And I promise, once you make it, you’ll be known as the “loaf lady” or “baking hero”—because it’s that good. The best part? I’ve made this countless times, testing it with almond milk, swapping nuts for chocolate chips, and tweaking the sweetness, and it’s always a hit. Trust me on this—it’s easily my most pulled-together, crowd-pleasing treat.
How do you make Zucchini Sweet Loaf?
Quick Overview
This loaf comes together in just a few steps—grate the zucchini, mix the batter, layer in the flavorings or add-ins, swirl, and bake. It’s honestly one of those recipes that you can throw together in under 10 minutes once you have your zucchini ready, then forget about it while it bakes. What makes this process special is how forgiving it is—overmixing is no big deal, and you can easily double the batch if you want extras for freezing. I love that you can prep everything ahead, pop it in the oven, and then relax for a bit. It’s perfect when you’re craving something sweet but don’t want to spend hours in the kitchen.
Ingredients
For the Main Batter:
- 2 cups grated zucchini (roughly 2 small zucchinis, drained well) – I always squeeze out the excess moisture to keep the loaf from getting soggy
- 1 1/2 cups all-purpose flour – or gluten-free blend, if you prefer
- 1/2 cup sugar – I like using brown sugar for a deeper flavor, but regular granulated works
- 1 teaspoon baking powder
- 1/2 teaspoon baking soda
- 1/2 teaspoon salt
- 1 teaspoon vanilla extract
- 1/2 cup vegetable oil (or melted coconut oil for a richer taste)
- 3 large eggs
For the Filling (Optional but yummy):
- 1/2 cup chopped walnuts or chocolate chips (whichever you prefer—my kids love mini chocolate chips!)
- 1/2 teaspoon cinnamon or nutmeg (for that cozy aroma)
For the Glaze (if you’re feeling fancy):
- 1/2 cup powdered sugar
- 1-2 teaspoons lemon juice or milk (to reach your desired consistency)
- Optional: a dash of cinnamon or vanilla for extra flavor
Step-by-Step Instructions
Step 1: Preheat & Prep Pan
Set your oven to 350°F (175°C). Grease a loaf pan or line it with parchment paper—this keeps things from sticking and makes for easy cleanup. I always do this first so I can focus on mixing without rushing. Plus, if you forget, you’ll be scrambling at the last second, and nobody wants that panic moment when the oven’s already hot!
Step 2: Mix Dry Ingredients
In a big bowl, whisk together the flour, baking powder, baking soda, salt, and cinnamon (if using). It’s important to do this first to evenly distribute the leaveners—they help your loaf rise beautifully and keep it from sinking in the middle. I’ve accidentally missed this step and ended up with a dense loaf, so trust me, don’t skip the dry mix.
Step 3: Mix Wet Ingredients
In another bowl, beat the eggs, then stir in the sugar, vanilla, and oil. Once combined, add the grated zucchini—squeeze out that excess moisture first, I learned this the hard way—you don’t want your batter to be watery. I tested this with almond milk once (because I ran out of regular milk) and it actually made it even creamier, though I’d only recommend that if you want an extra dairy-free version.
Step 4: Combine
Pour the wet mixture into the dry ingredients and gently fold until just combined. Be careful not to overmix—overmixing can make the loaf dense and chewy. Just stop as soon as you see the batter coming together; some lumps are okay. If you’re adding chocolate chips or nuts, fold those in now.
Step 5: Prepare Filling
If you’re using any filling or extra add-ins, sprinkle or layer them in now. I love swirling in a tablespoon of nut butter or dolloping some fruit preserves for surprises. Just pour a little batter, add your filling, then top with more batter and swirl gently with a knife for that marbled effect.
Step 6: Layer & Swirl
Pour the batter into the pan, smoothing the top with the back of a spoon. For a pretty swirl, use a toothpick or skewer to make figure-eight patterns or circles through the batter before baking. It’s just enough to give your loaf some visual pop and a bit of extra flavor.
Step 7: Bake
Pop it in the oven on the middle rack and bake for 50-60 minutes. I always start checking around 50 minutes—that’s when the top is golden and a toothpick inserted in the center comes out clean. Every oven is different, so if the top gets too dark but the inside isn’t baked, tent it with foil and keep going. Trust me, you’ll know it’s done because the smell will be irresistible and your kitchen will be filled with vanilla, cinnamon, and that cozy zucchini aroma.
Step 8: Cool & Glaze
Let the loaf cool in the pan for about 10 minutes, then transfer it to a wire rack. This step is key—cooling helps it set so slices are neat and tender. If you’re glazing, do this when it’s just warm—don’t wait until it’s stone cold or the glaze won’t spread smoothly. I like drizzling a lemon glaze for a bright zing, but cream cheese frosting is divine if you want it richer.
Step 9: Slice & Serve
Use a serrated knife and gentle pressure—this bread is tender! Serve slices slightly warm or at room temperature, maybe with a dab of butter or a spread of your favorite jam. This loaf’s stunning because it’s just as pretty on a breakfast table as it is on a dessert platter. My family loves it with a hot cup of coffee or tea for that perfect cozy moment.
What to Serve It With
This zucchini sweet loaf is so adaptable; it can be part of breakfast, brunch, or an afternoon snack. For breakfast, I love slicing it thick and toasting it slightly—adding a smear of butter and a sprinkle of cinnamon sugar. It’s also fantastic served alongside a cups of black coffee or a chai latte, especially on chilly mornings when the house feels extra warm and inviting.
For brunch, arrange slices on a platter with fresh berries, whipped cream, or a drizzle of honey. It’s elegant enough to serve at a gathering but simple enough to be an everyday treat. If I want to class it up a bit, I’ll add a dollop of Greek yogurt and some chopped nuts on top. My kids ask for this all the time when they want a sweet breakfast but I don’t want a sugar crash first thing in the morning.
As dessert, it’s perfect with a scoop of vanilla ice cream or a dusting of powdered sugar. I’ve even experimented with making mini loaves for gifting—wrap them in parchment and a pretty ribbon, and you’ve got the sweetest, most thoughtful gift.
And, honestly, this loaf comes into its own as a casual snack. I keep a few slices in the fridge, and they disappear faster than I can blink. It’s warm, comforting, and just sweet enough to satisfy that late-night craving without feeling over-the-top.
Top Tips for Perfecting Your Zucchini Sweet Loaf
After testing this recipe dozens of times, I’ve learned some tricks that might help you get everything just right.
- Zucchini Prep: Always squeeze out as much moisture as possible—you want a dry, crumbly zucchini for the best texture. I use a clean kitchen towel or cheesecloth to really press out the water. Bonus tip: grate zucchini ahead and store in an airtight container—this saves time on busy mornings.
- Mixing Advice: Overmixing is a common mistake that results in dense bread. Mix just until combined—think gentle folding rather than vigorous stirring. The batter should be lumpy but no dry pockets of flour remain.
- Swirl Customization: Use a skewer or the tip of a butter knife to create swirling patterns—try spirals or marbled circles. If you want more visual impact, sprinkle colored sugar or cocoa powder on top before baking for contrasting effects.
- Ingredient Swaps: Love nuts? Add chopped pecans or walnuts for crunch. Prefer a dairy-free version? Test with almond milk or coconut oil—I’ve truly loved the outcome with both.
- Baking Tips: For even baking, position your rack in the middle and avoid opening the oven door early. If your loaf gets too dark on top, loosely tent with foil after 30 minutes. Test for doneness with a toothpick; it should come out clean or with just a few moist crumbs.
- Glaze Variations: Change up the glaze with orange juice, maple syrup, or even a touch of coffee for added flavor layers. Adjust the drizzle’s thickness by adding more powdered sugar for a thicker coating or more liquid for a thinner look.
As I always say, baking is about experimenting and making it your own. I’ve made this loaf with all kinds of variations, and every time I learn something new that improves the next one. Sometimes the secret is extra zest, a splash more vanilla, or a pinch less sugar. Don’t be afraid to tweak—it’s part of what makes baking so joyful.
Storing and Reheating Tips
This loaf stays fresh surprisingly well, especially when stored correctly. I usually let it cool completely before wrapping it tightly in plastic wrap or placing it in an airtight container. If you’re planning to keep it for more than a day, pop it in the refrigerator—it’ll stay good for up to 4 days. Just give it a quick toast or warm-up in the microwave before serving to revive that fresh-baked feeling.
For longer storage, I recommend freezing slices individually wrapped in foil or airtight bags. They’re perfect for grabbing when you need a quick snack or breakfast on the go. Simply thaw at room temperature or microwave for a few seconds—delicious every time. If you’re adding glaze, I suggest doing it fresh, as it tastes best when the loaf is freshly glazed.
Frequently Asked Questions
Final Thoughts
This zucchini sweet loaf isn’t just a recipe; it’s a little piece of my baking heart. It’s adaptable, forgiving, and always brings a smile—whether it’s served at a family brunch, packed in a lunchbox, or enjoyed on a lazy weekend morning with a steaming mug of coffee. I love how it combines humble ingredients into something so warm and satisfying. Every time I bake it, I remember those cozy afternoons with my grandma, her gentle smile, and the smell of her kitchen. Now, I get to pass that feeling along in my own way. If you give this a try, I’d love to hear your tweaks and stories—after all, baking is most fun when it’s personal. Happy baking, and I can’t wait to hear how yours turns out!
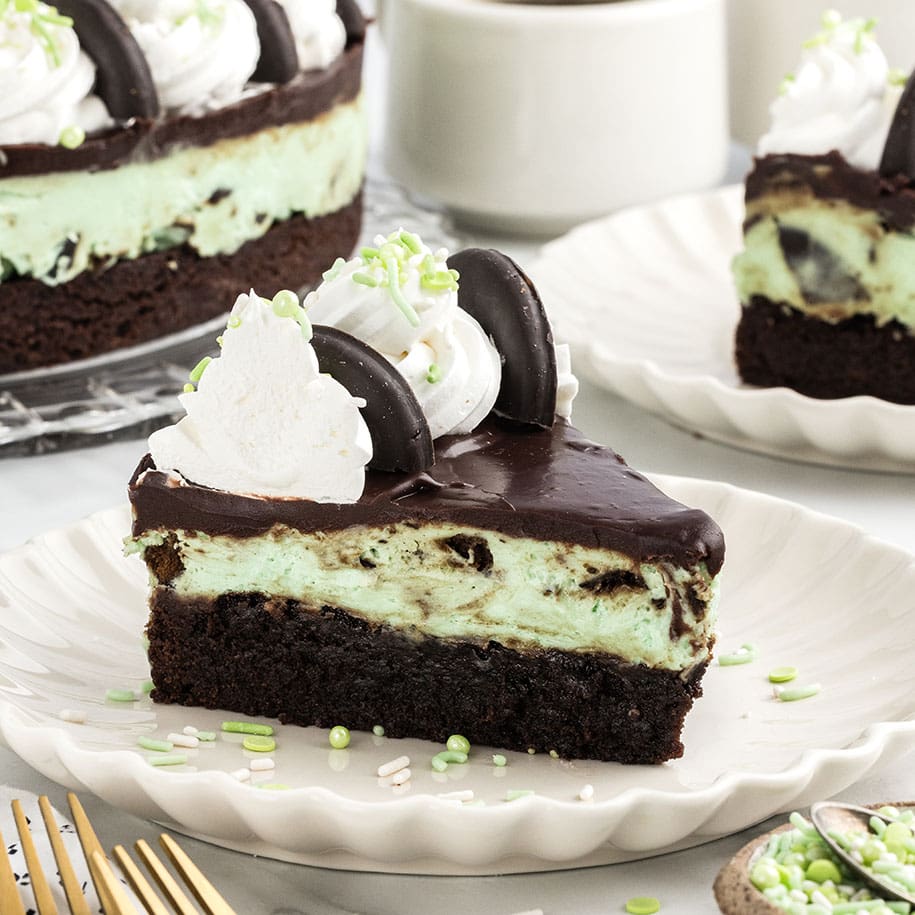
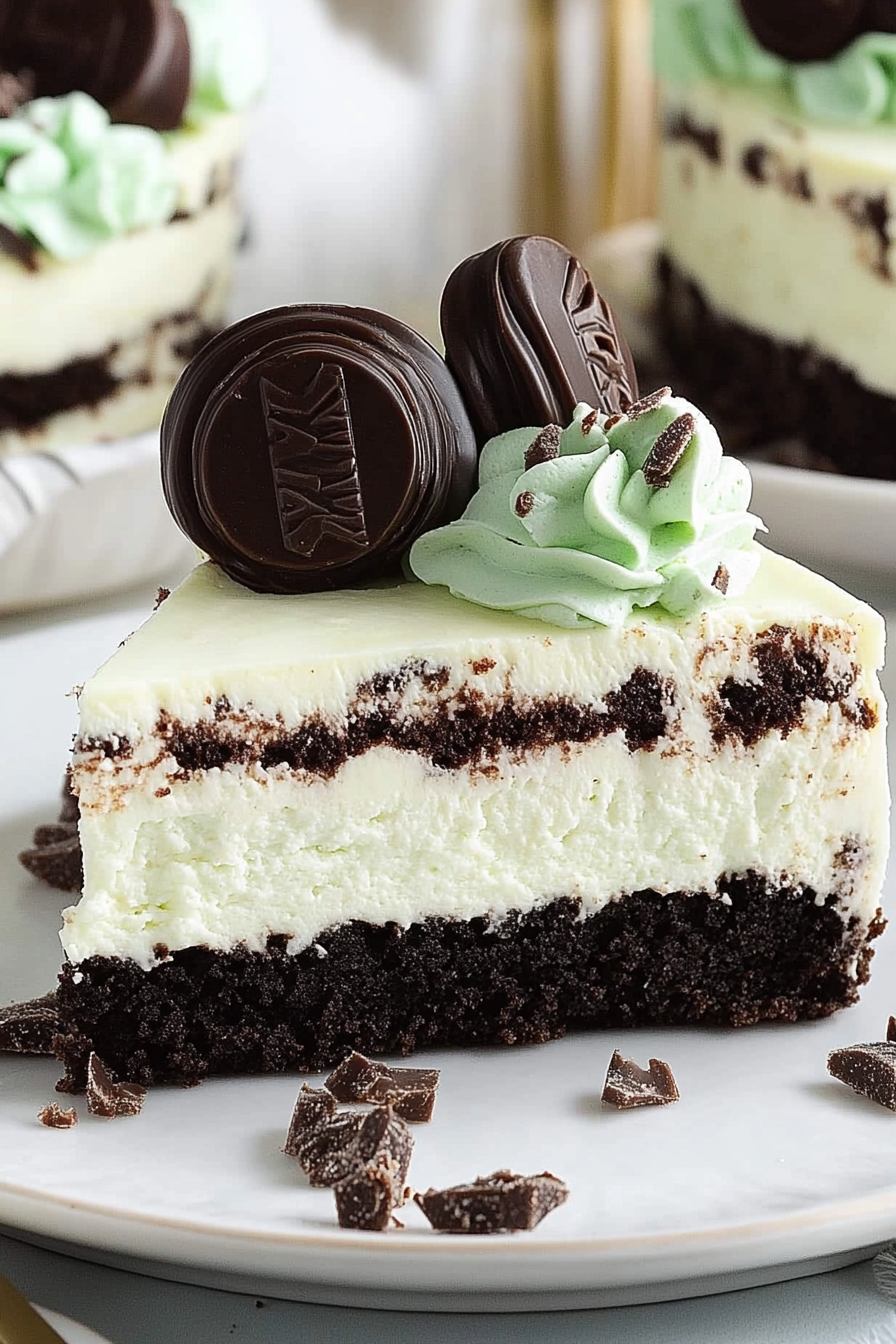
Thin Mint Cheesecake
Ingredients
Method
- Preheat oven to 350°F. Line a 9-inch springform pan with parchment and spray with baker’s spray.
- Mix brownie ingredients in a large bowl until just combined. Transfer to prepared pan and bake for 30-32 minutes.
- Cool the brownie crust completely on a wire rack.
- Beat softened cream cheese until fluffy. Add powdered sugar and mix well.
- Add mint extract, vanilla, and green food coloring. Mix until uniformly green.
- Fold in whipped topping and chopped Thin Mint cookies.
- Spread filling over cooled brownie crust. Refrigerate for at least 4 hours.
- Prepare ganache by heating chocolate chips and heavy cream. Stir until smooth.
- Pour ganache over set cheesecake. Chill overnight.
- Garnish with whipped topping, halved Thin Mints, and sprinkles before serving.


This recipe brought back so many happy memories of baking with my grandma! The mint flavor sounds perfect.