
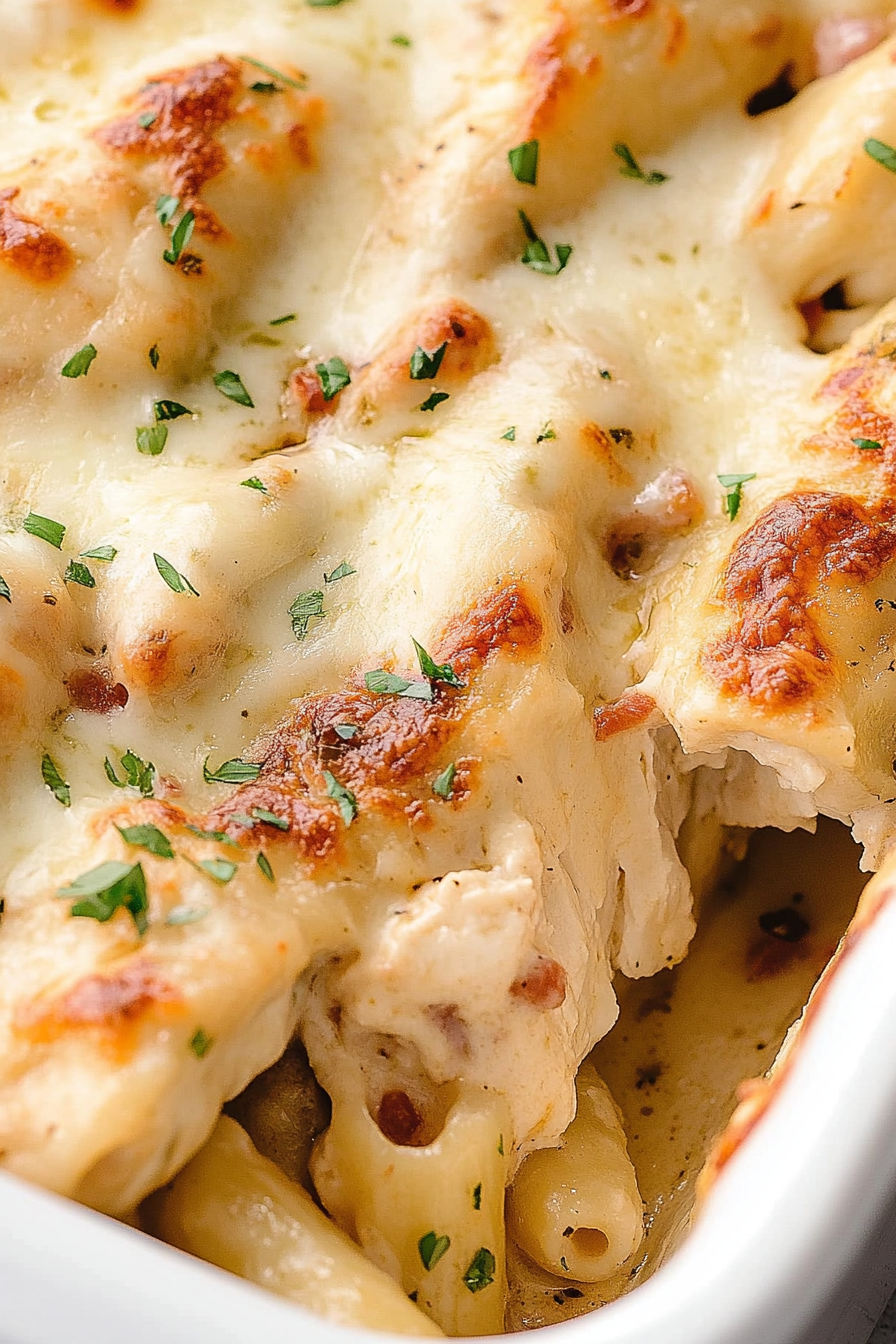
Creamy Chicken Bacon Ranch Delight
There’s just something about baking a coffee cake that feels like a warm hug on a cool morning, right? I remember my grandma’s kitchen filled with the scent of cinnamon and fresh coffee, and how everyone would gather around just waiting for that first slice. This zucchini swirl coffee cake is one of those recipes that somehow combines all that cozy nostalgia with a bit of a surprise twist – the sneaky addition of zucchini makes it incredibly moist and just a touch healthier. And honestly? It’s so easy, I’ve made it countless times, and it never fails to bring smiles around my breakfast table. Plus, this one’s a lifesaver on busy nights when I don’t want to fuss but still crave something sweet and comforting. I always do this when I want a treat that feels indulgent but is still somehow wholesome. My kids ask for this all the time, and I love that I can sneak in some greens without them even noticing. Trust me on this—once you make it, it’ll become part of your family’s morning lineup too.
What is Zucchini Swirl Coffee Cake?
Think of this as a delightful twist on the classic coffee cake, with a swirl of cinnamon-spiked batter and a hidden vegetable boost. It’s essentially a moist, tender loaf with layers of cinnamon goodness running through it—and a generous handful of shredded zucchini stirred right into the batter. The name might sound fancy, but this dish is as homey and approachable as your grandma’s favorite baking. The zucchini keeps the cake irresistibly moist and adds a subtle, almost nutty flavor that works beautifully with the cinnamon and brown sugar swirl. It’s the kind of baked good that looks pretty in the morning light, with a slightly crackly top and a ripple of cinnamon running through the middle. The best part? It’s versatile enough to serve for breakfast, brunch, or a cozy snack with a cup of coffee. And because of the zucchini, it feels just a little lighter—though don’t tell my sweet tooth that! It’s a slice of comfort, with a healthy little punch.
Why you’ll love this recipe?
What I love most about this zucchini swirl coffee cake is how it hits all those sweet spots—literally and figuratively. First off, flavor—oh my gosh, the cinnamon-vanilla-marble swirl is just intoxicating. The taste is warm, cozy, and honestly better than most bakery treats. And that moistness? It’s thanks to the zucchini, which I always do this when I want a lighter feel without sacrificing that melt-in-your-mouth texture we all crave in a good coffee cake. Plus, it’s super budget-friendly. Most of the ingredients are pantry staples—flour, sugar, cinnamon, and of course, zucchini from my garden who keeps giving year-round. What’s more, this is so versatile. You can dress it up with nuts, change the swirl to lemon or blueberry, or even add a crumb topping for extra crunch. It’s perfect if you’re craving something sweet at 10 pm but don’t want to bake a whole cake—this loaf slices beautifully and keeps well for days. Honestly, I’ve made this with almond milk instead of regular milk, and I swear it made it even creamier! It’s a total crowd-pleaser, family favorite, and a recipe I always keep in my back pocket.
How do I make Zucchini Swirl Coffee Cake?
Quick Overview
This cake is surprisingly straightforward. You’ll start by preparing your zucchini—grating and squeezing out excess moisture—then whisk up your batter, layer in the cinnamon-sugar swirl, and bake. The key is not overmixing once you combine the wet and dry ingredients—trust me, that keeps it tender. In about an hour, you’re rewarded with a beautiful, moist loaf that’s perfect hot from the oven or even the next day. What makes this method special? The swirling technique creates beautiful marbled ribbons of cinnamon through each slice, and the zucchini keeps everything super fluffy and moist. The whole process from start to finish is simple enough for a weeknight treat, but pretty enough to serve to guests.
Ingredients
For the Main Batter:
– 2 cups all-purpose flour (or gluten-free flour blend if you prefer)
– 1 cup sugar (trust me, this balances perfectly with the cinnamon swirl)
– 1 teaspoon baking powder
– 1/2 teaspoon baking soda
– 1/2 teaspoon salt
– 1 teaspoon vanilla extract (don’t skip this—adds depth)
– 1 cup buttermilk or milk (I tested with almond milk and it was SO creamy!)
– 1/2 cup vegetable oil or melted butter
– 2 large eggs
– 1 cup shredded zucchini (about one medium zucchini, excess moisture squeezed out)
For the Filling:
– 1/2 cup packed brown sugar
– 2 teaspoons ground cinnamon
– 1 tablespoon melted butter (for mixing with sugar and cinnamon)
For the Glaze:
– 1 cup powdered sugar
– 2-3 teaspoons milk (or a splash of cream)
– 1/2 teaspoon vanilla extract (optional)
– A pinch of cinnamon (for extra flair)
Step-by-Step Instructions
Step 1: Preheat & Prep Pan
Start by preheating your oven to 350°F (180°C). Grease a standard 9×5 inch loaf pan generously with butter or non-stick spray. Lining it with parchment paper makes for easy removal and keeps the crust intact. While the oven warms up, grate your zucchini and squeeze out excess moisture—this step is crucial for a moist cake without it turning soggy. I always do this with a clean dish towel or paper towels; it makes a huge difference in texture. Set everything aside so you’re ready to assemble once your batter is mixed.
Step 2: Mix Dry Ingredients
In a large bowl, whisk together the flour, sugar, baking powder, baking soda, salt, and cinnamon (for the swirl). This ensures everything is evenly distributed. Trust me, this is the base that guarantees your cake rises evenly and has that perfect crumb. Overmixing can make it dense, so just mix until combined—lumps are okay at this point.
Step 3: Mix Wet Ingredients
In a separate bowl, whisk the eggs, then add the buttermilk (or almond milk), oil, and vanilla. Mix until smooth. I like to do this right in the measuring cup for minimal dishes. When adding the grated zucchini, stir it in gently—try not to overmix here, or the batter can get heavy. I tested this with almond milk, and it made the batter extra creamy and light, but regular milk works perfectly too.
Step 4: Combine
Add the wet mixture into the dry ingredients, folding gently with a spatula or wooden spoon just until everything is moistened. Overmixing is the enemy of lightness—this batter will be a little lumpy, and that’s totally fine. It’s the secret to a tender crumb.
Step 5: Prepare Filling
Mix together the brown sugar, cinnamon, and melted butter to make your swirl. It should resemble a crumbly, cinnamon-sugar paste. If you want an extra nutty flavor, toss in chopped walnuts or pecans here—they’re delicious in this cake.
Step 6: Layer & Swirl
Pour half of the batter into the prepared loaf pan. Spread evenly, then sprinkle half of the cinnamon-sugar swirl over it. Add the rest of the batter on top, and finally, dollop the remaining cinnamon mixture in spoonfuls. Use a skewer or knife to swirl gently—don’t overdo it, just enough to create pretty ribbons of cinnamon running through.
Step 7: Bake
Pop it in the oven for about 50-60 minutes. Start checking around 50 minutes with a toothpick or cake tester—insert into the center, and if it comes out clean, it’s done. Every oven is different, so don’t be discouraged if it takes a little longer or shorter. You’ll see a lovely crackly top forming, and the smell—oh wow, that cinnamon and vanilla together—will make everyone come running.
Step 8: Cool & Glaze
Once baked, let the cake cool in the pan for about 15 minutes, then transfer to a wire rack to cool completely. This prevents sogginess. While it cools, whisk together your powdered sugar, vanilla, and milk to make a simple glaze. Pour it over the cooled cake for that shiny, sweet finishing touch. If you prefer a non-glazed version, dust with powdered sugar or serve plain—still delicious.
Step 9: Slice & Serve
Use a serrated knife to cut clean slices—this cake is soft, so gentle pressure works best. Serve at room temperature or slightly warmed. This slice looks beautiful on a plate with a dollop of whipped cream or a sprinkle of extra cinnamon if you’re feeling fancy. Honestly, every slice is like a little piece of comfort, and half the fun is seeing that cinnamon swirl peek through. It’s perfect for breakfast, brunch, or a cozy coffee break with friends.
What to Serve It With
This zucchini swirl coffee cake is so versatile—my family loves it in the morning, but I also enjoy it as a sweet afternoon break or even a simple dessert after dinner. For breakfast, I like to serve it with a strong cup of coffee or tea, and maybe some fresh fruit on the side—blueberries or sliced strawberries are perfect. A dollop of Greek yogurt or a drizzle of honey takes it to the next level, especially if you want that extra bit of richness. At brunch, pair it with mimosa or a freshly squeezed orange juice—it’s just fancy enough to impress, yet totally relaxed. If you’re baking it for a dessert, I like to serve it warm with vanilla ice cream or a dusting of powdered sugar—and maybe an extra little cinnamon sprinkle for flair. For casual snacking, this loaf is a hit on the coffee table, sliced into thick pieces. My kids ask for this all the time, especially when we have extra zucchinis from the garden. It’s a real family favorite, and honestly, a recipe I love because it makes me feel like I’m sneaking some greens into dessert without complaining!
Top Tips for Perfecting Your Zucchini Swirl Coffee Cake
Over the years of making this, I’ve picked up a few tricks to get every batch just right. First, always squeeze out as much moisture from your zucchini as possible—otherwise, the cake can become dense or soggy. I learned that after a few baking experiments! Grating zucchini super fine helps it incorporate seamlessly into the batter, giving that perfect tender crumb and moistness. When mixing, fold gently and avoid overmixing; otherwise, the cake loses its lightness. I find that letting the batter rest for 5 minutes after mixing helps everything hydrate, giving you a more uniform texture.
Swirling the cinnamon mixture takes a bit of practice. I actually layer half the batter, sprinkle on the swirl, then add the rest and do a few quick swirl motions with a toothpick or skewer. It’s okay if it’s slightly messy—what matters is that you see pretty ribbons of cinnamon as it bakes. If you want a more pronounced swirl, add a little more cinnamon or do two layers of the cinnamon mixture. Also, don’t skip the cooling stage—hot cake and glaze don’t mix well, and a cool cake will hold its shape better. I tested this with different oven temps—if your oven runs hot, dropping it to 340°F for the last 10 minutes helps prevent over-browning. And a little tip: If you want to switch up the flavor, try adding lemon zest or swapping cinnamon for apple pie spice. The dough is forgiving, and I’ve played around with nuts, cranberries, or even chocolate chips—trust me, it’s flexible and always delicious.
Storing and Reheating Tips
This cake stays fresh for several days if stored properly. Once cooled completely, wrap it tightly in plastic wrap or keep it in an airtight container. It’s perfect at room temperature for up to two days—after that, the moisture starts to fade a little, but it’s still tasty. For longer storage, pop slices into a zip-top bag or freezer-safe container and refrigerate for up to a week. To reheat, warm a slice in the microwave for about 15-20 seconds until just warm and fragrant again. If you want it to be extra moist, brush a tiny bit of melted butter over the top before reheating. Freezing individual slices is brilliant for busy mornings—I do this all the time and take out a slice when I need a quick treat. When ready to serve, just thaw at room temp or zap in the microwave. For the glaze, I recommend adding it after reheating to keep the shiny, sweet finish intact. This way, every slice feels fresh and satisfying—almost like a bakery treat made just for you.
Frequently Asked Questions
Final Thoughts
This zucchini swirl coffee cake is honestly one of those recipes that feels like a cozy secret—moist, fragrant, and just a little bit special without any complicated steps. I’ve tested it with different flavor tweaks, and it always turns out perfectly tender and flavorful. The beauty of it is how forgiving and versatile it is—great for breakfast, brunch, or sneaking in some veggies at snack time. I love how the cinnamon swirl makes each bite a little gem, and the zucchini keeps everything surprisingly light and fluffy. If you’re looking for a new favorite that’s easy to whip up on a busy weekday or a lazy weekend, give this a try. You’ll see—it disappears in minutes at my house! Happy baking, and I can’t wait to hear how yours turns out. Don’t forget to leave a comment below if you try it or add your own twist. Sharing food makes everything better, after all!
chicken ranch
Ingredients
Method
- Preheat oven to 350 degrees F. Grease a 9x13 inch pan.
- In a medium bowl, combine chicken with 0.5 teaspoon salt, 0.5 teaspoon pepper, and 1.5 tablespoons Ranch dressing mix.
- Cook bacon until crispy and set aside. Cook penne pasta according to package instructions, drain, and set aside.
- In a large skillet over medium-high heat, melt 4 tablespoons butter and 1 tablespoon olive oil. Add chicken and cook until browned, about 3-4 minutes. Remove chicken and set aside.
- Saute onion in the same skillet until translucent. Add garlic and cook for 1 minute.
- Add remaining butter, flour, Italian seasoning, basil, and Ranch dressing mix to the skillet. Whisk until smooth.
- Gradually whisk in chicken broth, then add heavy cream and cream of chicken soup. Cook until bubbly and slightly thickened. Stir in Parmesan cheese.
- Add cooked chicken, bacon, sun-dried tomatoes, and cooked pasta into the sauce. Mix well.
- Pour mixture into the prepared pan. Top with Italian cheese and chopped parsley.
- Bake uncovered for 30 minutes or until cheese is melted and bubbly.


This recipe sounds amazing—I love how comfort food brings back such sweet memories! The cinnamon scent really does feel like a warm hug.
That sounds absolutely comforting—I’ve never had a coffee cake quite like that, but now I’m really tempted to try it myself!