
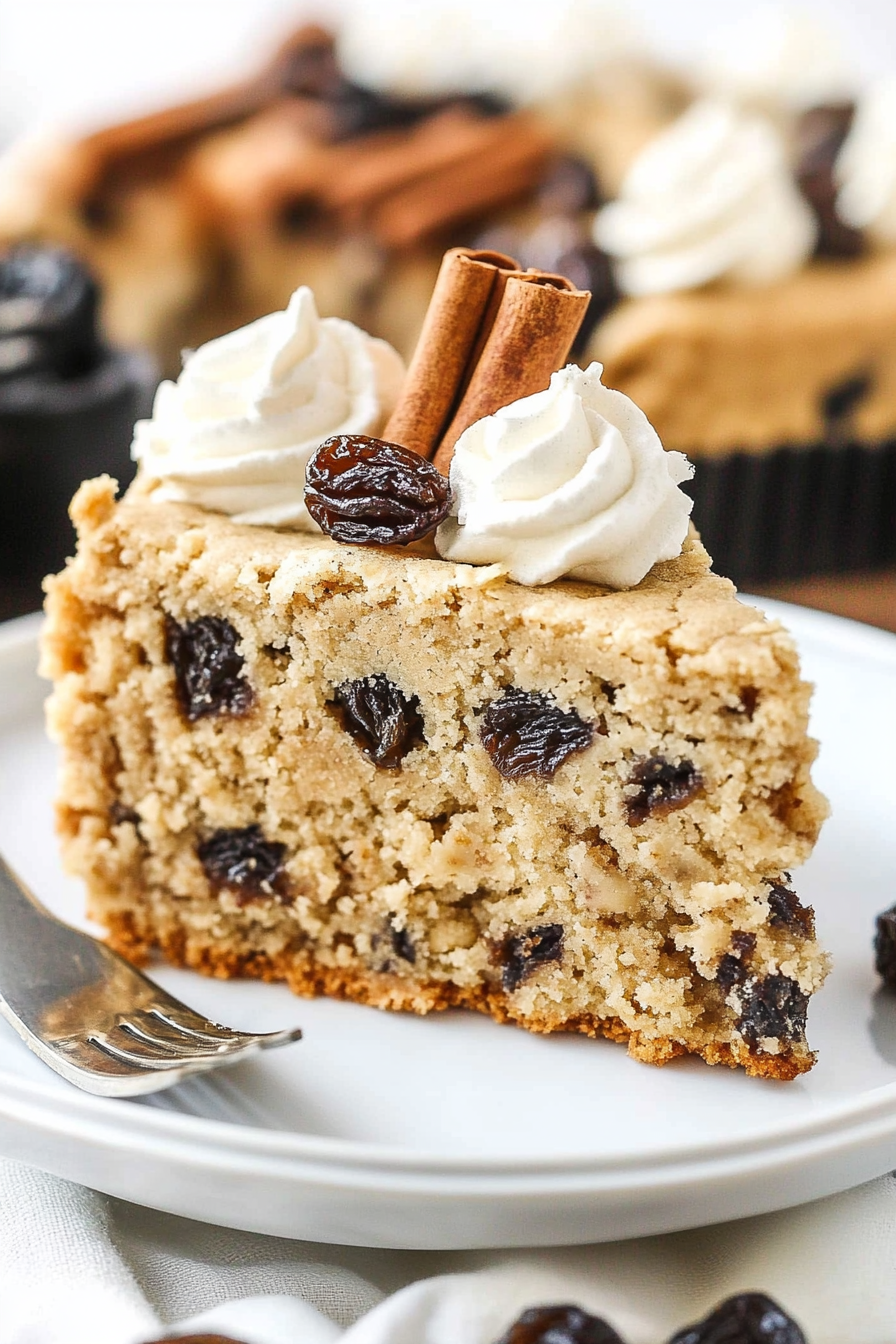
Best Soft Oatmeal Raisin Cookie Cake
There’s something about biting into a piece of freshly baked bread that just makes my whole day brighter. Maybe it’s the warm scent of chocolate mingling with the earthy sweetness of zucchini, or perhaps it’s the cozy routine of pulling a loaf out of the oven on a lazy Sunday. I remember my grandma making her famous zucchini bread, always announcing, “It’s healthy enough to eat for breakfast!” — and honestly, she wasn’t wrong. This zucchini chocolate swirl loaf is a twist on that old classic, and it’s become one of my go-to recipes when I need comfort, a quick treat, or just something a little special for weekend brunch. The best part? It’s incredibly easy, and even my kids ask for this one all the time. Plus, I always do this when I have those extra zucchinis sitting in the fridge, feeling a little lonely. Trust me, the smell alone will bring everyone running to the kitchen! It’s like a hug in loaf form, and I promise it tastes as good as it looks — moist, chocolaty, with just the right hint of zucchini’s subtle flavor.
What is Zucchini Chocolate Swirl Loaf?
This zucchini chocolate swirl loaf is essentially a moist, tender bread that combines grated zucchini with rich cocoa swirls. Think of it as a cross between zucchini bread and a chocolate cake, but in a loaf shape that’s perfect for slicing. The zucchini adds moisture and a bit of nutritional boost, while the chocolate swirl makes it feel indulgent without going overboard. It’s kind of like a sneaky treat that you can justify eating for breakfast, brunch, or an afternoon snack. The name itself says a lot — it’s about the harmonious blend of veggies and chocolate, making the ordinary extraordinary. and the name captures that cozy, homey feeling I love about baking. It’s perfect for using up those zucchinis from the garden or CSA box, and it’s guaranteed to wow anyone who takes a bite. Think of this as the loaf you bring to brunch and find everyone fighting over the last slice—every single time.
Why you’ll love this recipe?
What I love most about this zucchini chocolate swirl loaf is how effortlessly it combines two beloved flavors into one. The moistness of the bread is just perfect—soft but not dense—and the swirl of melt-in-your-mouth, deep chocolate goodness is such a surprise when you cut into it. It’s honestly a lifesaver on busy nights because I always keep a batch in the freezer—ready to defrost and toast whenever cravings hit. And trust me, the ingredients are super budget-friendly—just basic pantry staples and a couple of zucchinis. What makes this stand out in my recipe rotation is how versatile it is. You can add nuts or berries, switch up the cocoa powder for a mocha twist, or even make mini muffins if you’re feeling mini-sized! My kids ask for this all the time, especially when they want a sweet treat that feels a little healthy. It’s also great for snacking at school, sharing with friends, or even gifting for a homemade touch. This loaf is more than just a dessert; it’s comfort, a little elegance, and a ton of nostalgia wrapped into one slice.
How do you make Zucchini Chocolate Swirl Loaf?
Quick Overview
This zucchini chocolate swirl loaf comes together in a few simple steps—mix your dry ingredients, whisk your wet ones, combine everything without overdoing it, fold in the grated zucchini, then layer with a rich cocoa swirl before baking. It’s basically a one-bowl wonder, which I love because it means less cleanup. The secret is in the swirling—trust me on this one—you want those beautiful streaks of chocolate to peek through every slice. Once baked, it’s just a matter of letting it cool slightly before glazing or serving plain. The smell will fill your kitchen with warm chocolate and fresh zucchini, making everyone curious and hungry. It’s a forgiving recipe that adapts beautifully to your oven’s quirks, so once you get the hang of it, you’ll be making this on repeat.
Ingredients
For the Main Batter:
– 2 cups all-purpose flour (or gluten-free flour blend if needed)
– 1 teaspoon baking powder
– ½ teaspoon baking soda
– ½ teaspoon salt
– ½ cup granulated sugar (or coconut sugar for a healthier vibe)
– ¼ cup brown sugar (adds a molasses-y richness)
– ½ cup vegetable oil or melted butter
– 2 large eggs
– 1 teaspoon vanilla extract
– 1 cup grated zucchini (squeeze out excess moisture for the best texture)
For the Filling (Chocolate Swirl):
– ¼ cup unsweetened cocoa powder
– ½ cup hot water or brewed coffee (for a more intense chocolate flavor)
– ¼ cup brown sugar (more or less depending on sweetness preference)
– 1 teaspoon vanilla extract
For the Glaze (optional but recommended):
– ½ cup powdered sugar
– 1-2 teaspoons milk or cream
– A dash of vanilla extract
– A sprinkle of cocoa or chopped nuts for topping
Step-by-Step Instructions
Step 1: Preheat & Prep Pan
Set your oven to 350°F (180°C). Grease your loaf pan generously—trust me, this is the step that keeps your bread from sticking—and line it with parchment paper if you want a super clean release. While the oven warms up, grate your zucchinis and squeeze out excess moisture with a kitchen towel—this is the secret to keeping your loaf moist without getting soggy. I always do this when I want a nice crumb; it makes all the difference.
Step 2: Mix Dry Ingredients
In a large bowl, whisk together your flour, baking powder, baking soda, salt, and both sugars. Mixing dry ingredients well is key for even rising and fluffy texture. I actually sift mine sometimes just to get everything really combined and airy—makes a noticeable difference! Set this aside for now.
Step 3: Mix Wet Ingredients
In a separate bowl, beat the eggs, then add the oil, vanilla, and grated zucchini. I’ve tested this with almond milk instead of eggs when I’m feeling plant-based, and it still turns out wonderful—moist and flavorful. Just keep in mind that the eggs help bind everything together, so if you’re vegan, experiment with flax eggs or apple sauce. Whisk until smooth and combined.
Step 4: Combine
Make a well in your dry ingredients and pour in your wet mixture. Using a spatula, fold gently until everything’s just combined—don’t overmix, or your loaf might turn out dense. A few lumps are okay! You want airy batter that’ll rise well.
Step 5: Prepare Filling
In a small bowl, whisk together your cocoa powder, hot water (or coffee), brown sugar, and vanilla until smooth. It should be pourable but not runny—like thick syrup. This is what will create those beautiful chocolate swirls that make this loaf so irresistible.
Step 6: Layer & Swirl
Pour about half of the batter into your prepared loaf pan. Dollop half of your chocolate mixture on top, then repeat with the remaining batter and chocolate. Using a knife or skewer, swirl gently through the layers—don’t overmix, or you’ll lose the marbled effect. I like making big swooping motions to get nice streaks.
Step 7: Bake
Pop your loaf into the oven and bake for about 50-60 minutes, or until a toothpick inserted in the center comes out clean. I always start checking around 50 minutes because ovens vary. If the top gets too dark early on, tent it loosely with foil. Just trust your nose—when it smells all chocolatey and a toothpick comes out clean, it’s time!
Step 8: Cool & Glaze
Let the loaf cool in the pan for about 15 minutes, then transfer it to a wire rack. If you’re glazing, mix your powdered sugar with just enough milk and vanilla until smooth, then drizzle over the slightly warm loaf. It sets quickly and gives that glossy finish. I love adding a sprinkle of chopped nuts or extra cocoa dusting for a professional touch.
Step 9: Slice & Serve
When it’s completely cooled, slice with a serrated knife for neat edges. Serve slightly warm or at room temperature with a dollop of whipped cream or a cup of coffee on the side. Honestly, if you let it sit overnight, the flavors deepen, making it even more addictive the next day.
What to Serve It With
This loaf is so versatile, I’ve served it all kinds of ways. For breakfast, it’s fantastic toasted—spread lightly with butter or jam, paired with a mug of hot coffee or tea. My kids love it as a mid-morning snack, and it disappears in minutes around here. For brunch, I like to serve slices with fresh berries and a splash of cream, or even a dollop of Greek yogurt for extra richness. It’s a lovely addition to a casual weekend breakfast table—looks pretty plated, tastes decadent. When I want to jazz it up for dessert, I’ll add a splash of liqueur in the glaze or sprinkle with powdered sugar and chocolate shavings. Trust me, it’s a crowd-pleaser at any time of day or occasion. And on cozy nights, I’ve just reheated slices wrapped in foil—still soft, still delicious.
Top Tips for Perfecting Your Zucchini Chocolate Swirl Loaf
Like any baked good, a few little tricks make all the difference. First, always squeeze out as much moisture as possible from your zucchini; I’ve learned this the hard way—moisture is the enemy of a fluffy crumb. Use a clean dish towel or cheesecloth, and push out excess water gently. If you notice your batter is a bit thick, don’t hesitate to add a splash of milk—your loaf benefits from a little looseness.
For the swirling, use a skewer or butter knife to make big figure-eight motions; this creates those gorgeous streaks that seem like a little surprise in every slice. If you want a more intense chocolate flavor, add a bit more cocoa or even a handful of chocolate chips folded into the batter—just don’t overmix after adding chips, or they’ll sink to the bottom.
When it comes to baking, keep an eye on your oven’s quirks—every oven heats differently. I rotate the loaf halfway through baking and start checking for doneness around the 50-minute mark. If your top browns too quickly, tent it with foil to prevent burning.
In terms of variations, try swapping out the cocoa for cinnamon and nutmeg in the swirl for a spiced version, or fold in chopped walnuts or dried cranberries for extra texture. The batter is forgiving, so don’t be shy experimenting.
One secret I’ve learned after countless batches: letting the loaf sit covered at room temperature overnight intensifies the flavors, making it even more irresistible the next day. It’s like a fine wine—better with age, but still delicious fresh out of the oven.
Storing and Reheating Tips
Once cooled, store your zucchini chocolate swirl loaf in an airtight container at room temperature for up to two days—perfect if you plan to enjoy it fresh. To keep it fresher longer, wrap tightly in plastic wrap and pop it into the fridge; it’ll stay good for about five days. Just note that refrigeration can sometimes dry out baked bread, so I recommend reheating slices in the microwave for about 15 seconds or briefly in a toaster oven—trust me, it tastes just as good warm and moist. For longer storage, slices freeze beautifully—wrap wrapped slices in foil or place in a freezer bag, and they’ll keep for up to three months. Thaw at room temperature or reheat directly from frozen for a quick indulgence. If you’re planning to glaze, I suggest adding it fresh because the glaze soaks into the bread slightly when stored—best when freshly drizzled.
Frequently Asked Questions
Final Thoughts
There’s nothing quite like the smell of a warm loaf baking in the oven—especially when it’s filled with the combined comfort of zucchini and chocolate. This zucchini chocolate swirl loaf is a recipe I’ve made countless times, and each batch seems to get better, whether I experiment with add-ins or try different toppings. It’s my go-to for a quick breakfast, a cheerful brunch centerpiece, or even a thoughtful gift wrapped in parchment and ribbon. I love how flexible it is; you can make it healthier, richer, or more indulgent depending on your mood. Most importantly, it always disappears quickly in my house, so I know it’s a winner. I hope you try it and find as much joy in baking and sharing it as I have. Happy baking — and don’t forget to tell me all about your twists and toppings in the comments!
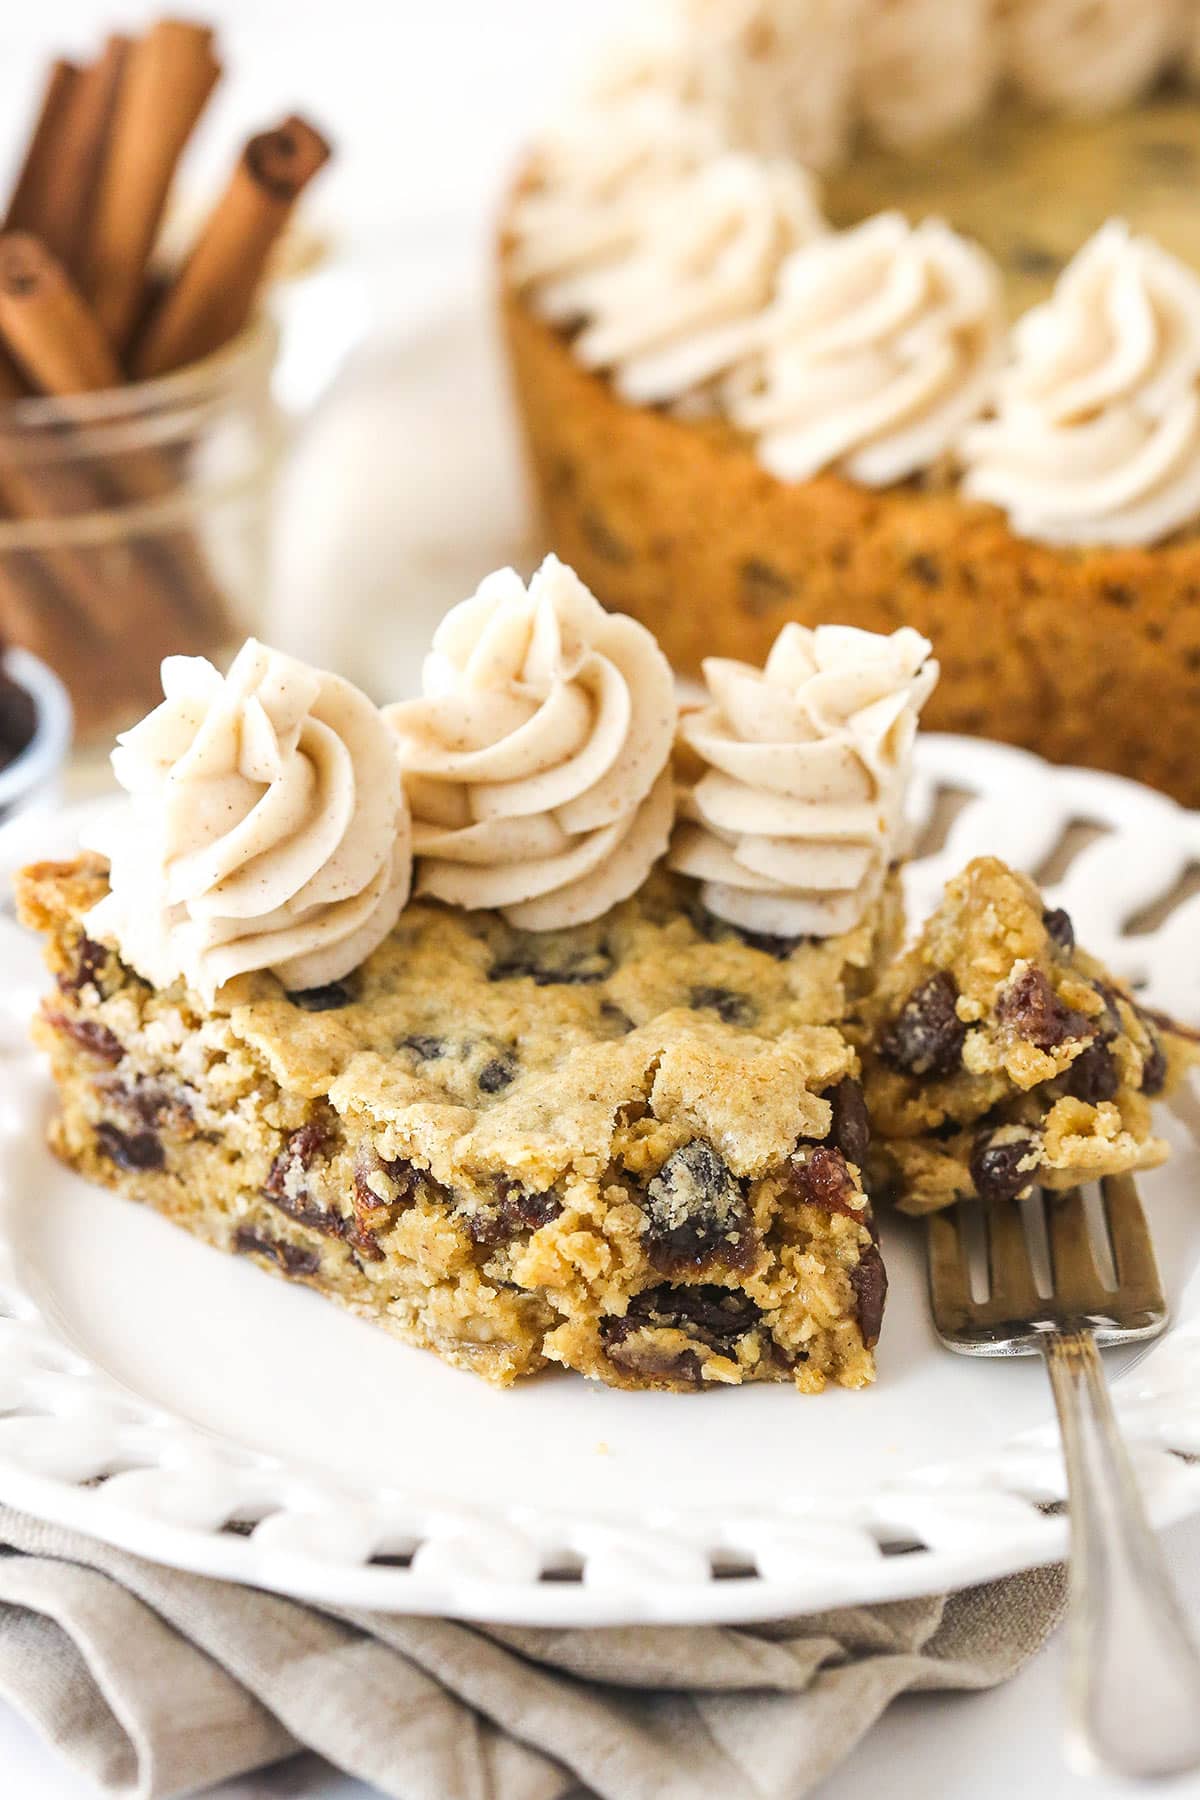
oatmeal raisin cookie cake
Ingredients
Method
- Preheat oven to 350°F. Prepare a 9-inch round cake pan with parchment paper and spray with non-stick spray.
- In a medium bowl, whisk together flour, baking soda, cinnamon, and salt. Set aside.
- In a large mixing bowl, beat butter, brown sugar, and sugar until creamy and light, about 2 minutes.
- Add eggs one at a time, beating well after each addition. Mix in vanilla.
- Gradually add dry ingredients to wet mixture, mixing just until combined.
- Stir in oats and raisins.
- Evenly press dough into prepared pan. Optional: press additional raisins on top.
- Bake for 18-20 minutes or until edges are golden. Cool in pan before transferring.
- Prepare buttercream: beat butter until smooth, gradually add powdered sugar and mix well. Add maple extract, cinnamon, and 1 tablespoon heavy cream. Adjust consistency with remaining cream if needed.
- Pipe or spread buttercream over cooled cookie cake. Serve and enjoy!


I totally agree! There’s nothing like the warm, comforting aroma of freshly baked oatmeal raisin cookies to lift your spirits. This recipe sounds amazing!