

Spiced Pork Dinner A Caribbean Delight
There’s something about pulling a warm slice of coffee cake out of the oven that instantly feels like a hug from an old friend. I remember my grandma baking her famous zucchini swirl coffee cake on lazy weekend mornings, the smell wafting through the house, tugging everyone out of bed. It’s funny how a simple combination of zucchinis, cinnamon, and a tender crumb can become a family favorite, right? When I first discovered this recipe, I was skeptical—zucchini in a sweet cake? But let me tell you, it’s a game-changer. It’s moist, flavorful, and honestly, sneaks a veggie into your day in the best way. My kids ask for this all the time, especially when I want to make something quick, impressive, and totally satisfying. Plus, it’s a great way to use up summer zucchini, or even those big ones from the farmers’ market. Trust me, once you try this, it’ll be in your regular baking rotation. Best part? It’s incredibly simple and humble—just like sharing a cozy coffee with a friend. Let’s dive into how to make it happen!
What is Zucchini Swirl Coffee Cake?
This zucchini swirl coffee cake is basically a tender, cinnamon-spiced crumb cake that hides a beautiful ribbon of sweet zucchini filling in the middle. Think of it as a cross between your classic coffee cake and a vegetable-packed indulgence. It got its name because of the swirled layer of zucchini which adds moisture and a subtle sweetness—kind of like a secret ingredient that everyone loves but nobody suspects. It’s essentially a versatile cake that’s perfect for breakfast, brunch, or even a cozy fallback when you need a quick dessert. What I adore about this recipe is how it balances the earthiness of zucchini with the warm aroma of cinnamon and sugar, creating a surprisingly decadent treat. The name “coffee cake” might make you think it’s just for mornings, but honestly, it’s great any time of the day, especially with a dollop of whipped cream or a drizzle of glaze. Think of it as the kind of dessert you can whip up on a weeknight and still feel fancy—perfect for sharing with friends or just keeping all to yourself!
Why you’ll love this recipe?
Okay, I promise I’m not just fan-girling here, but this zucchini swirl coffee cake is truly a little miracle in my kitchen. What I love most about this is how it combines simplicity with that wow factor. The flavor? It’s enticing—warm cinnamon, a hint of vanilla, and the natural sweetness of zucchini, which gives the cake an incredible moistness that you just don’t get with typical cakes. It’s like a little spa day for your taste buds! Plus, it’s a total budget-friendly baker’s dream—your basic pantry staples come together so effortlessly. No fancy ingredients required. And the best part? The versatility. You can swap out the zucchini for apples or carrots if you like, or add some nuts for crunch. This recipe is also a lifesaver on busy nights because I’ve tested it with extra-lean Greek yogurt instead of butter, and honestly, it turned out just as tender. It’s wholesome enough to serve for breakfast but indulgent enough to wow friends at brunch or dinner parties. My favorite thing? The smell alone makes the whole house feel cozy—baking this is like giving yourself a warm hug. It’s one of those recipes that feels special without all the fuss, and honestly, I think that’s what makes it so beloved in my house.
How do I make Zucchini Swirl Coffee Cake?
Quick Overview
Making this zucchini swirl coffee cake is easier than you might think. The key is preparing your zucchini filling ahead of time—grating and squeezing out excess moisture is a game-changer. Then, it’s just a matter of mixing your batter, layering the zucchini mixture in the middle, swirling it gently, and baking until golden. I love how forgiving this recipe is—once you get the hang of folding in the zucchini and swirling the batter, it practically makes itself. The real joy is in that surprise ribbon of zucchini at the center that keeps each bite moist and flavorful. Honestly, I always do this when I want to impress with minimal effort—it’s so satisfying to see how pretty the swirl turns out! Plus, baking on a lazy Sunday or a busy weekday evening, this comes together in under an hour. You’ll do a quick prep, pop it in the oven, and then enjoy that heavenly aroma filling your kitchen. Who knew healthy could taste this indulgent?
Ingredients
For the Main Batter:
– 1 ½ cups all-purpose flour (I always use unbleached for a better flavor)
– ¾ cup granulated sugar (or coconut sugar if you want a slightly caramel-y note)
– 1 teaspoon baking powder
– ½ teaspoon baking soda
– ½ teaspoon salt
– 1 teaspoon ground cinnamon (trust me on this—don’t skimp!)
– ½ cup unsalted butter, melted (or coconut oil for a dairy-free version)
– 2 large eggs
– ½ cup sour cream or Greek yogurt (adds all that moisture and tang)
– 1 teaspoon vanilla extract
For the Zucchini Filling:
– 1 cup grated zucchini (I prefer using a box grater, and I always squeeze out the moisture with a clean dish towel—game changer!)
– 2 tablespoons brown sugar
– 1 teaspoon cinnamon
– 1 tablespoon flour (to help thicken the filling)
– A dash of nutmeg if you’re feeling spunky
For the Glaze (optional but highly recommended):
– ½ cup powdered sugar
– 1–2 teaspoons milk or cream
– A splash of vanilla
– A sprinkle of cinnamon for extra warmth
Step-by-Step Instructions
Step 1: Preheat & Prep Pan
Set your oven to 350°F (175°C). Grease a 9-inch round or square baking pan with butter or non-stick spray. I also like lining the bottom with parchment for easy removal—trust me, it makes life so much simpler. Have your zucchini grated and squeezed ready—this step is key for moist, tender cake without excess water. Just a quick tip: I always do this when I’m ahead of the game, especially if my zucchini has a lot of moisture.
Step 2: Mix Dry Ingredients
In a big bowl, whisk together the flour, sugar, baking powder, baking soda, salt, and cinnamon. This ensures even distribution of the leavening and spices. Proper mixing here is crucial—no clumps!—so the cake bakes evenly and rises nice and tall.
Step 3: Mix Wet Ingredients
In a separate bowl, beat the eggs, then add melted butter, sour cream, and vanilla. Mix until smooth. I’ve tested this with almond milk instead of sour cream, and it actually made it even creamier—so feel free to experiment if you’re dairy-free! Just keep an eye on the batter’s consistency—it should be smooth but not runny.
Step 4: Combine
Add the wet ingredients into the dry, gently folding until just combined. Be careful not to overmix—this is where a lot of people go wrong and get a dense cake. A few streaks of flour are okay; the batter will be thick but pourable.
Step 5: Prepare Filling
Mix your grated zucchini with brown sugar, cinnamon, flour, and nutmeg in a small bowl. The flour helps to set the filling and prevent it from being too watery. Give it a stir—then set aside. I love to taste a tiny bit—yep, it’s as good as it smells!
Step 6: Layer & Swirl
Pour half of the batter into your prepared pan. Spread evenly. Drop spoonfuls of the zucchini filling over this layer, then add the remaining batter on top. Use a butter knife or a skewer to swirl the layers gently—think of drawing figure-eight shapes or circles. The goal is to get a beautiful marbling effect, not to fully mix everything. Trust me, this is where the magic happens.
Step 7: Bake
Put the cake in your preheated oven and bake for 35-40 minutes. Start checking at the 35-minute mark—the top should be golden, and a toothpick inserted in the center should come out clean. Every oven is different; mine sometimes takes a minute or two more, especially if I forget to rotate halfway through. Keep an eye out—it’s easy to overbake, and you want it soft and moist.
Step 8: Cool & Glaze
Let your cake cool in the pan for about 15 minutes—this helps it set up. Transfer to a wire rack to cool completely, or if you’re impatient like me, dive right in slightly warm. Mix up that glaze with powdered sugar, milk, and vanilla, then drizzle generously over the top. I always add a tiny dash of cinnamon to my glaze—it ties everything together beautifully.
Step 9: Slice & Serve
Use a sharp serrated knife to cut perfect slices. This cake is super tender, so gentle sawing is best. Serve it slightly warm or at room temperature with a cup of coffee or tea. My family loves it with a dollop of whipped cream or a streusel topping—both are game changers. Honestly, I can’t tell you how many times I’ve made this on a whim and watched everyone go back for seconds. It disappears in minutes around here!
What to Serve It With
This zucchini swirl coffee cake is so versatile, it practically adapts to your mood or occasion. For breakfast, pair it with a strong black coffee or a latte—I swear the aroma alone wakes you up. As a brunch dessert, serve slices warm with a smear of butter and maybe some fresh berries on the side. It’s also fantastic as an afternoon snack with a glass of milk or herbal tea. And if you’re feeling fancy, dust it with powdered sugar or serve it with a drizzle of honey and a dollop of Greek yogurt. Once cooled, it keeps beautifully wrapped in foil or stored in an airtight container—perfect for those mornings when you need a quick, comforting breakfast. Honestly, I even like to warm up a slice and serve it with a scoop of vanilla ice cream for an impromptu dessert. It’s hearty enough to feel indulgent but wholesome enough to feel good about, too. And hey, leftovers? They make a killer breakfast the next day!
Top Tips for Perfecting Your Zucchini Swirl Coffee Cake
After making this recipe dozens of times, I’ve picked up a few tricks I wanna share. First, always squeeze out as much moisture as possible from the zucchini—trust me, soggy cake is not the vibe. I use a clean dish towel to wring out every last drop, especially if the zucchini is extra watery. Second, don’t overmix your batter once you’ve added the wet ingredients; a gentle fold keeps things tender and fluffy. When swirling, I like to use a skewer or a butter knife and draw figure eights—this creates a stunning marbled effect that catches everyone’s eye. I’ve also tried swapping out the sugar for maple syrup or honey, which adds a lovely depth of flavor—just cut back slightly on the liquid. For the filling, adding crushed walnuts or chopped pecans gives a wonderful crunch—my kids love those! Baking: oven racks matter—middle rack is golden for even heat, but I sometimes rotate if I see one side browning faster. And the glaze? I prefer it a little thick so it stays put, but you can thin it out if you want a more drizzly look. Honestly, every time I tweak something, I learn something new—kitchen experiments keep things fun! My biggest lesson? Patience. Let the cake cool completely before glazing. That way, the glaze doesn’t melt right off, and you end up with that perfect glossy finish. Trust me, it’s all about details—like every good story, it’s the little things that make it memorable.
Storing and Reheating Tips
This cake keeps well and still tastes amazing the next day—my secret is proper storage. Once cooled, I wrap it tightly in plastic wrap or store it in an airtight container. At room temperature, it’s best to enjoy within two days—after that, the moisture starts to fade. If you want to keep it longer, the fridge is your friend—just make sure it’s well covered so it doesn’t dry out. It’s handy because this cake re-heats like a dream in the microwave—about 20 seconds or so until warm and cozy. For even longer storage, I freeze slices individually wrapped with parchment in a freezer-safe bag—defrost at room temp or gently warm before serving. A quick tip: don’t apply glaze until you’re ready to serve, unless you want it to get soggy. If you made a double batch, I like to reheat slices covered with foil at 300°F (150°C) for about 10 minutes—just enough to re-warm without drying out. My rule of thumb? If it smells as good as when it’s fresh, you’re golden. And honestly, the aroma alone makes any leftover slice worth anticipating!
Frequently Asked Questions
Final Thoughts
Honestly, this zucchini swirl coffee cake has become my go-to whenever I want something comforting yet surprisingly healthy. Every time I make it, I’m reminded that simple ingredients, a little love, and a few techniques can turn out something truly special. It’s one of those recipes that’s perfect for lazy weekends, last-minute brunches, or even unexpected guest visits—because everyone’s always impressed when a humble veggie sneaks into something this delicious. I love how adaptable it is too—you can swap ingredients, add nuts, or change the glaze to suit your mood. And the smell? It’s the kind of aroma that makes your house feel like a warm hug. I hope you try this and find as much joy in making it as I do. And hey, if you tweak the recipe or find your own favorite add-ins, I’d love to hear about it! Happy baking, my friend—may each slice bring you comfort and a little bit of sunshine.
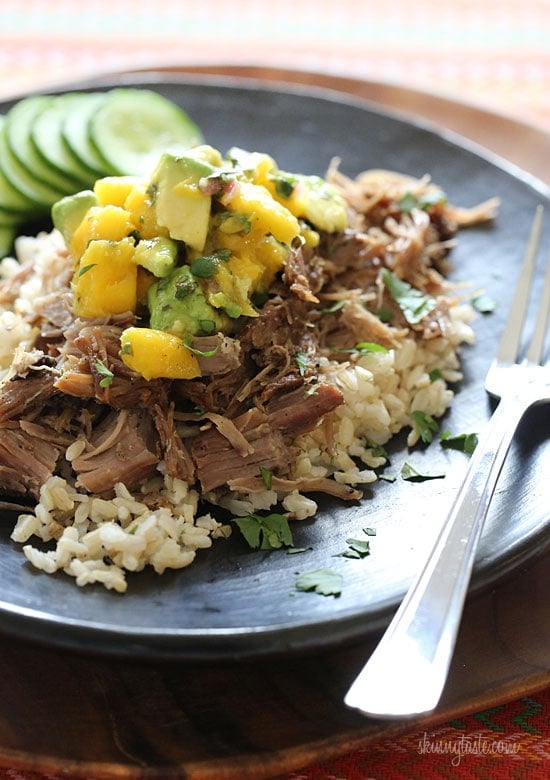
Jerk Pork
Ingredients
Method
- Using a sharp knife, cut slits into the pork and stuff holes with half of the crushed garlic.
- Combine the remaining garlic, jerk seasoning, and salt, rub all over pork.
- Place in a large container, pour the lime and orange juice over the pork; cover and refrigerate 5 hours or overnight, turning pork occasionally.
- The next morning, put everything in the crock pot and cook on LOW for 9 hours.
- After 9 hours, remove pork and shred using two forks.
- Remove liquid from crock pot and reserve.
- Add shredded pork back to the slow cooker.
- Add about 1 cup of the liquid back into the crock pot and taste for salt and pepper.
- Let it cook an additional 15 minutes.
- Meanwhile, make the Caribbean salsa: combine all the ingredients in a bowl, season to taste with salt and pepper. Refrigerate salsa until ready to serve.


That sounds so comforting! I love how baking brings back such warm memories.
This recipe sounds amazing—I’ve always loved how a warm meal can feel so comforting and homey!
That sounds so comforting! Nothing beats a homemade coffee cake with love and spice—just like grandma used to make.
That sounds delicious! I can almost smell the spices just reading about it.
This sounds amazing! That spiced pork and coffee cake combo sounds like the perfect comfort meal—warm, flavorful, and full of love.