
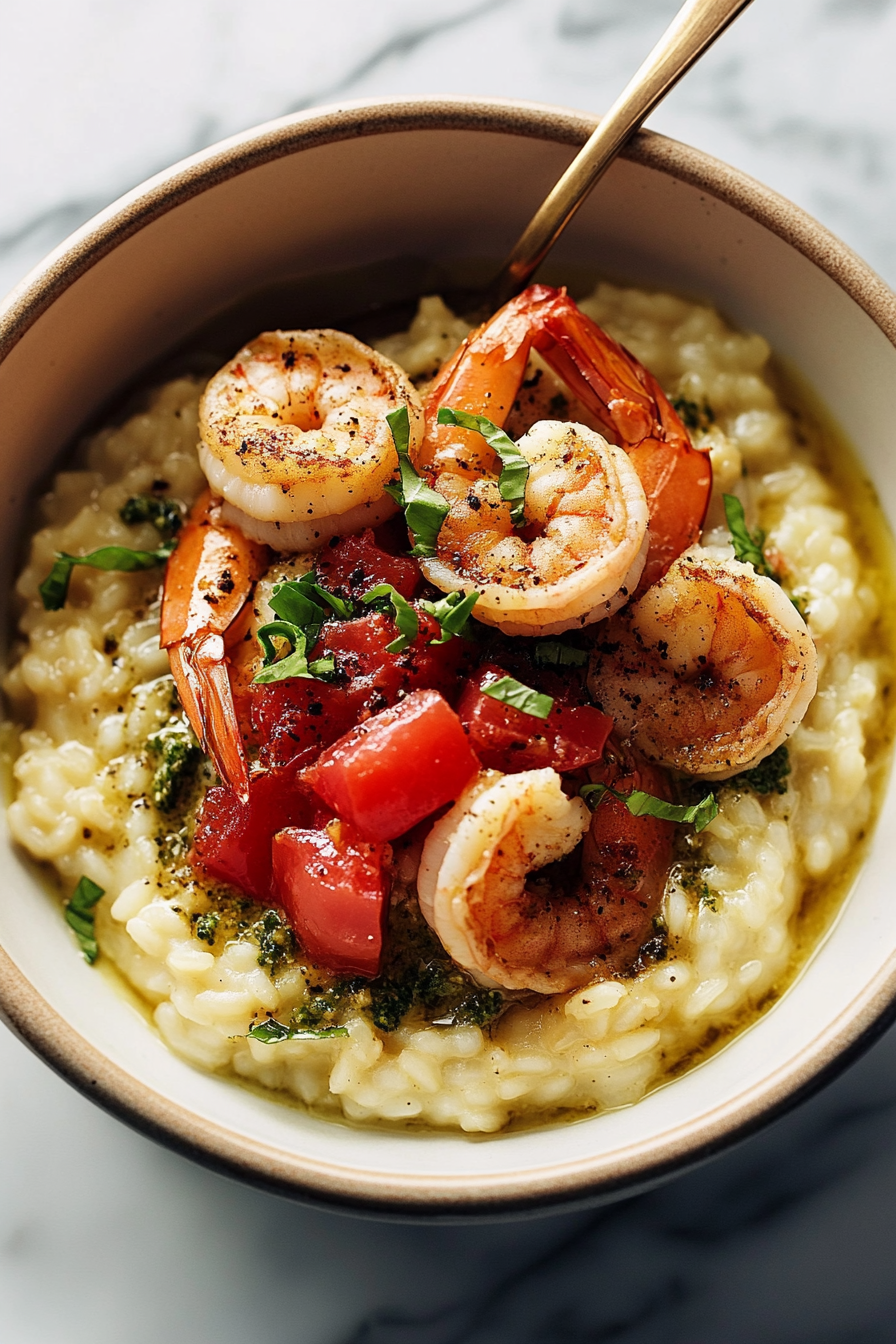
Creamy Pesto Shrimp Risotto Recipe
Have you ever found yourself staring at a pile of zucchinis from the garden, wondering what in the world to do with them before they go past their prime? I get it. I’ve been there — eyes wide as my kids ask, “Can we make something sweet with these?” This zucchini brownie recipe is my go-to answer. It’s like a little secret I love sharing, because no one ever guesses there’s zucchini hiding in that rich, fudgy goodness. And honestly, this one’s a lifesaver on busy nights when a quick treat is all I’ve got time for. The best part? It’s not only incredibly flavorful but also sneaks in some veggies, making it a win for both kids and grown-ups alike. I’ve tested this recipe with everything from almond milk to coconut oil, and every tweak just seems to make it better. The smell alone when these are baking is enough to bring everyone into the kitchen — trust me, it’s dangerously good. Whether you’re feeling a craving at 10pm or want to impress friends with a healthy twist, this recipe is what I turn to every single time.
What is Zucchini Brownies?
Think of zucchini brownies as the lovechild of classic chocolate brownies and a sneaky vegetable. Essentially, it’s a moist, fudgy brownie batter infused with grated zucchini. The name says it all — zucchini, the humble summer squash, is quietly doing its magic by adding moisture and a touch of nutrition without overpowering the rich chocolate flavor. It’s kind of like that one comfy sweater that’s been around forever — familiar, cozy, and surprisingly versatile. This recipe probably started out as a way to clear out the garden zucchini, but over time, I realized how perfectly it balances sweetness and density. It’s essentially a forgiving, easy-to-make treat that feels like a little bit of baking magic in every bite. And don’t worry — once baked, you can’t even tell there’s zucchini in there unless I tell you, which I love doing just to get a fun reaction. It’s a flavor and texture combo that makes people say, “Wow, I’d never guess!”
Why you’ll love this recipe?
What I love most about these zucchini brownies is how versatile and honest they are — it’s like a hug on a plate. The flavor? Rich, chocolatey, and just sweet enough, with a subtle earthiness that sneaks in from the zucchini, but nobody will notice unless I tell them. They’re moist and fudgy, kind of like a gooey center of a classic brownie, with a slight crumb on top that’s just perfect for snacking or dessert. These brownies are dead-simple to make — I always do this when I need a fast dessert that impresses. You don’t need any fancy gadgets; just a grater, a bowl, and a good whisk. Plus, they’re budget-friendly, using pantry staples like cocoa powder and flour, and I’ve found they even work well with black beans or sweet potatoes if you want to tweak things. My kids ask for these all the time, and honestly, I don’t mind serving up a sneaky veggie treat that disappears in minutes during snack time. They’re also endlessly versatile — serve them warm with a dollop of whipped cream, or chill and cut into squares for a more structured dessert. I’ve made these for parties, lunchboxes, and just to satisfy a late-night chocolate craving — each time, they get rave reviews.
How do I make Zucchini Brownies?
Quick Overview
This recipe is all about simplicity and flavor. First, grate the zucchini and squeeze out as much moisture as you can — trust me, it keeps your brownies from turning into a soggy mess. Mix dry ingredients in one bowl, wet ingredients in another, then fold everything together gently until just combined. Pour half of the batter into your pan, spread the prepared zucchini filling, then swirl the remaining batter on top to create a marbled effect. Bake until a toothpick inserted near the center comes out with moist crumbs — not wet batter. While they’re cooling, I like to prepare a quick glaze or dust with powder sugar, but honestly, these are fantastic just sliced and served as-is. What makes this method special is how forgiving it is — overmixing sometimes leads to dense brownies, so I’ve learned to fold gently and watch for that shiny batter consistency. This is perfect when you want a quick, satisfying bake that feels fancy but is really just a few ingredients and half an hour away from the first bite.
Ingredients
For the Main Batter:
- 1 ½ cups all-purpose flour (I like using half whole wheat for extra nutrition, but all-purpose works great too)
- ½ cup cocoa powder (sifted to avoid lumps)
- 1 teaspoon baking powder
- ½ teaspoon salt
- 1 cup sugar (brown, white, or a mix — I often do a little of both)
- ½ cup vegetable oil (or melted coconut oil for extra flavor)
- 2 large eggs
- 1 teaspoon vanilla extract
For the Filling:
- 1 medium zucchini, grated (the secret to keeping things moist and fudgy)
- Optional: ½ cup melted chocolate chips for extra chocolate punch
For the Glaze:
- ½ cup powdered sugar (or more, depending on desired thickness)
- 1 tablespoon milk or cream (add more for a thinner glaze)
- Optional: a splash of vanilla or a sprinkle of cocoa powder for flavor
Step-by-Step Instructions
Step 1: Preheat & Prep Pan
Set your oven to 350°F (175°C). Line a square or rectangular baking dish with parchment paper or lightly grease it. I like using a 9-inch square pan — it gives a nice thick slice. Make sure to set everything nearby because once you start mixing, it’ll come together fast.
Step 2: Mix Dry Ingredients
In a large bowl, whisk together the flour, cocoa powder, baking powder, and salt. This not only combines everything evenly but also helps prevent clumps. Sifting the cocoa and flour together really keeps the batter smooth and chocolatey all the way through. I learned this trick after some lumpy brownies — never skip this step!
Step 3: Mix Wet Ingredients
In a separate bowl, whisk together sugar, oil, eggs, and vanilla until they look a bit frothy and well combined. I always make sure my eggs are at room temperature because it mixes in better. Sometimes I even microwave them for 10 seconds — just enough to take the chill off. The smell of vanilla and cocoa together is what makes my kitchen feel cozy.
Step 4: Combine
Pour the wet mixture into the dry ingredients and fold gently with a spatula just until no streaks remain. Overmixing is the quick way to dense brownies, so I always stop as soon as the batter looks shiny and thick. Then, fold in the grated zucchini — squeeze out any extra moisture with a clean kitchen towel or paper towel first. The zucchini will release some water during baking, so I want to keep it from turning into a soup.
Step 5: Prepare Filling
Grab that grated zucchini and, if you like, stir in some chocolate chips. It’s totally optional, but I love that little melty surprise inside. You can also add chopped nuts or a sprinkle of sea salt on top for added texture.
Step 6: Layer & Swirl
Pour half of the brownie batter into your prepared pan. Spread the zucchini filling evenly over this layer, then carefully pour the remaining batter on top. Use a skewer or a butter knife to swirl gently for a marbled effect. It’s a fun step that makes each slice a little work of art — no two are exactly the same, which I think adds charm.
Step 7: Bake
Pop the dish into the oven and bake for about 25-30 minutes. Start checking at 25 with a toothpick inserted near the center; it should come out moist but not wet. If it’s still super wet, give it a few more minutes. Every oven is different, so I suggest setting a timer and then doing the toothpick test instead of relying solely on timing.
Step 8: Cool & Glaze
Let the brownies cool in the pan for at least 15 minutes. I think these are best slightly warm, but they cut beautifully when fully cooled. Drizzle with your glaze or dust with powdered sugar. I often do a quick glaze by mixing powdered sugar with just enough milk to make a pourable consistency. It’s a cute finishing touch and adds a little extra sweetness.
Step 9: Slice & Serve
Use a sharp knife to cut into squares, wiping it clean between cuts for neat edges. Serve with a glass of cold milk or a dollop of whipped cream — whichever mood strikes. These are just as good the next day, especially once the flavors have had a little time to mingle.
What to Serve It With
Nothing beats pairing these zucchini brownies with a good cup of coffee or tea. For breakfast or brunch, I love serving them alongside a latte or a cold glass of milk — the chocolate and zucchini combo feels like a treat but also surprisingly nourishing. During family gatherings, I like to cut them into smaller squares and set them out with fresh berries and a dusting of powdered sugar; everyone always thinks they look fancy. As an after-dinner dessert, I’ll warm them slightly and top with vanilla ice cream or a drizzle of caramel sauce — pure comfort. And on casual days, I just peel myself a piece, settle on the porch, and savor every bite, feeling proud of how sneaky and delectably good these are.
Top Tips for Perfecting Your Zucchini Brownies
Over the years, I’ve learned a few tricks to make these brownies even better:
- Zucchini Prep: Squeeze out as much moisture as possible after grating. I do this with my hands or a clean towel. Excess water can make the brownies soggy, and nobody wants that!
- Mixing Advice: Gently fold, don’t beat — overmixing is the enemy of fudgy brownies. When the batter is shiny and just combined, stop. Trust me, that’s when they turn out perfect.
- Swirl Customization: Use a skewer or a toothpick to create ripples and marbling. You can be playful here — try different patterns or even add a swirl of peanut butter or Nutella for an indulgent twist.
- Ingredient Swaps: I’ve tested this with ricotta and Greek yogurt — both add extra moisture and a subtle tang. For healthier options, you can swap out some flour for oats or almond flour, but keep in mind it might change the texture slightly.
- Baking Tips: Every oven bakes differently. My trick is to start checking a few minutes early and watch for that moist but not raw look. Overbaking turns fudgy into crumbly, which nobody wants.
- Glaze Variations: Try adding a splash of espresso or a pinch of cinnamon to the glaze for an adult flavor boost. Some folks even sprinkle sea salt on top — which balances the sweetness beautifully.
This recipe has been a journey of trial, error, and delicious surprises. I’ve learned to adjust the zucchini amount for moister brownies or to add a bit more cocoa for deeper flavor. Every tweak has brought me closer to what I think is the perfect, decadent yet sneaky vegetable dessert. And honestly, I can’t wait for you to try it and tell me your own variations!
Storing and Reheating Tips
These brownies are quite hardy, and I love how they keep. Once cooled completely, store them in an airtight container at room temperature for up to 2 days. Just cover them loosely or use a container with a nice lid — fresh air is key to preventing sogginess. If you want to keep them longer, pop them in the fridge for up to a week. I recommend letting them come to room temp or giving them a quick 10-second zap in the microwave before serving — that way, the texture stays moist and fudgy. For freezing, wrap each brownie in plastic wrap, then place in a freezer bag or airtight container. They hold up beautifully for up to 3 months! When you’re ready to eat, thaw at room temp or warm gently in the microwave. Just remember, if you’re planning to add the glaze later, do that when the brownie is fully thawed — it sticks better and looks prettier.
Frequently Asked Questions
Final Thoughts
If you’re looking for a way to make your zucchini a little more exciting, or simply craving something rich and satisfying without the guilt, this zucchini brownie recipe is where you want to be. It’s a blend of cozy nostalgia and wholesome ingredients, wrapped up in a treat that tastes way indulgent than it really is. Over the years, I’ve made these for everything from after-school snacks to dinner parties — each time, they’re gone before I know it! The best part? The process is so easy, I often whip them up on a whim, and they always impress. If you try this out, I’d love to hear how it turns out or what variations you add. Just remember, cooking is all about having fun and making it your own — so don’t be afraid to experiment. Happy baking, and I can’t wait to hear how yours turn out!

pesto shrimp risotto
Ingredients
Method
- Place the shrimp, garlic, 1 tablespoon olive oil, salt, and lemon zest in a bowl or plastic bag. Mix to coat the shrimp and marinate in the fridge for about 1 hour.
- In a large skillet over medium heat, melt the butter. Add minced garlic and cook until fragrant, about 1 minute.
- Add arborio rice, stir to coat, then pour in white wine. Cook until the wine is absorbed, then add broth 1/2 cup at a time, stirring until each addition is absorbed and rice is creamy and tender.
- Stir in Parmesan cheese, truffle oil (if using), and adjust seasoning. Keep warm.
- Meanwhile, heat remaining 2 tablespoons olive oil in a skillet over medium-high heat. Cook marinated shrimp for 2-3 minutes per side until pink and cooked through. Brush with pesto in the last minute of cooking.
- Serve risotto topped with pesto shrimp, chopped tomatoes, fresh basil, and a drizzle of fresh lemon juice.

This looks amazing! I love how creamy and flavorful risotto can be—definitely adding this to my dinner rotation.
I love risotto, and this sounds amazing—perfect for using up garden veggies! Will definitely try this with extra zucchini.
This risotto sounds so comforting! I’ve been wanting to use up my garden zucchinis—maybe I’ll try adding some next time.
Love this recipe! The pesto adds such a fresh twist to risotto—definitely trying it this weekend.
I love risotto but never thought to add shrimp and pesto—this sounds amazing! Perfect use of zucchinis too, thanks for the creative idea.