
Tropical Cake Recipe How to Bake It
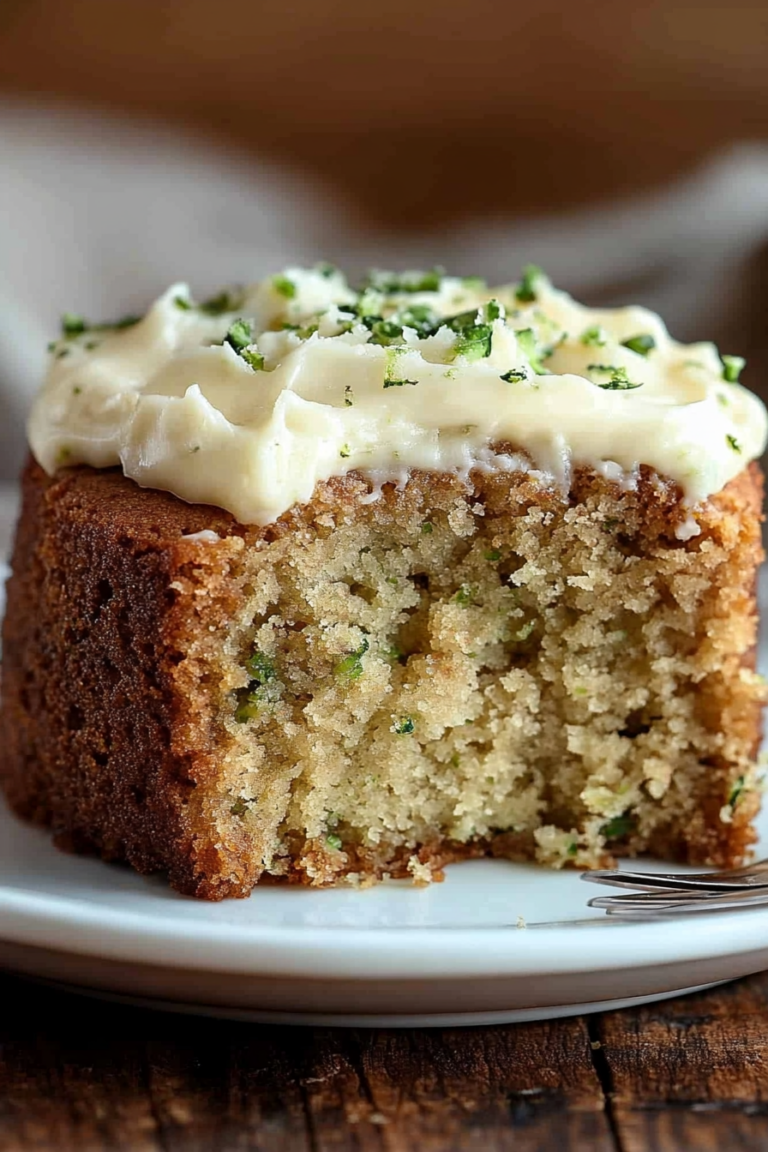
I remember the first time I made these zucchini cheesecake bars—my kitchen was filled with this warm, sweet aroma that instantly took me back to lazy Sundays at my grandma’s house. It’s funny how a simple dish can trigger a flood of childhood memories, right? What I love most about these is that they’re almost like a secret treat—crave something sweet but don’t want to bake a full cake? These are your lifesaver. They’re insanely easy to pull together, naturally moist, and the perfect way to sneak some extra veggies into your kid’s snacks without a fuss. Honestly, they disappear in minutes at my house, and I’ve made this recipe so many times, I could probably do it with my eyes closed. Trust me on this one: once you try it, it’s going to become a go-to for mornings, afternoons, or whenever a craving hits. Plus, they taste incredible even the next day—if they last that long!—and I promise, once you get the hang of it, you’ll be making these by the batch. Ready to see why I call this “Ulitimate Zucchini Cheesecake Bars”? Let’s dive in—your new favorite treat awaits!
What is Zucchini Cheesecake?
Think of these as the lovechild between a cheesecake and a healthy snack—only better because they’re far less intimidating to make than a traditional cheesecake. They’re essentially a creamy, cheesy base layered with tender zucchini bits, all sitting on a buttery crust that’s just a little crunchy. The name might throw you off at first—“cheesecake,” but it’s more like a rich, sweet, veggie-packed bar that’s perfect for breakfast, snack time, or even dessert. The zucchini adds moisture and a subtle veggie richness that pairs perfectly with the tangy cream cheese, while the crust provides that satisfyingly crumbly texture everyone loves. It’s a recipe that’s been my family’s secret weapon for turning a simple vegetable into a star of the show. It’s also surprisingly forgiving—so if you’re new to baking or just looking for something wholesome and crowd-pleasing, this is it. No fussy layers, no water baths, just straightforward comfort in every bite.
Why you’ll love this recipe?
So, why do I keep coming back to this zucchini cheesecake bars? For starters, the flavor is absolutely incredible. You get that rich, creamy tang from the cream cheese, balanced with just a hint of sweetness and the gentle veggie taste from the shredded zucchini. It’s like a hidden treasure—your friends will never guess how sneaky and healthy these are until they’re already hooked! What I love about this book is that it is so good. is how effortless they are to make. I always do this on busy weeknights when I want something special but I’m short on time. The prep is minimal, and the baking is straightforward—plus, I’ve tested this with almond milk instead of regular milk, and it actually made the batter even creamier! That’s a win for dairy-free friends. Cost-wise, it’s super budget-friendly because most of these ingredients are staples I already keep around. And versatility? Oh, it’s a dream. You can adapt the filling with different flavorings—think lemon zest, cinnamon, or even a sprinkle of crushed nuts on top. Bonus: these bars are a hit with kids, grown-ups, everyone! They’re perfect for a special weekend brunch or to pack in the lunchbox. Honestly, once you get the hang of this, it’s like having a magic wand—sweet, veggie-packed, and ridiculously easy.
How do I make Zucchini Cheesecake Bars?
Quick Overview
This recipe is all about balance—crust, creamy filling, and a tempting swirl of zucchini goodness. You start with a simple buttery crust pressed into your baking pan. Then, you whip up a rich, tangy cream cheese mixture, fold in shredded zucchini, and pour everything carefully over the crust. A quick swirl with a spoon gives it a marbled look that’s as pretty as it is delicious. Bake until golden, cool, then top with a shiny glaze if you like that extra sweet finish. It’s honestly so straightforward—most of your effort goes into mixing, layering, and waiting for that glorious bake. What makes this method special is how forgiving it is: no fancy techniques, just good old intuition and a bit of patience, and you’re rewarded with something that looks professional but tastes like a grandma’s hug in every bite.
Ingredients
For the Main Batter:
- 8 oz (about 225 g) cream cheese, softened — don’t skimp; it’s the star of the show
- 1 cup granulated sugar — classic sweetness that balances the tang
- 2 large eggs — room temp, please; they mix better that way
- 1 teaspoon vanilla extract — for that cozy warmth
- 1 cup shredded zucchini — grated finely and drained well
- 1/4 cup all-purpose flour — helps set everything up nicely
For the Filling:
- 1/2 cup sour cream or Greek yogurt — adds creaminess and tang
- 1 tablespoon lemon juice (optional but highly recommended!)
- A pinch of salt — to balance everything out
For the Glaze:
- 1/2 cup powdered sugar
- 1-2 teaspoons milk (or lemon juice for zing)
- Optional: a sprinkle of zest or chopped nuts
Step-by-Step Instructions
Step 1: Preheat & Prep Pan
Preheat your oven to 350°F (180°C). Line your 9×9-inch baking dish with parchment paper or butter generously—trust me, this helps a lot with cleanup and getting neat slices. Make sure your oven rack is in the middle so everything bakes evenly.
Step 2: Mix Dry Ingredients
In a small bowl, whisk together the flour and a pinch of salt. Set this aside. This step keeps things from clumping and helps you avoid overmixing the batter later on.
Step 3: Mix Wet Ingredients
In a large mixing bowl, beat the softened cream cheese and sugar until smooth and fluffy—you’ll notice it’s nice and creamy. Add eggs one at a time, mixing after each, until just combined. Stir in vanilla. The batter should be smooth and silky, with no lumps. I’ve tested this with a hand mixer and a stand mixer—both work fine, but don’t overmix once you add the flour later.
Step 4: Combine
Gently fold in the shredded zucchini, then sprinkle the flour over the mixture and fold until just incorporated. The key here is to not overmix—overworking the batter can make it dense. If you see streaks of zucchini, that’s okay; it’s part of the charm and flavor.
Step 5: Prepare Filling
In a small bowl, mix the sour cream or Greek yogurt with lemon juice and a pinch of salt. This tangy layer complements the richness of the cheesecake and adds a fresh zing. If you want a little variety, sprinkle in some cinnamon or zest here too.
Step 6: Layer & Swirl
Pour the cheesecake batter into your prepared pan, smoothing it out evenly. Drop dollops of the sour cream mixture on top and use a toothpick or skewer to swirl it in—making beautiful marbled patterns. It’s simple but creates such a lovely visual and flavor contrast.
Step 7: Bake
Pop it into the oven and bake for about 35-40 minutes. Keep an eye on it—see if the edges are golden and the center jiggles just a little when you wiggle the pan. That’s perfect. Overbaking can make it dry, so err on the side of slightly underdone; the residual heat will finish the job.
Step 8: Cool & Glaze
Let it cool completely in the pan on a wire rack—this step is crucial for clean slicing. Once cooled, mix your powdered sugar with milk to make that glossy glaze. Drizzle artfully over the top, then let it set for about 15 minutes.
Step 9: Slice & Serve
Use a sharp knife dipped in hot water to get clean cuts. Serve at room temperature or chilled—either way, every bite is a harmonious blend of creamy, tangy, and slightly sweet. I like to add a few extra zucchini ribbons or a sprinkle of nuts for presentation. These bars look gorgeous on a platter and taste even better than they look.
What to Serve It With
For breakfast, pair these with a strong cup of coffee or a glass of fresh orange juice. The bright acidity of the juice complements the tangy cream cheese, and the richness of the bars balances the citrus’ zing. My kids love them as part of a brunch spread—maybe with some fresh berries or a dollop of whipped cream on the side for an extra special touch. As dessert, these are fantastic served with a drizzle of honey or a side of vanilla ice cream. Trust me, they’re even better when slightly warm. If I’m just craving comfort, I pull a slice out after dinner, add a sprinkle of cinnamon, and enjoy in cozy silence. They make a lovely, wholesome snack too—perfect for packing in lunchboxes or enjoying during afternoon breaks. The best part? Everyone’s always surprised when they learn there’s zucchini in them—they just taste that good!
Top Tips for Perfecting Your Zucchini Cheesecake Bars
This is one of those recipes where a few little tricks make all the difference. First, don’t skip draining the shredded zucchini; excess moisture can mess with the texture, leaving your bars a bit soggy. I’ve learned the hard way that squeezing out the zucchini with clean kitchen towels really helps keep everything nice and firm. Second, I always use room temperature cream cheese—it blends much easier and results in a silky batter. Overmixing is tempting but can lead to a dense finish; fold gently as instructed. For the swirl, I like to use a toothpick to drag the sour cream mixture through the batter in a figure-eight pattern—makes it look pretty and distributes flavor evenly. If you want to experiment with different flavors, try adding lemon zest to the batter or a sprinkle of cinnamon on top before baking. Regarding baking time, I recommend checking around the 35-minute mark—every oven is different. And if you notice the edges browning too quickly, tent it with foil and keep an eye on it. The glaze is optional but adds that adorable glossy finish and just enough sweetness. I tested this with almond milk, and it made the mixture a little creamier—I’d suggest trying it if dairy’s a concern but don’t expect major changes in flavor. Play around, have fun, and don’t stress—this recipe is meant to be warm, forgiving, and full of love.
Storing and Reheating Tips
Once cooled, these bars keep beautifully in an airtight container at room temperature for about 24 hours. Just cover loosely with foil or a kitchen towel to keep the crust crisp and prevent them from drying out. For longer storage, pop them in the fridge—either in a sealed container or wrapped tightly in plastic wrap—where they’ll stay fresh for up to 4 days. I find that they taste even better chilled, especially if you add the glaze after refrigeration so it stays shiny and beautiful. Want to freeze some? Wrap slices individually in plastic wrap, then in foil. They’re good for up to 3 months—perfect for grabbing on busy mornings or unexpected guests. To reheat, just pop a slice in the microwave for about 15-20 seconds or warm it gently in the oven at 325°F (160°C) for 10 minutes. If you’re adding glaze after rewarming, do it just before serving to keep that glossy finish. For best flavor, I recommend enjoying them at room temperature or slightly warmed—trust me, the creaminess is unbeatable that way!
Frequently Asked Questions
Final Thoughts
If you’re looking for a way to make veggies feel like a treat, these zucchini cheesecake bars are it. They’re rich but not heavy, simple but impressive, and secretly packed with nutrition. I always keep a batch in the fridge because they’re one of those recipes that tastes great at room temp or chilled—plus, they’re a total crowd-pleaser. Whether it’s for a laid-back weekend brunch, a quick afternoon snack, or even a special dessert, these bars never disappoint. I truly believe that good food is about comfort, connection, and a little bit of magic—this recipe checks all those boxes. So go ahead, give it a try, and let me know how it turns out! I love hearing your variations and stories. Happy baking, my dear friends—trust me, these will become a favorite in your home too.
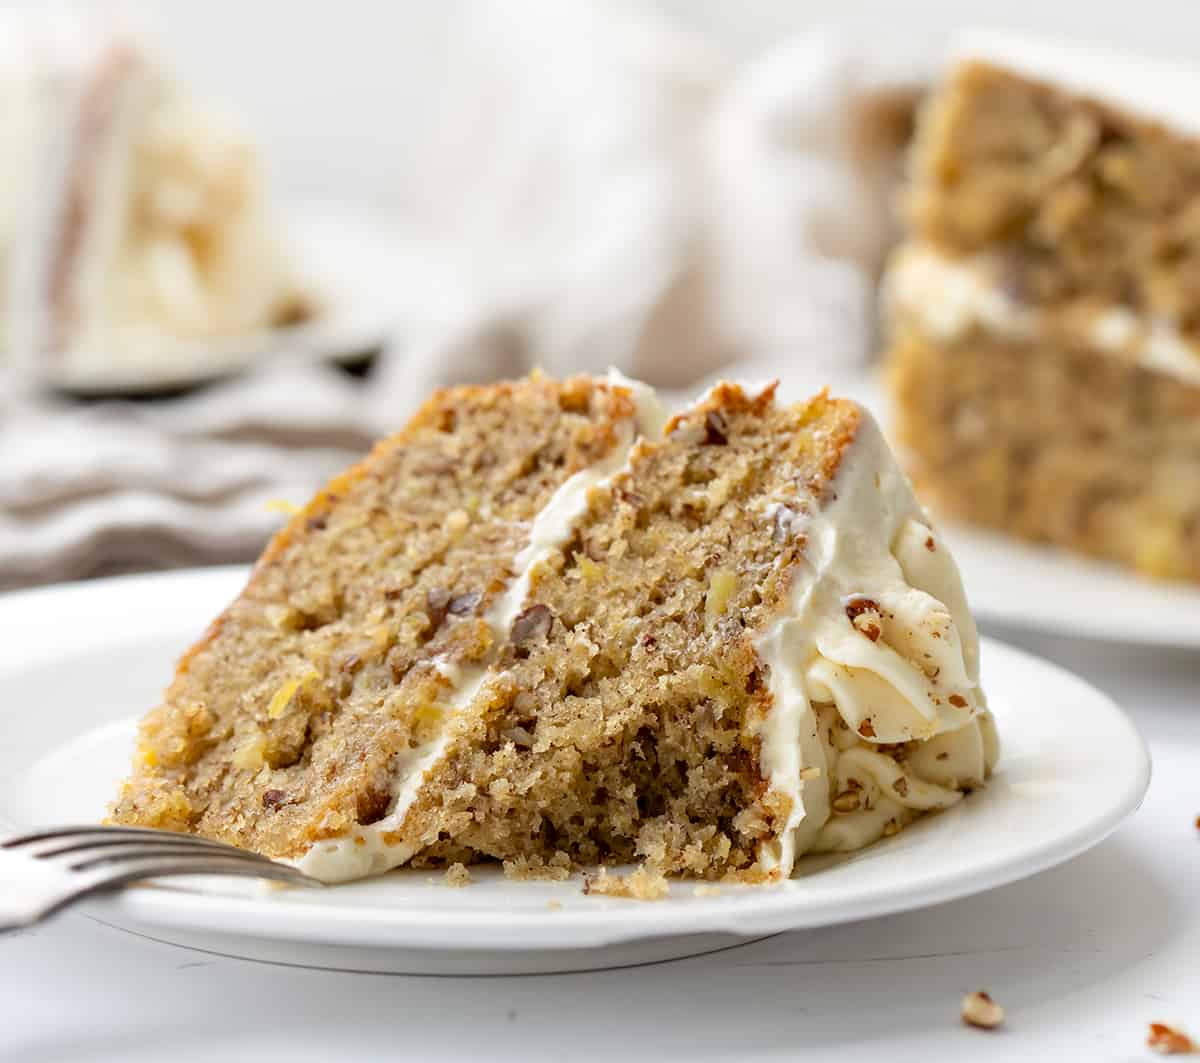
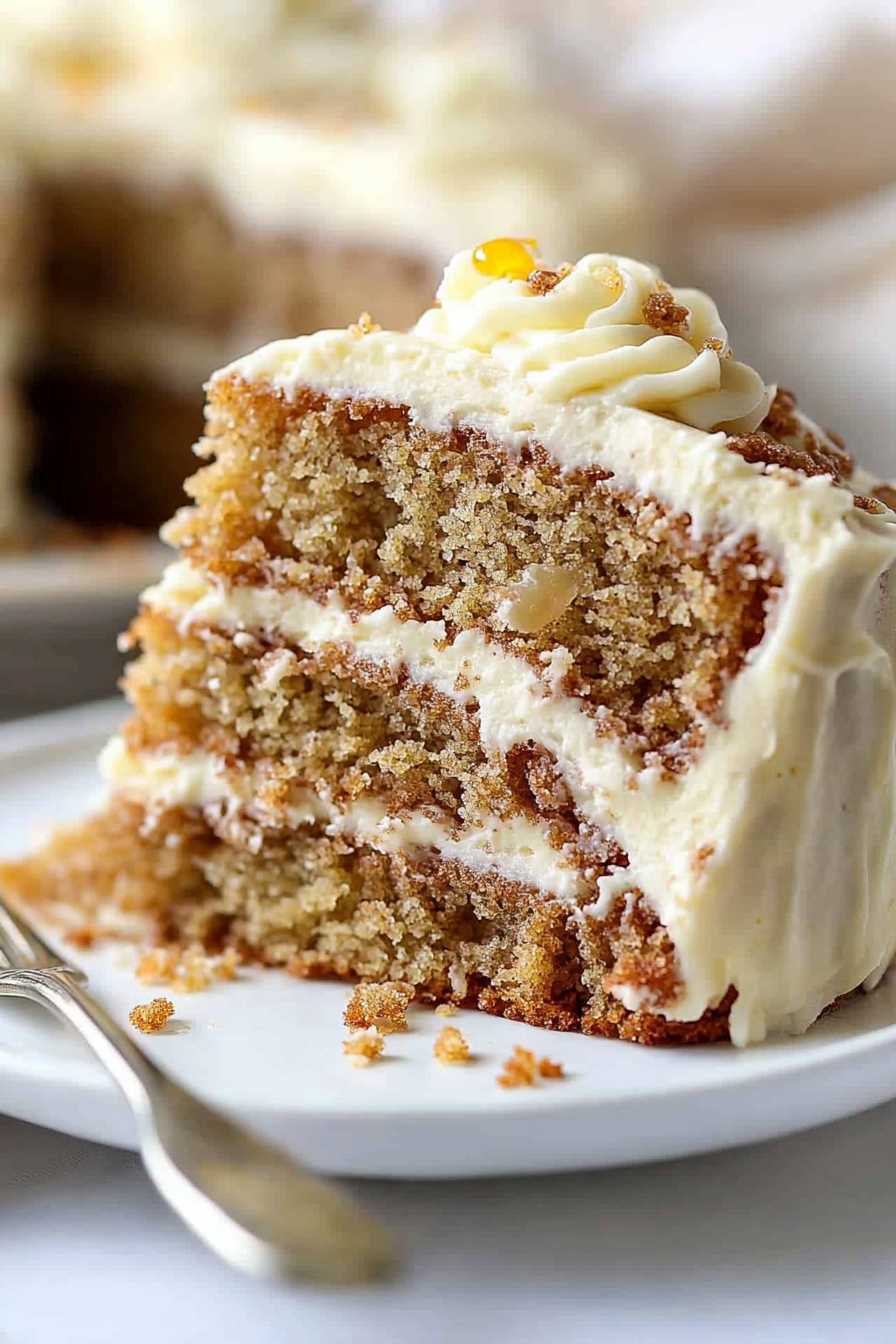
hummingbird cake
Ingredients
Method
- Preheat oven to 350°F. Spray two 8-inch round cake pans with cooking spray and line the bottoms with parchment paper.
- In a large bowl, mix all dry ingredients together: flour, sugar, cinnamon, baking powder, baking soda, and salt.
- Add oil, eggs, mashed bananas, crushed pineapple, and vanilla extract to the dry ingredients. Stir until combined and fold in chopped pecans.
- Divide batter evenly between the prepared pans and bake for 35 minutes, or until a toothpick inserted in the center comes out clean.
- Allow cakes to cool for 10 minutes in pans, then transfer to wire racks to cool completely.
- Prepare frosting by beating butter and cream cheese together until smooth. Add vanilla and gradually mix in confectioners' sugar until fluffy.
- Assemble the cooled cakes, spreading frosting between layers and over the top and sides. Decorate with toasted pecans if desired.

This recipe looks amazing! I love how it brings back such sweet memories with every bite—definitely adding this to my baking list.
This recipe sounds so comforting! I love how it brings back those cozy, nostalgic feelings—like a warm hug in cake form.
Love this memory—aromas really do transport you back. This cake sounds perfect for bringing that same cozy feeling home.
This recipe looks amazing—I can already imagine the cozy kitchen vibes! The aroma must be so comforting, just like your grandma’s.
This recipe brought back so many happy memories of baking with my grandma—the smell alone is like a warm hug!