
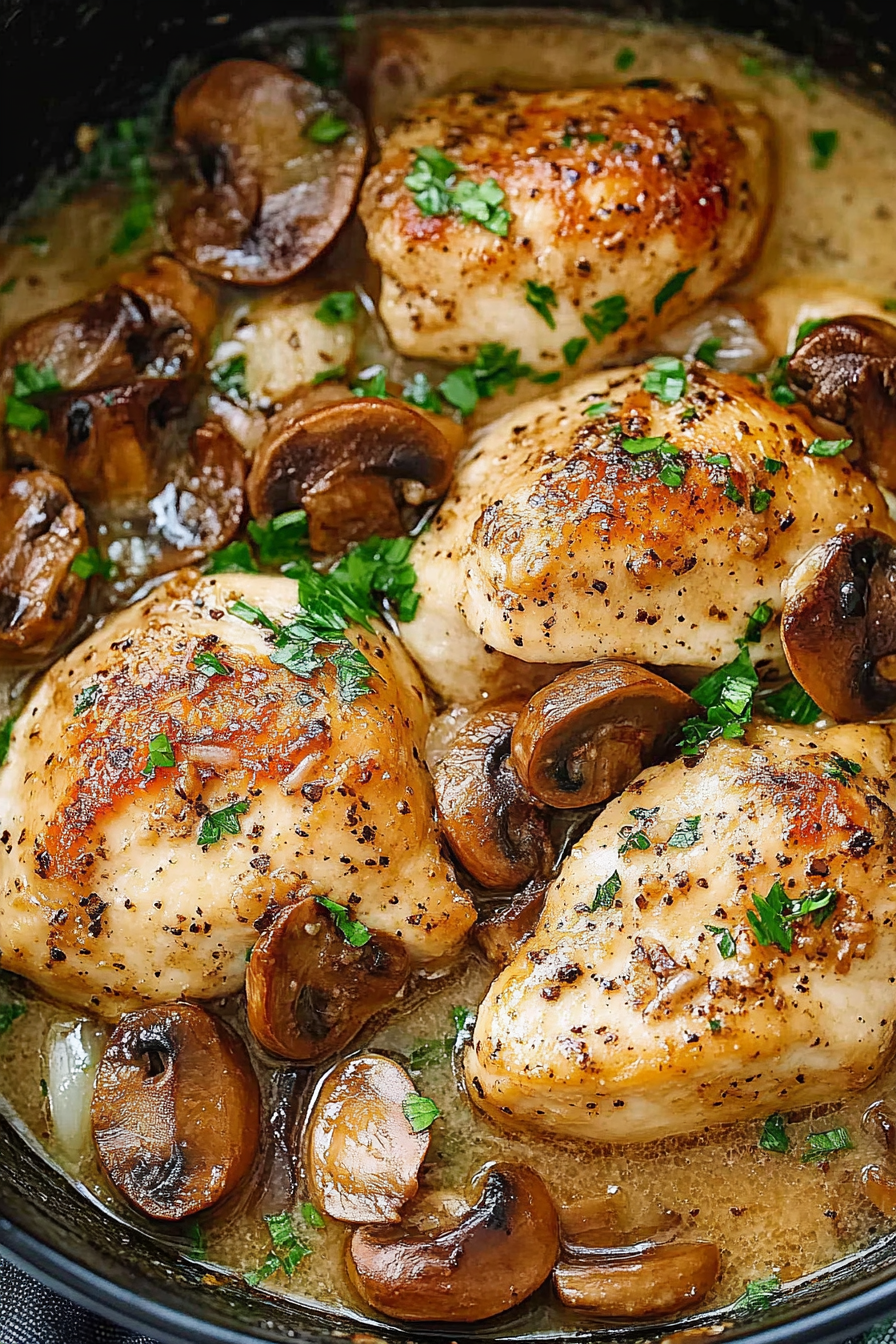
Easy Crockpot Chicken Marsala Recipe
There’s something about the smell of cake baking that instantly transports me back to lazy Sunday mornings at grandma’s house. The warmth, the sweet aroma sneaking through the kitchen door—it’s pure magic. And honestly, I get pretty excited when I whip up this zucchini swirl cake. It’s one of those recipes that feels like a cozy hug in dessert form—surprising, because zucchini might seem odd in a sweet treat, but trust me on this, it’s pure genius. I first stumbled upon this little gem when I was hunting for a way to sneak some extra veggies into my kids’ diet without them noticing. The best part? This one’s a lifesaver on busy nights because it’s pretty forgiving, super easy to pull together, and it tastes like a decadent bakery special. If you’re anything like me—always craving something sweet but don’t want to spend hours in the kitchen—this is your new go-to. And the smell alone? It’s enough to bring everyone running to the kitchen in seconds.
What is Zucchini Swirl Cake?
Think of this zucchini swirl cake as a happy marriage between a moist, tender cake and a surprise burst of flavor in every bite. It’s basically a classic sponge cake with a secret ingredient—finely grated zucchini—that keeps things unbelievably moist and adds a gentle earthiness that balances out the sweetness. The swirl of fruit preserves or jam through the batter gives it a lovely marbled look and an extra punch of flavor. The name might make you think it’s more of a bread or loaf, but trust me, once it’s baked, it’s more like a slice of cozy heaven—perfect with coffee or tea. This recipe is friendly for bakers at all levels because it’s forgiving of small mistakes, like a slightly off measurement or a hurried mix. Think of it as a sneaky veggie cake that’ll wow everyone at your next gathering or even just for yourself on a bad day!
Why you’ll love this recipe?
What I love most about this zucchini swirl cake is the way it combines simplicity with that wow factor. The flavor? Oh, it’s the perfect balance of sweetness and a subtle veggie undertone—that earthiness just makes each bite richer. Plus, the texture is out of this world—super moist, almost fudgy in the middle but still light enough to slice easily. The best part? It’s a total budget-friendly miracle. You probably already have most of the ingredients in your pantry or fridge, and if you don’t, they’re cheap to buy. No fancy equipment or obscure ingredients here. This cake is versatile; you can switch up the jam filling—strawberry, raspberry, even apricot—and it still comes out fantastic. I’ve tested this with almond milk, and it made the crumb even creamier and more tender. My kids actually ask for this all the time—sometimes I make it just for them to take to school or pack in lunchboxes. And when I have friends over, it disappears before I even get a chance to take a proper photo!
How do I make Zucchini Swirl Cake?
Quick Overview
This cake is all about keeping things straightforward and stress-free. You’ll grate some zucchini, mix up your batter, spread a layer of jam, swirl it through, and bake. It’s a process I’ve perfected over years—making sure it’s moist, flavorful, and pretty enough to serve to guests. The secret is not overmixing and layering your swirl just right for that beautiful marbled finish. In under an hour, you’ll have a delicious, homey cake ready to enjoy. Trust me, once you make this, it’ll become a staple in your baking rotation!
Ingredients
For the Main Batter:
– 2 cups all-purpose flour (or a gluten-free blend if you prefer)
– 1 ½ teaspoons baking powder
– ½ teaspoon baking soda
– ¼ teaspoon salt
– 1 cup granulated sugar
– ½ cup vegetable oil or melted butter
– 2 large eggs
– 1 teaspoon vanilla extract
– 1 cup finely grated zucchini (squeezed to remove excess moisture)
For the Filling:
– ½ cup fruit jam or marmalade (strawberry, raspberry work beautifully)
– A pinch of lemon zest (optional, for brightness)
For the Glaze:
– 1 cup powdered sugar
– 1-2 teaspoons milk or lemon juice
– A splash of vanilla or almond extract (optional)
– Food coloring or sprinkles for fun (if you’re feeling playful)
Step-by-Step Instructions
Step 1: Preheat & Prep Pan
Set your oven to 350°F (175°C). Grease a 9-inch round cake pan or line it with parchment paper—this cake tends to stick if you’re not careful. I usually give it a quick spray of non-stick spray and dust with a little flour or sugar for easy removal later. Think about your oven’s hot spots, and if your oven runs hot, rotate the cake halfway through baking. This simple step will save you from that dry, overbaked corner disaster!
Step 2: Mix Dry Ingredients
In a large bowl, whisk together the flour, baking powder, baking soda, and salt. This helps aerate the dry ingredients and ensures even distribution of leavening agents. I do this step first so the flour doesn’t become clumpy. Plus, it’s a good moment to check you’re not missing any ingredients—been there, forgot the baking soda, and it’s a sad, flat cake without it!
Step 3: Mix Wet Ingredients
In a separate bowl, combine the sugar, eggs, and vanilla. Whisk until the mixture is golden and slightly frothy—that’s how you know it’s well combined. Then, add the oil and mix until smooth. I tested this with coconut oil once and it worked perfectly; the flavor was subtle, and it kept the cake super moist. You can also use melted butter if that’s what you have on hand—it’s all about what you prefer!
Step 4: Combine
Pour the wet mixture into the dry ingredients and gently fold together with a spatula. Do not overmix—that’s the quickest way to dense, chewy cake. You want just enough to incorporate everything and get a smooth batter. It’ll look a little thick but still pourable. If it’s too stiff, a splash of milk helps loosen it up a bit.
Step 5: Prepare Filling
Warm your jam slightly so it’s easier to swirl through the batter. If you’re feeling fancy, zest a little lemon or orange over the jam—brightens the flavor and makes the swirl pop visually. Keep it thick but spreadable—thinner and it will bleed everywhere, which isn’t what we’re aiming for.
Step 6: Layer & Swirl
Pour half of the batter into your prepared pan. Dollop the jam in the center, then spread the rest of the batter over it. Use a toothpick or skewer to swirl through the batter in gentle figure-eights. This creates that beautiful marble effect with little pockets of fruity goodness inside. Don’t overdo it—less is more for that perfect swirl look.
Step 7: Bake
Pop it into your oven and bake for around 40-45 minutes. Keep an eye out for a golden top and a toothpick inserted in the center coming out clean—that’s your signal it’s done. Every oven is different—I’ve had to adjust times by 5 minutes here and there. If you notice the top browning too fast, tent it with foil and continue baking. Allow it to cool in the pan for about 15 minutes before transferring to a wire rack—this helps it set and makes slicing easier.
Step 8: Cool & Glaze
Once cooled, mix up your glaze, adding just enough milk or lemon juice to get a smooth drizzle consistency. Drizzle it over the top, waiting until it’s mostly set but still slightly tacky so it adheres beautifully. If you want to play around, sprinkle colorful sprinkles or chopped nuts on top for extra flair. This is the moment I love—seeing that glossy, inviting finish come together.
Step 9: Slice & Serve
Use a serrated knife to gently cut slices—this cake is tender, so take your time. Serve it slightly warm or at room temperature—either way, the flavors shine through. It pairs beautifully with a cup of strong coffee or a glass of milk. I like to add a dollop of whipped cream or a scoop of vanilla ice cream on the side when I want something richer. For a fancy brunch, I serve slices on a nice plate with fresh berries—looks so pretty, and it’s a sweet little treat that your guests will rave about.
What to Serve It With
This zucchini swirl cake is a chameleon—fantastic for breakfast, brunch, or dessert. At breakfast, I love serving it with a strong black coffee or a frothy cappuccino. It’s practically like a coffee cake you can start your day with without feeling guilty. For brunch, I suggest a platter of fresh fruit, maybe some yogurt on the side, and a nice glass of orange juice or mimosa. I’ve also done a fancy brunch with a dollop of mascarpone or ricotta on slices topped with fresh berries—check your pantry or fridge, and you can elevate it easily!
As a dessert, this cake shines with a dusting of powdered sugar or a drizzle of extra glaze. My kids ask for this all the time after dinner—it’s that perfect amount of sweet and satisfying. If I’m craving something cozy for an afternoon snack, I slice a piece and warm it up for a few seconds—perfect with a cup of tea. One of my favorite traditions is taking a few slices to a potluck, and everyone always asks for the recipe. It’s become a little family favorite, and I love how flexible it is—you can tweak the jam flavor or add nuts or chocolate chips if you want to get fancy.
Top Tips for Perfecting Your Zucchini Swirl Cake
Now, after making this a handful of times, I’ve learned a few tricks I want to share. First, zucchini preparation is key: I always give it a good squeeze in a clean kitchen towel after grating to remove excess moisture. Too wet, and the batter gets soupy, and the cake can turn out dense or gooey. When mixing, I avoid overmixing the batter—once the flour disappears, that’s enough. You want a tender crumb, not a chewy one. For the swirl pattern, I find that gently marbling with a skewer creates a beautiful, rustic look that still feels intentional. If you use a different jam or preserve, taste-test first—it can change the sweetness level, and you might want to adjust the sugar in the batter accordingly.
I’ve tested a few swaps, like substituting applesauce for some of the oil, which made the cake softer and less fatty. Nut flours can work, but they tend to make the batter thicker, so add a splash more liquid if needed. When baking, I recommend oven positioning in the center and checking around the 40-minute mark. Every oven bakes differently, after all. As for the glaze, I like adding a splash of vanilla to the powdered sugar and a few drops of food coloring for fun—it’s a small thing but makes the cake look festive. And if the glaze gets too thick, just stir in a bit more milk until drizzling consistency. Don’t be discouraged if it takes a couple of tries to get the swirl just right—part of the fun is perfecting your technique and making it your own!
Storing and Reheating Tips
This cake keeps beautifully, which is probably why I love making it ahead of time. At room temperature, it’s good for up to 24 hours if kept in an airtight container—just be sure to keep it away from direct sunlight or heat sources to prevent drying out. If I want to make it last longer, I pop slices into a resealable bag or airtight container and store them in the fridge for about 3 days. It stays surprisingly moist, especially if you add the glaze at the last minute. For longer storage, the freezer is your friend—wrap individual slices tightly in plastic wrap and pop them in a freezer bag. Thaw at room temp or warm gently in the microwave for a cozy snack. Just remember, if you plan to add the glaze later, wait until it’s fully cooled—otherwise, it’ll just melt away. I’ve done all of these, and honestly, the cake still tastes fresh and delicious after days.
Finally, some people like to reheat slices briefly—just 10-15 seconds in the microwave—so they’re warm and fluffy again. It’s a neat trick when you want that freshly baked taste without waiting. The key is not overdoing it so it doesn’t dry out, but trust me, a warm slice with a little extra glaze drizzled on top feels just like the first time I baked it!
Frequently Asked Questions
Final Thoughts
Honestly, this zucchini swirl cake has become a bit of a culinary secret weapon in my house. It’s humble enough to whip up on a weeknight but fancy enough to impress friends and family alike. The fact that it sneaks in a veggie and still manages to be irresistibly delicious makes it one of those recipes I keep going back to—every time, I learn a new tweak or flavor twist. If you give it a try, I promise you’ll get hooked on that moist crumb and pretty swirl pattern. Plus, it’s a reminder that sometimes, the simplest ingredients come together to create something truly special—like an edible hug. Happy baking, and I can’t wait to hear how yours turns out! Be sure to leave a comment and share your variations—I love seeing how everyone makes it their own.

Chicken Marsala
Ingredients
Method
- Season chicken breasts with garlic powder, basil, thyme, paprika, salt, and pepper.
- Heat olive oil in a skillet over medium-high heat. Sear chicken for 3 minutes per side until browned. Transfer to slow cooker with mushrooms and garlic.
- Pour Marsala wine into skillet, cook for 1 minute, scraping browned bits, then pour over chicken and mushrooms.
- Cook on low for 4 to 5 hours or high for 2 to 3 hours until chicken reaches 165°F internal temperature.
- Mix water and cornstarch, whisk into sauce, then add heavy cream. Adjust seasoning as needed.
- Return chicken to slow cooker, cook on high for 20 minutes until thickened. Add more heavy cream for creamier sauce if desired.
- Serve chicken with sauce, garnished with parsley.


That crockpot chicken marsala sounds amazing—perfect for cozy nights in! I can just imagine the rich, savory scent filling the house.
This recipe sounds perfect for a cozy dinner—nothing beats coming home to a warm, savory meal like this one!
This sounds so cozy and comforting! I love how food can bring back such warm memories.
I love how this recipe brings back those cozy memories—simple ingredients making such a comforting meal, just like grandma used to make.
I love how comforting this recipe sounds—perfect for a cozy dinner and brings back such warm memories of family time!