
Easy Snowman Pizzas: A Winter Treat
There’s something about a warm slice of coffee cake that instantly feels like a hug in the middle of the day. My grandmother’s recipe was always the one I asked for on lazy weekend mornings—back then, I didn’t realize how much love she poured into that sweet batter and buttery crumble. Now, as I whip up my own version, I realize it’s more than just a treat—it’s a little slice of nostalgia, a perfect way to use up those zucchinis growing like weeds in the garden, and honestly, a dish that never fails to brighten anyone’s mood. I always do this when I want something comforting yet a little special—this brown sugar zucchini coffee cake is my go-to. The smell alone—caramelized brown sugar, cinnamon, and toasted walnuts—can turn an ordinary afternoon into a celebration. Whether I’m serving it for breakfast, brunch, or just a cozy afternoon snack, this recipe has become my family’s favorite. And trust me, it’s so easy to make, I sometimes wonder why I didn’t discover it sooner. It’s that kind of comfort food that sticks to your ribs and makes everyone ask for seconds—my kids ask for this all the time! It’s incredible how something so simple can bring so much happiness. Ready to dive in?
What is Brown Sugar Zucchini Coffee Cake?
This is my favorite kind of coffee cake—moist, tender, packed with fresh zucchini, and topped with a rich, buttery crumble that’s sweet enough to satisfy a dessert craving but still perfect for breakfast. Think of it as a cozy twist on classic banana bread, but with a little crunch and an extra layer of flavor. The name kind of says it all: I use plenty of brown sugar, which gives it that caramel-like richness, and zucchini, which keeps it super moist without adding any weird flavor—just the opposite. The idea behind it is simple: you grate fresh zucchini into a tender batter, swirl in a quick cinnamon-sugar mixture, and then top everything with a buttery, crumbly streusel. It’s essentially an elevated, more indulgent version of your usual coffee cake, but still straightforward enough for a weeknight bake. The best part? It’s versatile enough to serve warm with a dollop of cream or sliced cold straight from the fridge—both ways, it’s delicious. Plus, it’s a sneaky way to get more vegetables into your kids’ diet while enjoying something sweet. Trust me, once you taste this, it’ll become a regular in your baking rotation!
Why you’ll love this recipe?
Let me tell you, this brown sugar zucchini coffee cake has won a permanent spot in my kitchen—and I think it’ll do the same for you. One of the reasons I love this recipe so much is the flavor. The combination of cinnamon, brown sugar, and the natural sweetness of zucchini creates this incredibly warm, inviting aroma that makes the whole house smell like a bakery—even if you’re just making it on a busy weeknight. The caramel notes from the brown sugar are divine, and the zucchini keeps it wonderfully moist without making it heavy—something I’ve learned to appreciate after *way* too many dry baked goods. What I really appreciate about this recipe is how simple it is to pull together. No crazy special ingredients, just pantry staples and fresh zucchini. It’s also budget-friendly and adaptable—feel free to toss in some chocolate chips, chopped nuts, or even dried fruit if you like. And honestly, what I love most about this is its versatility. You can serve it warm for breakfast, as a snack with coffee, or even as a dessert after dinner. It’s a crowd-pleaser, I promise. Plus, it always disappears in minutes at my house—I think everyone’s secretly obsessed with the crumb topping. This one’s a lifesaver on busy nights when you want something homemade but don’t want to slave away. I’ve tested this with almond milk and a splash of vanilla, and it made it even creamier—so feel free to play around. Once you try this, I bet you’ll want to make it all the time.
How do I make Zucchini Brown Sugar Coffee Cake?
Quick Overview
This recipe comes together in just a few bowls and whisks—no fancy equipment needed. You start by preheating your oven, grate up some zucchini, and mix your dry ingredients. In another bowl, blend your wet ingredients, then gently combine everything, being careful not to overmix. Prepare your filling—cinnamon and sugar—then layer it into the batter, swirling it to get that pretty marbled look. Top with a buttery crumb and bake until golden, cooling just a little before glazing. It’s honestly foolproof once you get the hang of it, and it smells so good while it’s baking, you might want to sneak a taste early. The best part? No special skills required—just some patience and a love of baking. The end result is a moist, flavorful cake that’s perfect for any time of day. Honestly, there’s a reason I always have zucchinis on hand in late summer—this cake is my secret weapon for turning veggies into something downright irresistible.
Ingredients
For the Main Batter:
– 2 cups all-purpose flour (I always use unbleached for extra flavor)
– 1 cup packed light brown sugar
– 1 teaspoon baking powder
– 1/2 teaspoon baking soda
– 1/2 teaspoon salt
– 1 teaspoon ground cinnamon
– 1/2 teaspoon ground nutmeg (optional, but I love a little warmth)
– 1/2 cup vegetable oil or melted butter
– 1 cup plain or almond milk (I tested with almond milk—actually made it creamier!)
– 2 large eggs
– 1 teaspoon vanilla extract
– 1 1/2 cups grated zucchini (about 1 large zucchini, excess moisture squeezed out)
For the Filling:
– 1/2 cup brown sugar
– 2 teaspoons ground cinnamon
– 1/2 cup chopped walnuts or pecans (optional but recommended for crunch)
For the Glaze:
– 1/2 cup powdered sugar
– 1-2 teaspoons milk or cream
– A splash of vanilla or lemon juice for zing (if you want)
Step-by-Step Instructions
Step 1: Preheat & Prep Pan
Heat your oven to 350°F (175°C). Grease a 9-inch square baking pan or line it with parchment paper—I like to use butter or cooking spray for easy release. If you have a glass or ceramic dish, go ahead and use that. The key is to make sure everything’s ready so you can move smoothly once the batter is mixed.
Step 2: Mix Dry Ingredients
In a large bowl, whisk together the flour, brown sugar, baking powder, baking soda, salt, cinnamon, and nutmeg. This helps distribute everything evenly so your cake rises beautifully and the flavors are balanced. Trust me, don’t skip this step—it’s small but makes a big difference.
Step 3: Mix Wet Ingredients
In another bowl, combine the eggs, oil, milk, and vanilla. Whisk until smooth. I always do this in a separate bowl to ensure the eggs are well incorporated before adding to the dry ingredients. If your eggs are cold, just give the mixture a few extra seconds of whisking to clear out the streaks.
Step 4: Combine
Pour the wet ingredients into the dry and gently stir until just combined—be careful not to overmix! A few lumps are okay—the batter will be moist and slightly shaggy. Overmixing can make the cake dense, and no one wants that.
Step 5: Prepare Filling
In a small bowl, mix together the brown sugar and cinnamon. If you’re using nuts, chop them roughly and have them ready. This filling adds that irresistible cinnamon-sugar swirl—think of it as the cake’s surprise inside.
Step 6: Layer & Swirl
Pour about half of the batter into your prepared pan, then sprinkle on half of the cinnamon-sugar mixture and nuts. Pour in the remaining batter, then swirl with a knife or skewer to create a marbled effect. Trust me, the swirl makes it prettier and adds a lovely burst of flavor with each bite.
Step 7: Bake
Pop it into the oven and bake for about 40-45 minutes. Start checking around 40 minutes—look for a golden top and a toothpick inserted in the center that comes out clean. If your oven runs hot, rotate the pan halfway through to get an even bake. The smell will fill your house with warm spices and caramel notes—prepare for some serious cravings.
Step 8: Cool & Glaze
Allow the cake to cool in the pan for at least 15 minutes before transferring to a wire rack. Once cooled a bit, whisk together your glaze and drizzle over the top. The glaze is optional but adds that extra touch of sweetness and polish. If you’re in a hurry, skip it—either way tastes divine.
Step 9: Slice & Serve
Cut into squares when mostly cooled—wait a few minutes so it doesn’t fall apart. Serve warm or cold, with a cup of coffee, and watch everyone rave about how delicious it is. You can even sprinkle a little extra cinnamon or nuts on top for presentation. Honestly, I love it plain with a hot cup of tea or drizzled with honey if I want a bit more sweetness.
What to Serve It With
This cake is incredibly versatile. For breakfast or brunch, pair it with a strong cup of coffee or a glass of cold milk—my kids actually ask for seconds when I serve it with a splash of cream. It’s also great as a dessert, especially when served warm with vanilla yogurt or a dollop of whipped cream—the creamy contrast highlights the caramel undertones. On lazy weekends, I like to cut big slices, warm them up slightly in the microwave, and enjoy with a side of fresh fruit or a drizzle of honey. For more informal gatherings, a simple dusting of powdered sugar or a sprinkle of chopped nuts adds a lovely crunch. It’s become part of our family’s cozy weekend ritual, and I love how everyone physically lights up the moment I bring it out. It’s classic comfort food, but with that little elevated twist that makes it feel special. And honestly, it’s one of those recipes I always keep in my back pocket because it’s so forgiving. The zucchini keeps it moist, the brown sugar adds richness, and the crumble is just the right finishing touch. I guarantee this’ll be the one you reach for when you need a moment of happiness in the kitchen.
Top Tips for Perfecting Your Brown Sugar Zucchini Coffee Cake
After making this so many times, I’ve picked up a few tricks to make it perfect every time. First, when grating the zucchini, I always squeeze out as much moisture as possible—this prevents the batter from becoming too wet and ensures a tender crumb. I use a clean kitchen towel to press out the excess water—it’s a small step that really helps. When mixing the wet and dry ingredients, I fold gently rather than stirring vigorously, which keeps the batter light and fluffy. Overmixing is the enemy here—trust me, you want a delicate touch. For the swirl, I recommend using a skewer or a toothpick to create swooping figures rather than just mixing in circles—it creates more visual interest and a prettier marbling effect. Substituting with gluten-free blends works surprisingly well, but I find that the texture can be a little denser; a mix of rice and tapioca flour tends to yield the best results. As for baking, always start checking a few minutes early—if you overbake, the cake can get dry. I’ve also experimented with swapping the walnuts for chopped pecans or even caramel bits, and honestly, each variation has its charm. The glaze can be jazzed up with a splash of bourbon, a dash of lemon juice, or even a bit of mascarpone cheese mixed in—play around and see what makes your taste buds happy. The bottom line? Be gentle with the batter, don’t rush the bake, and adjust ingredients according to your preferences. Once you get the hang of it, this cake is a foolproof, tear-jerking hit every single time.
Storing and Reheating Tips
This cake stays fresh surprisingly long, especially if you wrap it tightly or store in an airtight container. At room temperature, it’s best eaten within a day or two—you can cover it with foil or keep it wrapped with plastic. If you want to keep it for longer, popping it in the fridge is a great option, where it will stay good for up to four days. Just remember to bring it back to room temperature or warm slices gently in the microwave before serving—trust me, it makes a difference. For freezing, I like to cut the cake into slices first, wrap each slice tightly in plastic wrap, then toss them into a freezer-safe bag. They’ll keep for up to three months, and thaw in the fridge or at room temp. As for the glaze, I recommend adding it just before serving—if you store the cake with glaze on, it can become a little tacky or the glaze might dissolve into the cake, so that’s just my personal hack. When reheating, a quick 20-30 seconds in the microwave works magic—just keep an eye so it doesn’t get too hot or soggy. This way, you can enjoy that fresh-from-the-oven feeling anytime you want it!
Frequently Asked Questions
Final Thoughts
Honestly, this brown sugar zucchini coffee cake has become a staple in my home because it’s the kind of bake that feels both special and effortless. It’s a great way to sneak in vegetables without anyone noticing—well, not until they take their first bite, and then they’re hooked. The aroma alone is enough to make you smile, and the texture strikes that perfect balance between moist and crumbly. I love how adaptable it is—you can toss in your favorite nuts, play around with the spices, or even add chocolate chips if you’re feeling decadent. Every time I make it, the house fills with warmth and sweetness, and I get to see my family’s happy faces. I hope you love it as much as I do; it’s one of those recipes that just feels like a warm hug on a busy day. Happy baking! And please, share your own twists and photos—nothing makes me happier than seeing someone else fall in love with this cake. Cheers to cozy afternoons, good flavors, and sweet memories.
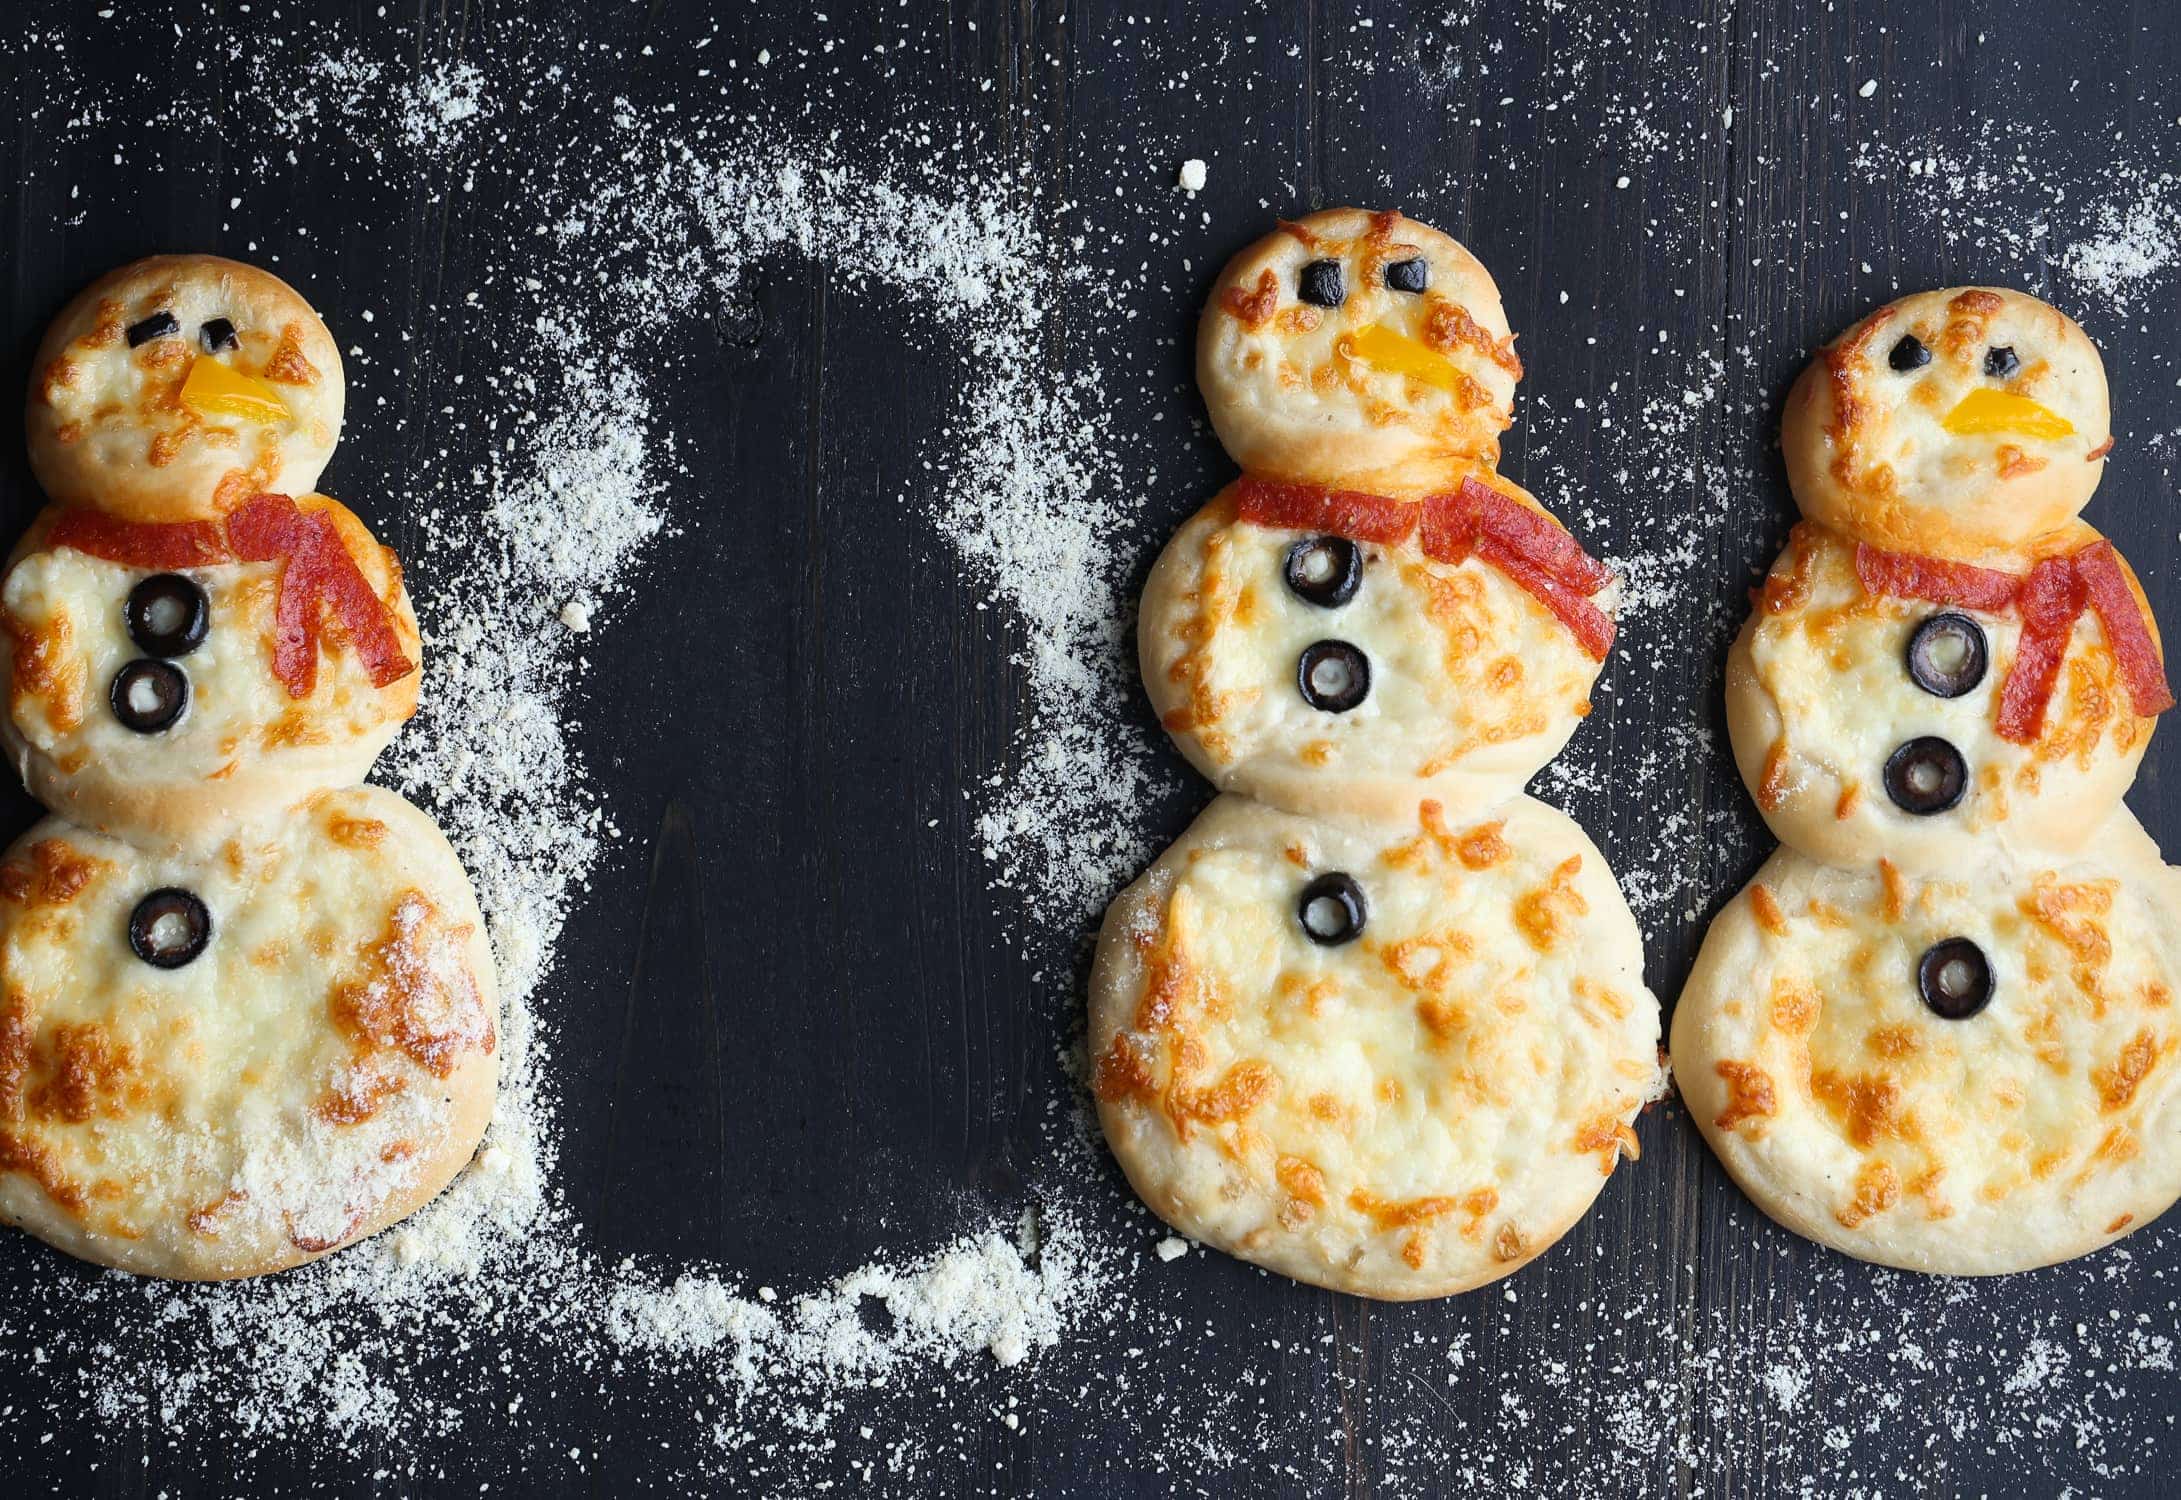
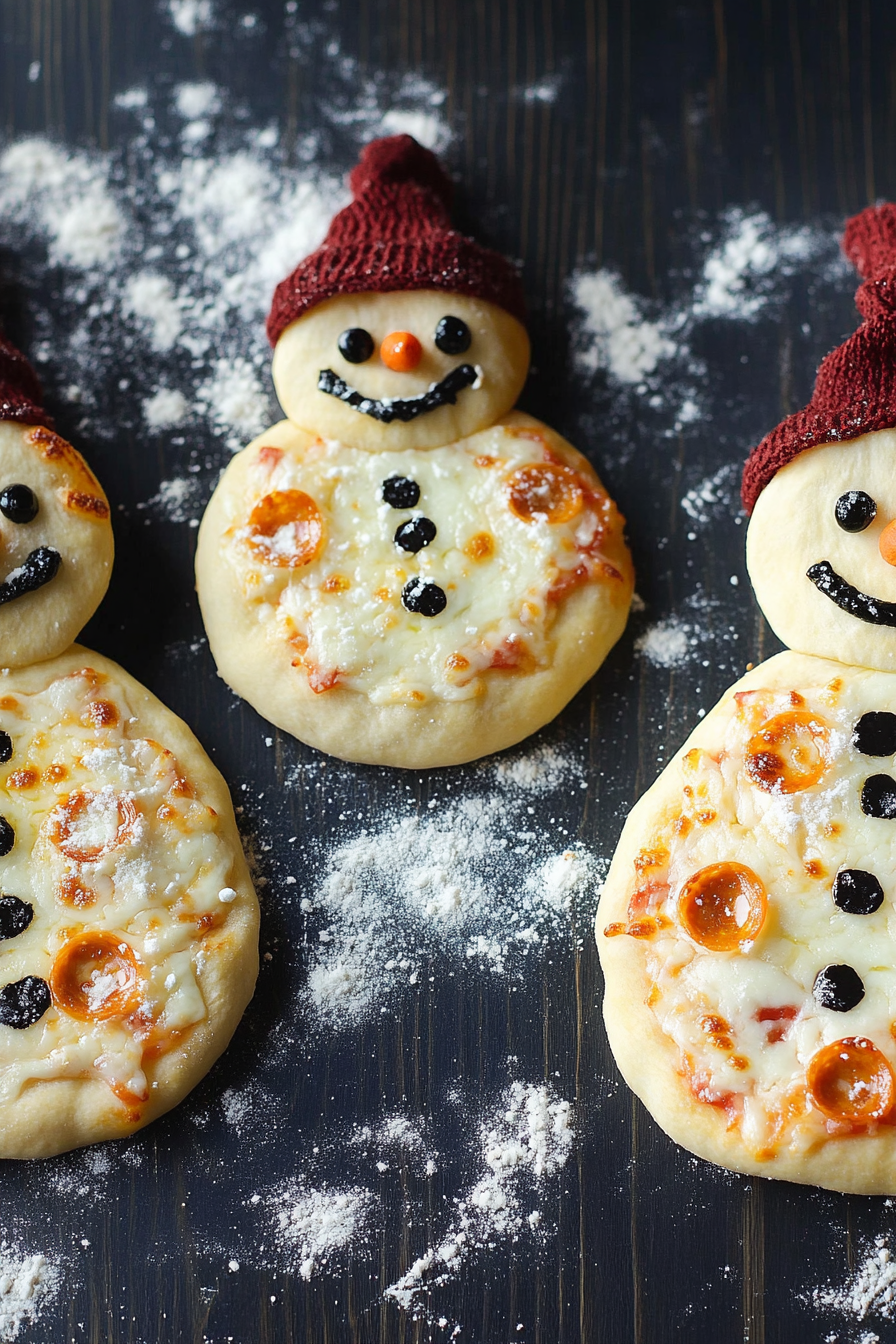
snowman pizzas
Ingredients
Method
- Preheat oven to 425°F. Line a large sheet pan with parchment paper and set aside.
- In a large bowl, combine one cup of flour, yeast, sugar, salt, water, and oil. Stir to combine. Add more flour until the dough is slightly sticky but forms a ball.
- Place dough on a floured surface and knead for 4 minutes until smooth and elastic.
- Divide dough into 4 equal portions. Pat or roll each into a 4-inch circle for the large base, 3-inch for the torso, and 2-inch for the head. Arrange to resemble snowmen with overlapping circles.
- Pinch edges of each circle to form small edges to hold sauce.
- Spread Alfredo sauce onto each piece of dough.
- Decorate snowmen with black olives for eyes and buttons, pepperoni for scarves, and yellow bell pepper for noses.
- Bake for 15 minutes until crust is golden and cheese is melted.
- Sprinkle with Parmesan cheese and serve warm.


I love this idea—so creative and perfect for kids! The snowman theme makes it even more fun.
I love how this brings back such sweet memories—your grandma’s recipe sounds absolutely wonderful!
This reminds me of cozy winter mornings! I’d love to try making these snowman pizzas with my kids this weekend.
I love the idea of snowman pizzas—so creative and perfect for kids! My niece would go wild over these.
This post made me crave a slice right now—thanks for the cozy reminder!