
Simple Eggplant Lasagna Recipe
There’s something about the smell of baking that always takes me back—those warm, comforting scents of cinnamon, ripe bananas, and thatunexpected twist of zucchini coming together. I remember my grandma making her famous banana bread, the whole house smelling like heaven, and now, over the years, I’ve perfected a version that’s become a family favorite—moist, tender, with just enough sweetness to make it special. This zucchini banana bread isn’t just delicious; it’s honestly a little magic trick. Think of it as a cozy hug wrapped in a slice of bread. I particularly love making this on weekend mornings when cozying up with a hot cup of coffee, or it’s a lifesaver on busy nights when I want something delightful but don’t have hours to spend in the kitchen. And trust me, once you try this, it’ll be on your weekly rotation—my kids ask for it all the time! And, oh, the glaze? It’s the finishing touch that makes this almost too pretty to eat. Are you ready to bake something that truly feels “human” and made with love? Let’s go!
What is Moist Zucchini Banana Bread?
Think of it as a cozy mash-up of two kitchen classics—banana bread and zucchini bread—married into one irresistibly moist and flavorful loaf. The name might sound a little funny, but the idea is simple: you use zucchini just like you would in a savory dish, but here, it adds moisture and a nice subtle flavor balance to the sweet bananas. This bread is essentially a way to sneak in some veggies without anyone noticing, making it perfect for sneaking extra nutrition into kids’ snacks or even in your own guilty pleasure. It’s quick to whip up, requires pantry staples, and the best part? It stays moist for days without getting dry or crumbly. Plus, it’s versatile—you can add nuts, chocolate chips, or even coconut if you like. Think of this as comfort in every bite, with a little healthy twist, all baked into a beautifully rustic loaf that’s perfect for sharing. The name “moist zucchini banana bread” might be a mouthful, but once you taste it, you’ll see why it quickly becomes a go-to in my kitchen.
Why you’ll love this recipe?
What I love most about this zucchini banana bread is how it manages to be both indulgent and nourishing all at once. The flavor? Oh, it’s so good—you get that sweet, ripe banana aroma paired with just a hint of earthiness from the zucchini. It’s like a snapshot of comfort food that hits all the right notes—soft, moist, with a tender crumb that melts in your mouth. And let’s talk about how easy it is to make. I’ve made this countless times—sometimes last minute when I realize I have overripe bananas and a leftover zucchini or two. The entire process comes together quickly, no complicated techniques needed. Plus, it’s budget-friendly because most ingredients are staples—flour, sugar, eggs, ripe bananas, zucchini, and a few extras. What’s even better? It’s so versatile! I’ve tested it with almond milk, and it actually made it even creamier. Sometimes I add a handful of walnuts or chocolate chips for a little extra indulgence. This bread is perfect on lazy mornings, but it also shines as a charming dessert or a snack for my kids’ lunchboxes. Honestly, once I baked it, my family devoured it in record time—and I was already planning my next batch.
How do I make Moist Zucchini Banana Bread?
Quick Overview
This zucchini banana bread is designed for simplicity and maximum flavor. You start by grating the zucchini and mixing it with mashed bananas, eggs, and a handful of staples. While the batter comes together swiftly, I always do this when I want an impressive, homey treat in under an hour. The trick is not overmixing, which keeps the bread tender, and layering in chunks of banana for pockets of sweetness. The baking is straightforward—just pop it in the oven and wait for that irresistible aroma. Afterward, a quick glaze makes it look as pretty as it tastes. The best part? It’s practically foolproof—trust me, I’ve tested this with overripe bananas, different flours, and even dairy substitutes. You’ll love how forgiving it is and how versatile you can get with the add-ins. Plus, it makes your kitchen smell like a bakery, which is honestly the best mood booster on a quiet weekend morning.
Ingredients
For the Main Batter:
- 1 ½ cups all-purpose flour — I like to use bread flour sometimes for extra chewiness, but all-purpose is perfect.
- 1 teaspoon baking soda — This is what gives the bread its rise.
- ½ teaspoon salt — Enhances all the flavors.
- 1 teaspoon ground cinnamon — Optional, but adds warmth and depth.
- 3 ripe bananas, mashed — Overripe ones are best; they’re sweeter and easier to mash.
- 1 cup grated zucchini — Squeeze out excess moisture after grating to keep the bread from getting too wet.
- ¾ cup granulated sugar — Feel free to reduce if your bananas are super sweet.
- 2 large eggs — For richness and binding.
- ½ cup vegetable oil or melted butter — I sometimes switch to apple sauce for a lighter version.
- 1 teaspoon vanilla extract — Because everything’s better with vanilla, right?
For the Filling:
- Optional sliced bananas or chocolate chips — I add these for extra texture and sweetness.
For the Glaze:
- ½ cup powdered sugar
- 1-2 tablespoons milk or cream
- ½ teaspoon vanilla
Step-by-Step Instructions
Step 1: Preheat & Prep Pan
Preheat your oven to 350°F (175°C). Grease your loaf pan with butter or line it with parchment paper—makes for easy cleanup and a flawless crust. While it’s warming up, grate your zucchini and squeeze out as much moisture as you can—this is crucial for keeping the bread moist but not soggy.
Step 2: Mix Dry Ingredients
In a large bowl, whisk together the flour, baking soda, salt, and cinnamon. Doing this first helps distribute everything evenly so your bread rises nicely and has no clumps of baking soda or salt in every bite.
Step 3: Mix Wet Ingredients
In a separate bowl, mash the bananas until smooth—it’s so satisfying watching those ripe bananas turn into a creamy pulp. Whisk in the eggs, oil, vanilla, and sugar until everything’s combined — just enough to blend, but don’t overmix. I’ve learned that overmixing makes the bread a little tough, so I keep it gentle.
Step 4: Combine
Pour the wet into the dry and fold gently—use a spatula or wooden spoon. Mix just until combined; a few lumps are totally fine. If you overmix, you risk ending up with dense, rubbery bread, and nobody wants that!
Step 5: Prepare Filling
If you’re adding chocolate chips or sliced bananas, fold them in now. I usually sprinkle a few extra on top before baking for that rustic look.
Step 6: Layer & Swirl
Pour half of the batter into your prepared pan. If you like extra banana flavor, scatter some banana slices here, then add the rest of the batter on top. Using a skewer or knife, gently swirl the batter to create fun marbling—this makes each slice special with hidden pockets of gooey banana or chocolate.
Step 7: Bake
Pop it in the oven for about 55–60 minutes. The house will fill with that warm, inviting smell—my kids come running from across the house! Check doneness with a toothpick inserted into the center; it should come out clean or with moist crumbs. If it browns too quickly, cover with foil halfway through. Every oven’s different—I’ve learned to test a little early the first time.
Step 8: Cool & Glaze
Let the bread cool in the pan for at least 15 minutes, then transfer to a wire rack. While it cools, mix your glaze ingredients until smooth. Drizzle it over the warm bread with a spoon or a piping bag for an even, glossy finish. The glaze adds just enough sweetness and makes it look irresistibly gourmet!
Step 9: Slice & Serve
Use a sharp serrated knife to cut through and serve at room temperature. I like to slice it thick—I swear the texture is best that way. These slices disappear quickly at my house, especially when I serve it with a dollop of Greek yogurt or a splash of honey.
What to Serve It With
This bread is so versatile that I could go on forever. In the mornings, I love having a thick slice with my coffee—nothing beats that aroma and the way it gently soaks up a little butter. For brunch, serve it warm with a dollop of mascarpone or cream cheese—looks fancy but is super simple. It’s also a showstopper as a dessert, especially with the glaze shining on top and a sprinkle of chopped nuts or flaked coconut. When I pack it for school lunches, I cut it into smaller bars—kids go crazy for the gooey pockets. And on cozy weekends, I sometimes toast slices and spread a little Nutella or jam. Honestly, this bread is a little today, a little tomorrow, and even better the next day.
Top Tips for Perfecting Your Moist Zucchini Banana Bread
Over the years, I’ve picked up a few tricks that really helped elevate this recipe from good to great. First, always squeeze out as much water from the zucchini as possible—moisture is the enemy of good baking because it can make the loaf dense or gummy. I’ve tried grating zucchini with a box grater and also with a food processor—both work, but the hand grater gives more control. Also, I learned that using bananas that are *really* ripe—like, black-spot ripe—gives the best sweetness and flavor. If yours aren’t super ripe yet, just pop them in a paper bag for a day or two. When mixing the batter, be gentle—overmixing is the biggest mistake I made early on. It’s tempting to stir till smooth, but I’ve found that a few lumps keep the bread tender and moist. For add-ins like chocolate or nuts, fold them in at the end to prevent sinking to the bottom. And don’t forget to check the bread around the 55-minute mark—every oven bakes differently. If it browns too fast, a loose foil cover will save the day. Finally, I tested different glazes, and I think vanilla powdered sugar glaze is the winner—it’s sweet but not overpowering, and it gives that beautiful shiny finish that makes it look store-bought yet homemade. Trust me, once you nail these tips, your bread will come out perfect every time—and your family will be sneaking slices before it even cools!
Storing and Reheating Tips
This bread stays moist and delicious for days, which is such a relief because I hate wasting good baked goods. Once cooled completely, store it in an airtight container or wrapped tightly in foil—at room temperature, it’s good for about 2 days. If you want it to last longer, pop it into the refrigerator (especially if you added fresh fruits like bananas or chocolate chips). When refrigerated, it’ll stay yummy for up to 5 days—just let it come to room temp or pop a slice in the toaster for a little warm-up. For longer storage, I recommend freezing it—wrap slices individually with plastic wrap and keep in a good-quality freezer bag. To reheat, just warm slices in the microwave for 15-20 seconds or toast slightly. If you’ve glazed it, I recommend adding the glaze just before serving—freezing or refrigerating after glazing can make it dull or sticky. Trust me on this one: fresh glaze makes all the difference! A quick reheat and a drizzle of glaze, and that warm, sweet-smelling bread is as good as new.
Frequently Asked Questions
Final Thoughts
Honestly, I can’t recommend this zucchini banana bread enough. It’s become one of those recipes I turn to when I want a little bit of home, comfort, and that warm, irresistible smell that makes everyone come running. The moisture level? Perfect—never dry, never gummy. The flavor? Rich, balanced, with that lovely hint of zucchini and banana taking center stage. When you bake this and slice into it, I promise you’ll feel that same cozy happiness I do—like a warm hug in loaf form. Plus, it’s flexible, forgiving, and delightfully straightforward. Whether you’re a seasoned baker or just starting out, this recipe isn’t going to let you down. I love experimenting with add-ins—chocolate, nuts, coconut—and every variation seems to turn out slightly better than the last. So gather your ingredients, turn on some good music, and enjoy the process. I know you’ll love it—happy baking, and I can’t wait to hear how yours turns out! Don’t forget to leave a comment or share your own tweaks—this recipe is just the beginning of your baked good adventures.
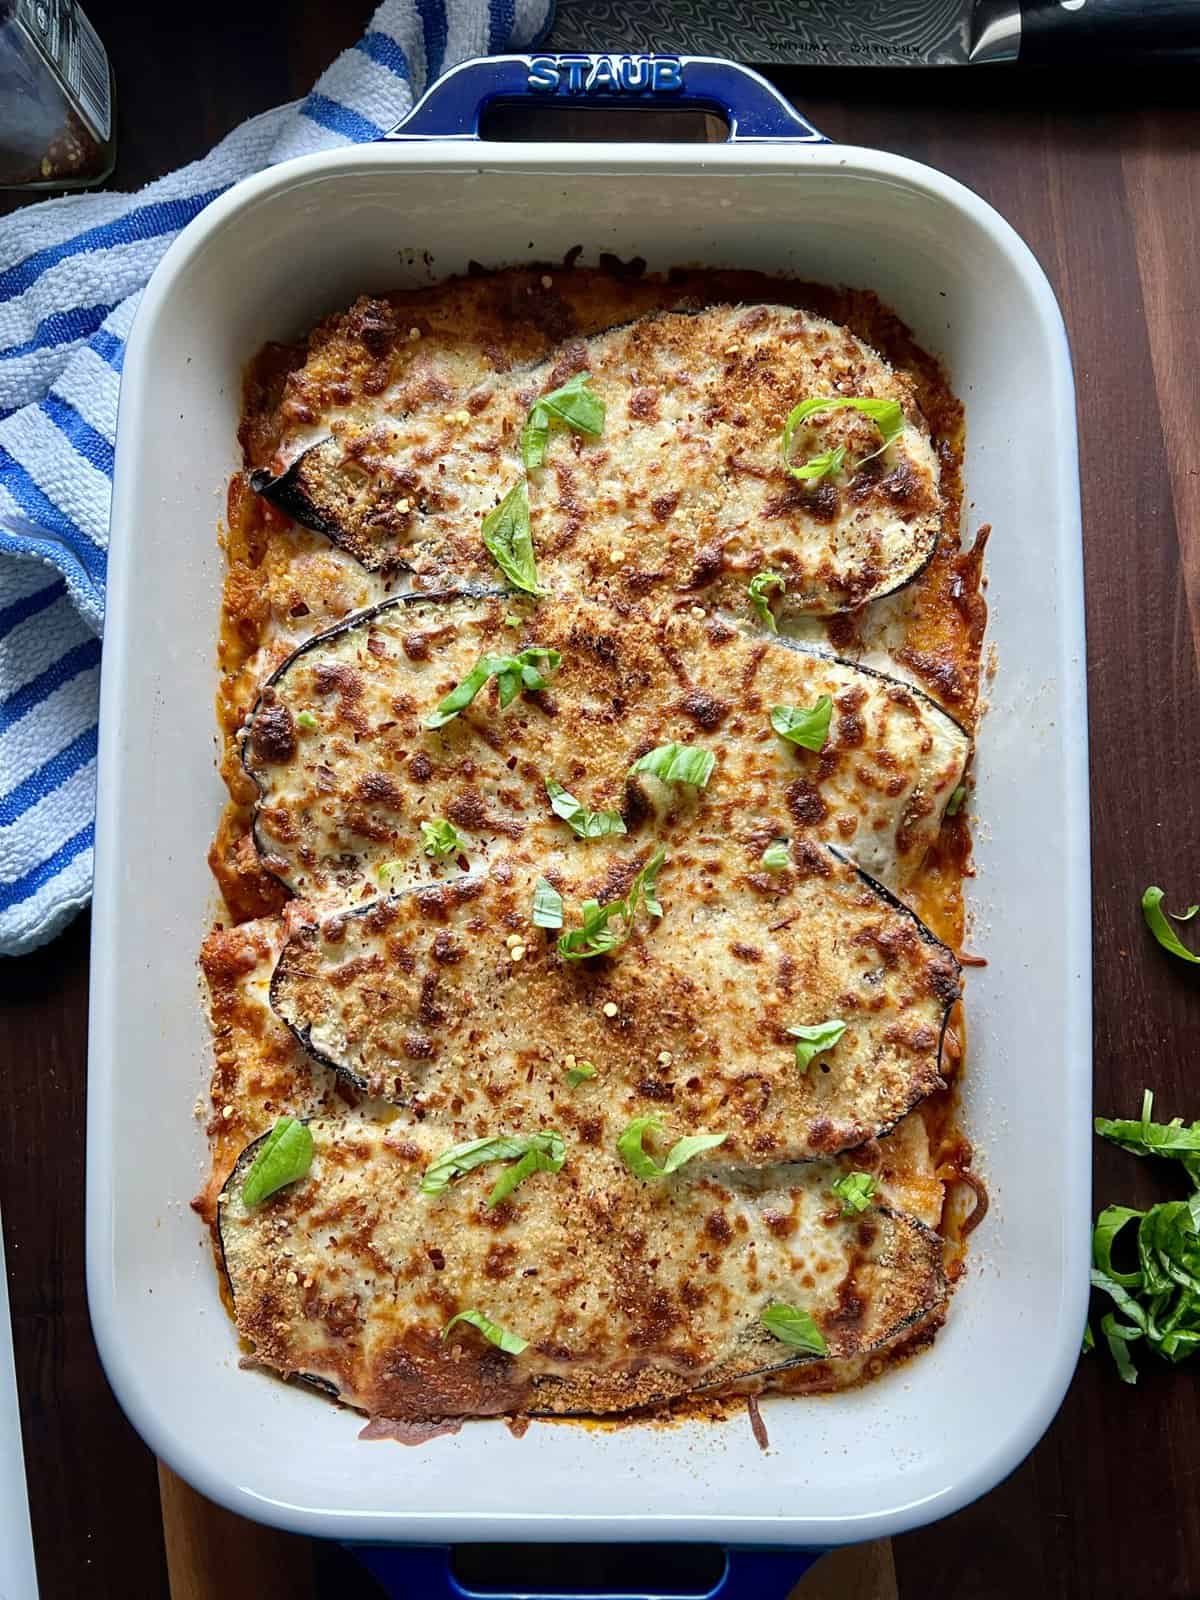
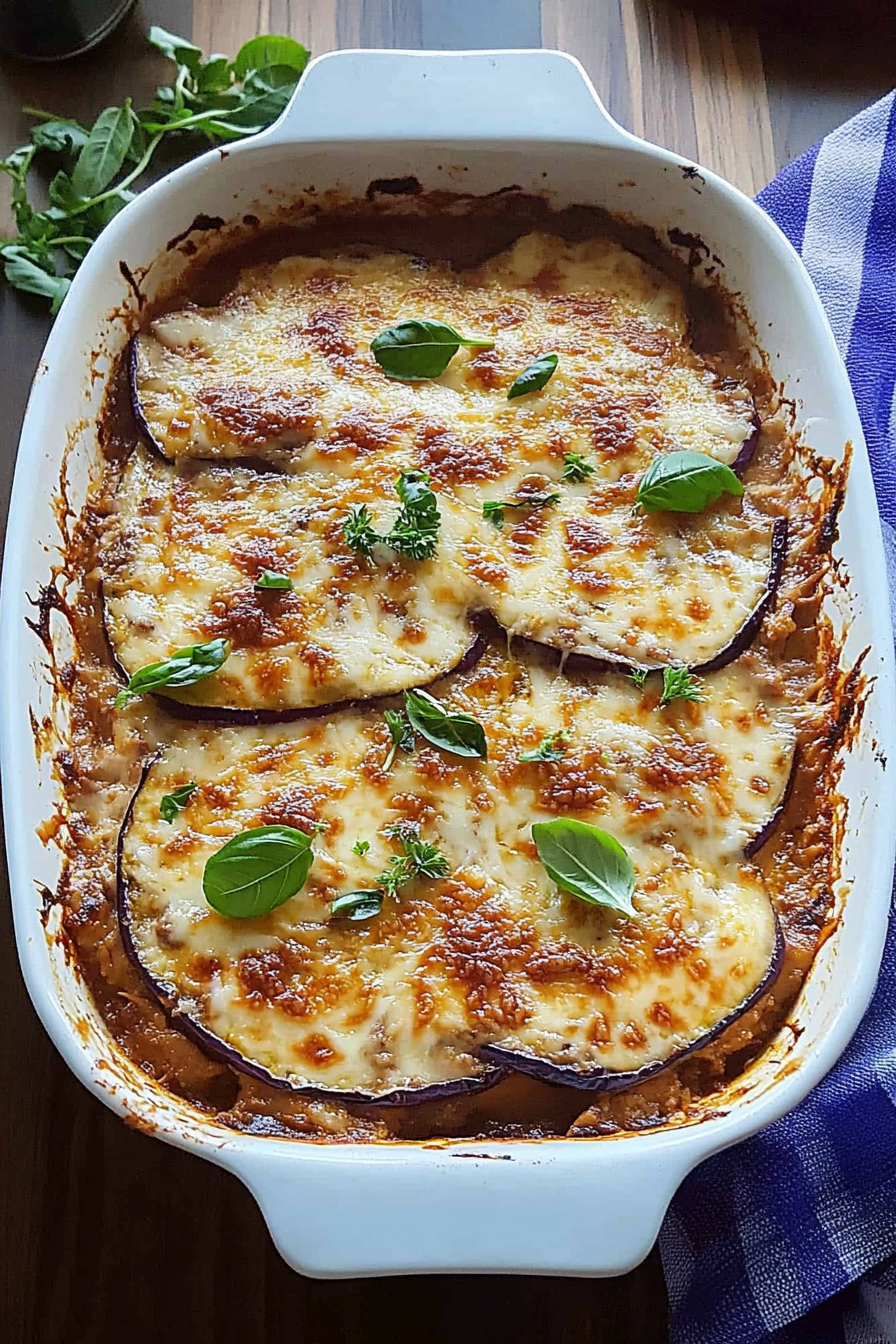
Eggplant Lasagna
Ingredients
Method
- Preheat oven to 375°F (190°C). Grease a 9x13 inch baking dish.
- Lay eggplant slices on a baking sheet, brush with olive oil, and bake for 15 minutes, or until slightly softened.2 large eggplants
- In a large skillet, brown the ground turkey over medium heat. Drain off any excess fat. Add chopped onion and cook until softened, about 5 minutes. Stir in minced garlic and cook for 1 minute more until fragrant.2 large eggplants
- Stir in crushed tomatoes, oregano, basil, salt, and pepper. Bring to a simmer and cook for 10 minutes.2 large eggplants
- In a medium bowl, combine ricotta cheese, egg, and Parmesan cheese. Mix well.2 large eggplants
- Spread a layer of meat sauce in the bottom of the prepared baking dish. Arrange a layer of eggplant slices over the sauce. Dollop half of the ricotta mixture over the eggplant. Sprinkle with one-third of the mozzarella cheese.2 large eggplants
- Repeat the layers: meat sauce, eggplant, remaining ricotta mixture, and another third of the mozzarella cheese. Top with the remaining meat sauce, eggplant, and mozzarella cheese.
- Cover the baking dish with foil and bake for 25 minutes. Remove the foil and bake for another 15 minutes, or until the cheese is bubbly and golden brown.
- Let stand for 10 minutes before serving.
Love this recipe—it’s so cozy and reminds me of family dinners. That zucchini twist sounds like a delicious surprise!
I love how this recipe combines simple ingredients with such comforting aromas—definitely making me hungry and bringing back fond memories!
This sounds amazing! I’ve never tried zucchini in lasagna—definitely adding this to my weekend dinner plan.
This recipe sounds amazing—eggplant lasagna with a warm, comforting twist? Count me in! That blend of scents is pure nostalgia.
This sounds absolutely comforting—eggplant lasagna is such a cozy dish! I love how baking brings back such sweet memories.