
Autumn Pumpkin Brownies How to Bake Them
There’s something about baking that whispers nostalgia to me—like a warm hug from an old friend. This zucchini chocolate swirl cake is no exception. I remember my grandma making similar treats when I was a kid, sneaking bites of the soft, moist slices while everyone else was busy chatting or setting the table. It’s funny how simple ingredients—zucchini, cocoa, flour—can come together to create something that’s not only incredibly delicious but also secretly healthy, depending on how you look at it!
Honestly, I’ve made this more times than I can count, especially on those busy weeknights when I need something sweet but don’t want to spend hours in the kitchen. My kids ask for this all the time, and I love that I can sneak in a vegetable without them batting an eye. The smell alone—rich chocolate with just a hint of zucchini—fills the whole house and makes everyone linger around the oven. Trust me, once you try this, it’ll become a staple in your recipe arsenal, just like it is in mine!
What is Zucchini Chocolate Swirl Cake?
Think of this zucchini chocolate swirl cake as a cozy hybrid—part moist, fudgy cake, part fruity vegetable surprise. It’s essentially a one-bowl batter with a touch of grated zucchini folded in to keep things moist. The “swirl” part comes from a rich, velvety chocolate mixture that gets drizzled and swirled into the batter before baking—kind of like a dessert version of that classic marbled bread everyone loves. The key here is that the zucchini adds a subtle earthiness and moisture, while the cocoa provides a decadent flavor that’s perfect for any chocolate lover. It’s a friendly, approachable dessert that looks fancy but is surprisingly easy to make. Think of it as a little love letter to your baking skills, wrapped in a fudgy hug!
Why you’ll love this recipe?
What I love most about this zucchini chocolate swirl cake is how adaptable and straightforward it is. You don’t need fancy ingredients or a fancy kitchen—just good old pantry staples. It’s budget-friendly too, which is a lifesaver on busy nights or when you want to whip up something special without going overboard. The flavor? Oh, the flavor! Rich cocoa with just a hint of the fresh, slightly grassy undertone from the zucchini. It’s the kind of dessert that makes people ask for seconds, and I’ struggling to keep myself from sneaking another piece when no one’s looking.
Plus, the texture is everything—moist, tender, and almost fudgy with a bit of chew from the shredded zucchini. And get this—my kids actually ask for seconds of this, and they don’t even realize it’s healthy(ish)! The swirl of chocolate makes each bite a little adventure—kind of like having dessert and a nature walk in every forkful. I also love that you can customize it. Want it more chocolaty? Add extra cocoa. Prefer it a bit nuttier? Toss in some chopped nuts into the swirl. The possibilities are endless, and that’s what keeps me coming back for more.
How do I make Zucchini Chocolate Swirl Cake?
Quick Overview
This cake comes together in about 10 minutes of prep and about 40 minutes in the oven. The secret is simple: grate the zucchini and squeeze out some of that excess moisture, then whisk it into a basic cocoa batter. Pour half into your pan, add a rich chocolate mixture over the top, swirl it all together, and bake. It’s kind of like a delightful layered cake without all the fuss. The batter is super forgiving—if you overmix a little, no worries. The result? A beautifully marbled, fudgy cake that’s impossible to resist. I love that it’s practically foolproof, so don’t worry if you’re new to baking—this one’s a winner every time.
Ingredients
For the Main Batter:
- 1 ½ cups all-purpose flour (I always use unbleached for extra flavor)
- ½ cup unsweetened cocoa powder (good quality makes a difference)
- 1 teaspoon baking soda
- ½ teaspoon salt
- 1 cup granulated sugar
- ½ cup brown sugar (for a deeper, caramel-y flavor)
- ½ cup vegetable oil (or melted coconut oil for a hint of tropical vibe)
- 3 large eggs (fresh and at room temperature)
- 1 teaspoon vanilla extract
- 1 cup grated zucchini (about 1 small zucchini, squeezed dry)
For the Filling:
- ½ cup semi-sweet chocolate chips or chopped dark chocolate
- ¼ cup heavy cream or coconut cream (to make a quick ganache)
For the Glaze:
- ½ cup powdered sugar
- 2-3 teaspoons milk or cream
- Optional: a splash of vanilla or a pinch of cocoa powder for extra flavor
Step-by-Step Instructions
Step 1: Preheat & Prep Pan
Set your oven to 350°F (175°C). Grease a 9-inch round cake pan or line it with parchment paper. If you want a cleaner look, I sometimes use a silicone baking mold—it’s a game changer for easy release! Also, grate your zucchini and squeeze out the excess moisture with a clean towel—this makes a big difference in keeping the cake tender and won’t make it soggy.
Step 2: Mix Dry Ingredients
In a large bowl, whisk together the flour, cocoa powder, baking soda, and salt. This step is key to ensuring everything is evenly distributed—no dry pockets of flour or cocoa. You want a smooth, homogeneous mixture before you add the wet ingredients, so give it a good stir.
Step 3: Mix Wet Ingredients
In another bowl, beat the eggs, sugar, brown sugar, oil, and vanilla until smooth and slightly frothy. I do this step by hand with a whisk—messes less than a mixer sometimes! Make sure your eggs are at room temp so everything blends seamlessly. Then, gently fold in the grated zucchini, making sure it’s well incorporated but not overworked.
Step 4: Combine
Pour the wet mixture into the dry ingredients, folding gently until just combined. Don’t overmix here! A few lumps are fine—this keeps your cake light and fluffy, not dense. This batter should look fudgy, not runny.
Step 5: Prepare Filling
While the batter is resting, make your chocolate filling. Heat the cream until just boiling and pour over the chocolate. Let sit for a minute, then stir until silky smooth. You can add a teaspoon of butter or vanilla for extra richness. Once ready, set aside to cool slightly—thick but still pourable.
Step 6: Layer & Swirl
Pour half of the batter into your pan. Then, drizzle some of the cooled chocolate mixture over it. Use a toothpick or a thin knife to swirl the chocolate into the batter, creating beautiful marbled patterns. Repeat with the rest of the batter and chocolate—this is the fun part! Don’t overdo the swirling; gentle motions create the best marbled look.
Step 7: Bake
Pop it in the oven for about 40 minutes. Check doneness by inserting a toothpick into the center—if it comes out clean or with moist crumbs, you’re good. Remember, ovens vary, so start checking at 38 minutes if your oven runs hot. The top should be slightly cracked and have a deep, chocolatey aroma wafting out—it’s irresistible.
Step 8: Cool & Glaze
Let the cake cool in the pan for about 15 minutes before transferring to a wire rack. Patience here prevents cracks! Once cooled, whip up your glaze by mixing powdered sugar with milk until smooth. Drizzle over the top, then use a toothpick to make pretty swirl patterns—bonus points if you do it while still slightly warm for a shiny finish.
Step 9: Slice & Serve
Slice with a serrated knife for clean edges. Serve at room temperature for the best flavor and texture. I love pairing this with a dollop of whipped cream or a scoop of vanilla ice cream—another reminder that simple pleasures are often the best ones.
What to Serve It With
This cake is versatile enough to serve all day long. For breakfast, it’s amazing with a strong cup of coffee or a fancy latte—trust me, a slice with a mug of steaming coffee makes mornings brighter. At brunch, serve it alongside fresh berries and a dollop of mascarpone or Greek yogurt. When I’m craving something sweet after dinner, I warm a slice slightly and top it with vanilla ice cream—pure heaven. And don’t forget, it’s perfect for casual snacks too—cut thick or thin, it’s a hit at quick family dinners or a bake sale.
In my family, this cake became an instant favorite. We’d keep a few slices hidden—the kids loved to hide the last piece in the fridge, claiming it was *their* secret snack. The combination of fudgy chocolate and fresh zucchini keeps everyone coming back for more. It’s one of those recipes that tastes even better the next day, and often I find myself making a double batch just for the leftovers.
Top Tips for Perfecting Your Zucchini Chocolate Swirl Cake
Over the years, I’ve learned a few tricks to make this cake even better. First, don’t skip squeezing out the zucchini moisture! Too much water turns the batter runny, and nobody wants a soggy cake. I’ve tested this with both fresh and frozen zucchini—frozen works great if you thaw and squeeze. Also, I’ve experimented with different cocoa powders—Dutch-processed makes for a richer flavor, but natural cocoa works just fine.
When it comes to mixing, I always fold gently, especially after adding the chocolate swirl. Overmixing can deflate the batter, and no one wants a dense cake. For the swirl, I like using a small skewer or toothpick—the bolder the swirl, the more visual impact. And as for substitutions, you can swap the vegetable oil for melted butter or coconut oil—each gives a slightly different flavor profile. If you’re lactose intolerant, coconut cream in the filling is a lovely alternative, giving richness without dairy.
Baking is straightforward, but I recommend checking early—you don’t want to overbake and turn it dry. I usually start checking at 38 minutes and go from there. The glaze? Keep it thick but pourable; if it’s too runny, add a touch more powdered sugar. I like to add a pinch of vanilla or espresso powder to deepen the flavor, especially if I want a more intense chocolate hit.
Storing and Reheating Tips
To keep this cake fresh, store it in an airtight container at room temperature for up to 2 days—cover loosely with foil. If it’s hot or humid outside, refrigeration is better. Wrap it tightly or place in a sealed container; it’ll last 4-5 days and still stay moist. I’ve also frozen slices for quick snacks—wrap each piece tightly in plastic wrap and then foil, and they’ll stay good for up to 3 months. Thaw at room temperature or briefly microwave for a warm, gooey treat.
If you want to add the glaze later, wait until the cake cools completely—this prevents it from sliding off or melting. To reheat, just warm slices in the microwave for about 15-20 seconds, and they’ll taste just as fresh.
Frequently Asked Questions
Final Thoughts
This zucchini chocolate swirl cake has truly become one of my go-to desserts—fudgy, flavorful, and secretly healthy enough that I don’t feel guilty indulging. It’s perfect for making ahead of time, sharing with friends, or just keeping in the fridge for those late-night cravings. Every time I bake it, I’m reminded of the fun in mixing a little veggie goodness into a rich chocolate treat. It’s like a hug for your taste buds, and I promise, once you try it, you’ll be making it all the time too. Don’t hesitate to experiment with flavors and toppings—baking is all about personal touches! Happy baking, and I can’t wait to hear how yours turns out!
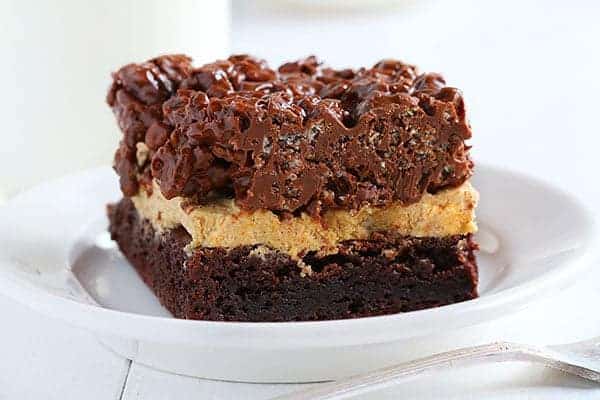
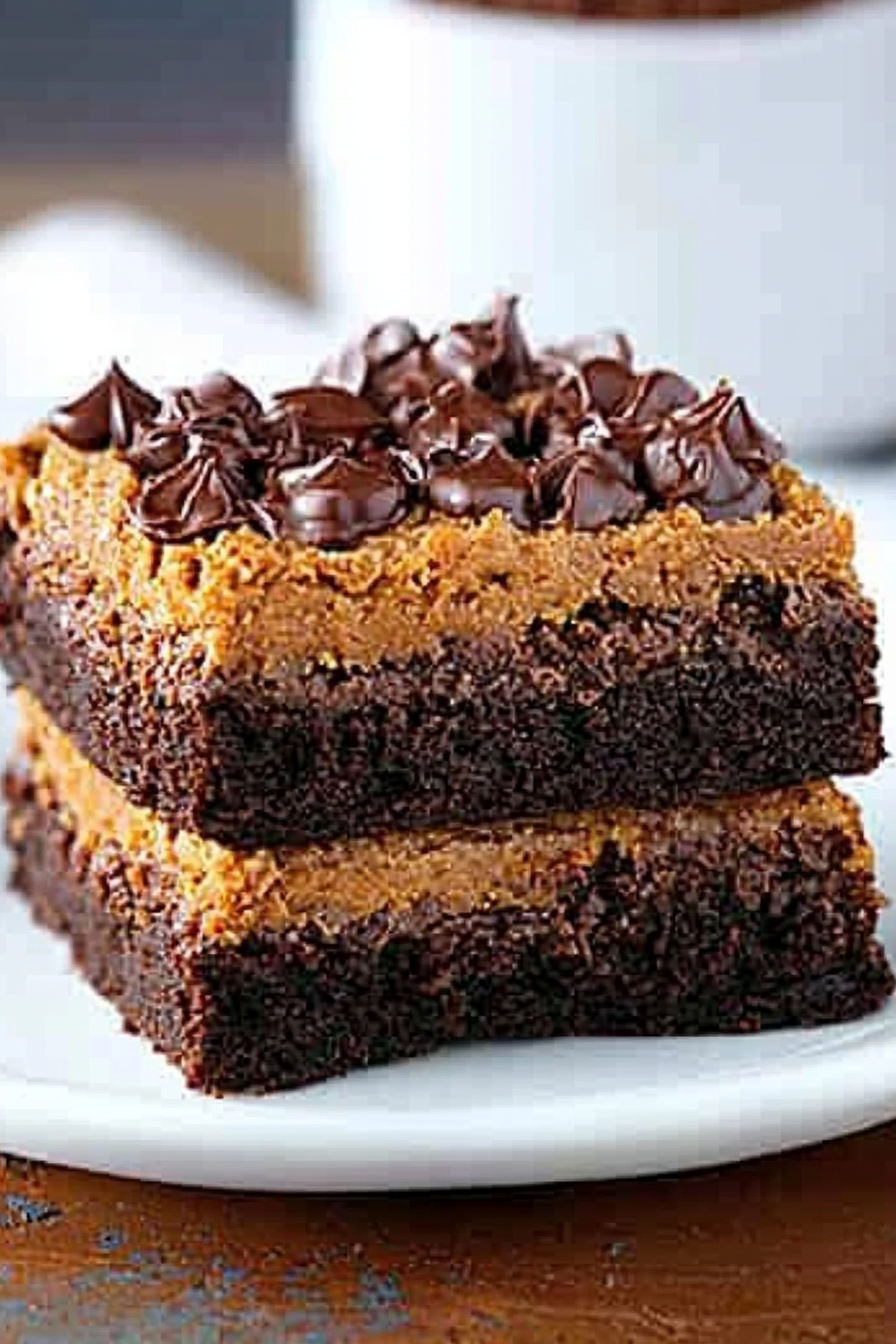
pumpkin brownies
Ingredients
Method
- Preheat oven to 350°F. Line a 9-inch square pan with parchment or foil and spray with cooking spray.
- Make the brownie batter as per package instructions, fold in pumpkin puree, and bake until done. Cool completely.
- In a stand mixer, beat softened butter for 2 minutes, then add pumpkin pie spice, vanilla, pumpkin puree, and confectioners sugar. Mix until smooth.
- Spread the pumpkin frosting over the cooled brownies.
- In a saucepan, melt peanut butter and chocolate chips over low heat, stirring continuously. Remove from heat.
- Add cereal to the chocolate mixture, stir until evenly coated, then spread over the frosting layer. Refrigerate for 1 hour before slicing.
Love this—pumpkin brownies are such a cozy treat! Reminds me of fall and baking with my abuela too. 🍂🧁
Love this—so cozy and comforting! My grandma used to bake something similar, and these brownies definitely bring back those warm memories. 🍁🍫
Love these! They remind me of my mom’s baking too—so cozy and comforting. Definitely trying this recipe soon!
I totally get that feeling—baking just feels like home, doesn’t it? These brownies sound absolutely perfect for cozy autumn days.
I love how this post brings back such sweet memories! Your grandma’s baking must have been something special.