
Orange Spice Ice Cream Cake Delight
There’s something about the smell of freshly baked brownies that instantly takes me back to lazy Sunday afternoons with my family. But for years, I was stuck thinking I had to choose between indulgence and health. Then I stumbled across a recipe for zucchini brownies, and I thought, “Really? Zucchini in brownies?” Turns out, it’s one of those sneaky good ideas that sounds odd at first but makes total sense once you try it. The zucchini keeps the brownies moist and tender—trust me, you won’t taste it at all!—plus, it sneaks in some veggies without sacrificing that rich, chocolatey goodness everyone loves. This recipe is a lifesaver on busy nights when I want something sweet but don’t want to spend hours baking or feel guilty afterward. My kids ask for this all the time, and honestly, I don’t blame them because the first bite is like a little piece of chocolate heaven. Plus, with a swirl of cream cheese on top, it’s practically dessert and comfort food all in one. Trust me on this one—you’ll want to keep the secret ingredient just between us!’
What is Zucchini Brownies with Cream Cheese Swirl?
Think of zucchini brownies as a secret treasure inside a rich, fudgy treat. They’re essentially your classic chocolate brownies, but with a surprising zucchini twist. The key is that zucchini adds moisture and a subtle richness that makes each bite so velvety, you won’t even realize there’s a veggie sneaked in. The name might sound a little funky, but it’s honestly one of those clever kitchen hacks that turns a simple snack into a bit more nourishing. It’s like a brownie and a veggie powerhouse rolled into one, making it perfect when you want a little indulgence without going overboard. The cream cheese swirl on top takes it from good to wow—kind of like that fancy bakery flavor but homemade and way more comforting. Whether you’re looking for a sneaky way to get some greens into your kids or just craving chocolate with a twist, this recipe hits all the sweet spots while keeping things light enough that you won’t feel sluggish afterward. Basically, it’s a win-win for everyone.
Why you’ll love this recipe?
What I love most about these zucchini brownies is how they manage to be both indulgent and secretly healthy at the same time. The flavor? Rich, chocolatey, and just slightly fudgy, with a hint of earthiness from the zucchini that keeps the sweetness grounded. It’s honestly a flavor combo I never expected to love, but it just works. They’re super simple to make—no fancy equipment needed—and I always do this when I want a quick dessert without a lot of fuss. Plus, these brownies are budget-friendly — most of the ingredients are pantry staples, so you don’t have to run to the store for anything fancy. And because you can customize the flavor with different types of chocolate or add extras like nuts or berries, it’s very versatile. I’ve tested these with dark chocolate chips, milk chocolate, and even a dash of chili powder for a spicy kick—you name it. This is my go-to when I need a sweet treat that won’t leave me feeling sluggish. It’s perfect for everyday snacking, special occasions, or even as a last-minute gift—everyone’s always impressed, and I never have leftovers. Honestly, what stands out is how moist and tender they stay—thanks to the zucchini, I don’t need to add extra butter or oil, which makes me feel a little better about indulging. It’s like a little piece of happiness you can feel good about eating.
How do you make Zucchini Brownies with Cream Cheese Swirl?
Quick Overview
This recipe is as straightforward as it gets—no complicated steps, just simple mixing and layering. You start by grated zucchini, which keeps things super moist, then whisk together your dry ingredients. In a separate bowl, you mix up the wet ingredients—think eggs, vanilla, and a little oil or melted butter. Combine everything carefully, fold in some chocolate chips, and pour the batter into a prepared pan. The star twist is swirling in a tangy cream cheese mixture on top before baking. Once in the oven, these brownies bake up into perfect little squares of chocolatey goodness with that creamy swirl on top. The best part? They’re ready in about 30-35 minutes, making this perfect for a quick dessert after dinner or a sweet snack anytime. They’re also incredibly forgiving—if your zucchini is a little watery, just squeeze out excess moisture, and you’re good to go. Trust me, once you try this method, you’ll be making it again and again because it’s just that easy and fail-proof.
Ingredients
For the Main Batter:
– 1 1/2 cups grated zucchini (about 2 medium zucchinis, grated and gently squeezed to remove excess moisture)
– 1 cup all-purpose flour (or gluten-free blend)
– 1/2 cup unsweetened cocoa powder (high-quality for best flavor)
– 1 cup sugar (white or coconut sugar for a healthier twist)
– 1/2 teaspoon baking powder
– 1/2 teaspoon baking soda
– 1/4 teaspoon salt
– 1/2 cup vegetable oil or melted coconut oil
– 2 large eggs
– 1 teaspoon vanilla extract
For the Filling:
– 4 oz cream cheese, softened
– 1/4 cup sugar
– 1 teaspoon vanilla extract
For the Glaze:
– Optional: Melted chocolate, powdered sugar, or a drizzle of caramel for extra flair
Step-by-Step Instructions
Step 1: Preheat & Prep Pan
First things first, set your oven to 350°F (175°C). Line a 9×9-inch baking pan with parchment paper or grease it lightly—trust me, nothing’s more frustrating than a brownie that won’t come out clean! If you’re feeling fancy, sprinkle a little cocoa powder in the pan instead of flour to prevent sticking, but parchment is your best friend here.
Step 2: Mix Dry Ingredients
In a large bowl, whisk together the flour, cocoa powder, sugar, baking powder, baking soda, and salt. This step ensures all your dry ingredients are evenly distributed, which is key for a uniform bake. I always do this first—less chance of clumps or uneven pockets of baking soda. It’s basically the foundation of good brownies. They should look like a deep, velvety mixture.
Step 3: Mix Wet Ingredients
In another bowl, beat together the eggs, vanilla, and oil until smooth. If your eggs are straight from the fridge, a quick 10-second zap in the microwave makes them easier to blend. I’ve tried using almond milk to lighten things up, and honestly, it made the brownies even creamier—bonus! Stir in the grated zucchini now—don’t worry, it’s just about the size of a large pea, so no hassle there.
Step 4: Combine
Pour the wet ingredients into the dry and fold gently until just combined—you don’t want to overmix or the brownies turn tough. The batter will be thick but glossy, and that’s exactly what you want. If it feels a little stiff, a splash of milk can loosen it up just a tad, but be careful not to make it runny.
Step 5: Prepare Filling
In a small bowl, beat the softened cream cheese, sugar, and vanilla until smooth and creamy—think cheesecake filling. It should be thick but spreadable. Feel free to add a pinch of lemon zest or a dash of cinnamon for a flavor upgrade. I love a hint of lemon with the cream cheese—it brightens it up so nicely.
Step 6: Layer & Swirl
Spread half of the brownie batter into your prepared pan. Drop spoonfuls of the cream cheese mixture on top, then top with the remaining brownie batter. Use a skewer or toothpick to gently swirl the cream cheese and brownie layers together—no need to overdo it, just enough to create a marbled look. This swirling is what makes the brownies look fancy and taste even better.
Step 7: Bake
Pop the pan into your preheated oven and bake for about 30-35 minutes. Check doneness with a toothpick inserted in the center—if it comes out with moist crumbs, they’re perfect. The edges might start to pull away just a little, which is a good sign. My oven runs hot, so I often check at 30 minutes and go from there.
Step 8: Cool & Glaze
Let the brownies cool completely in the pan—this is important, otherwise they fall apart when you cut them. I usually wait about 20 minutes, then transfer the whole thing to a wire rack. If you’re feeling fancy, drizzle with melted chocolate or dust them with powdered sugar once cooled. The aroma alone during cooling makes everyone hang around the kitchen!
Step 9: Slice & Serve
Use a sharp knife to cut into squares—clean cuts happen best if you wipe the blade between slices. Serve at room temperature for that perfect fudgy texture. My favorite way? Warmed slightly, with a dollop of whipped cream or a scoop of vanilla ice cream on the side. Perfect for cozy family nights or bringing to a potluck. Trust me: these disappear faster than you’d think.
What to Serve It With
On mornings when I’m feeling indulgent, I love slicing these brownies and pairing them with a hot cup of coffee or a glass of cold milk. It’s like a quick breakfast treat that feels a little naughty but actually isn’t, thanks to the zucchini. For brunch, serve with fresh berries and maybe a dollop of Greek yogurt—kind of like a decadent fruit-and-cream dessert. When I make these for after dinner, I like adding a drizzle of caramel or a dusting of powdered sugar to make them look extra special. They also work beautifully as casual snacks—my kids grab a brownie and run outside to play, their little hands dusted with cocoa. Honestly, this recipe is so versatile and forgiving—you can even top them with chopped nuts or shredded coconut if you want more texture. No matter how you serve it, one thing’s for sure: this brownie never stays around for long in my house.
Top Tips for Perfecting Your Zucchini Brownies with Cream Cheese Swirl
After making these dozens of times, I’ve picked up a few tricks that really elevate the final result. First, make sure to squeeze out as much moisture as possible from the grated zucchini—if it’s too watery, your brownies could turn out a little cakey or soggy. I use a clean kitchen towel to gently press the zucchini or even roll it in paper towels if I’m in a hurry. Honestly, that tiny step makes all the difference. When mixing the batter, don’t overthink—you want just enough mixing so everything is combined. Overmixing leads to tough brownies, and nobody wants that. As for the swirl, I’ve found that dropping spoonfuls of cream cheese randomly and swirling gently gives a beautiful marbled look—if you want more flair, try swirling in a little raspberry jam or nut butter. Substituting ingredients is simple too—using coconut sugar instead of white sugar adds a caramel note, and swapping dark chocolate chips for white chocolate offers a different flavor twist. When baking, keep an eye on the edges—they tend to cook faster than the center. To test for doneness, I insert a toothpick and pull it out just as moist crumbs form; that’s the sweet spot. For the glaze, I’ve tested adding a splash of bourbon or espresso powder to intensify the chocolate flavor—trust me, it’s worth experimenting. These brownies are forgiving and adaptable, so don’t worry about perfect precision—have fun with it!
Storing and Reheating Tips
This batch of brownies is so moist, they’re best enjoyed within a couple of days. Keep leftovers in an airtight container at room temperature for up to 2 days—just cover with a cloth or foil. If you want to keep them longer, pop them in the refrigerator for up to a week; just be aware they might firm up slightly. To reheat, a quick 10-15 seconds in the microwave does the trick—they come out just as tender and warm. For longer storage, freeze individual portions wrapped tightly in plastic wrap and then foil—these will stay fresh for up to 3 months. Thaw at room temperature for an hour or microwave briefly. If you’ve added a glaze or topping, I recommend waiting to do that until just before serving, especially if you’re freezing—gels and drizzles can sometimes lose their gloss or seep into the brownies when frozen. A little planning and good storage practices keep these brownies tasting fresh and delicious for days—if they last that long!
Frequently Asked Questions
Final Thoughts
If you’re like me, always on the lookout for a treat that feels indulgent yet a little sneaky—these zucchini brownies are exactly that. I’ve made them countless times, tweaking ingredients and swirling techniques, and they never fail to impress. They’re moist, fudgy, and just the right amount of sweet, with that subtle earthiness from the zucchini that keeps them from feeling overly rich. Plus, they’re so easy that even on busy weeknights, I whip up a batch in under an hour. The kids love them, my friends rave about them, and honestly, I love how they secretly pack in some greens. Whether you serve them warm with a drizzle of caramel or chilled with a cup of coffee, these brownies always feel like a warm hug. I encourage you to try all your favorite variations—add nuts, switch up the chocolate, or even experiment with different cheeses on top. The beauty of a good recipe is how it evolves with your tastes. Happy baking! I can’t wait to hear how yours turn out. Drop a comment or share your own twists—I love hearing your stories!

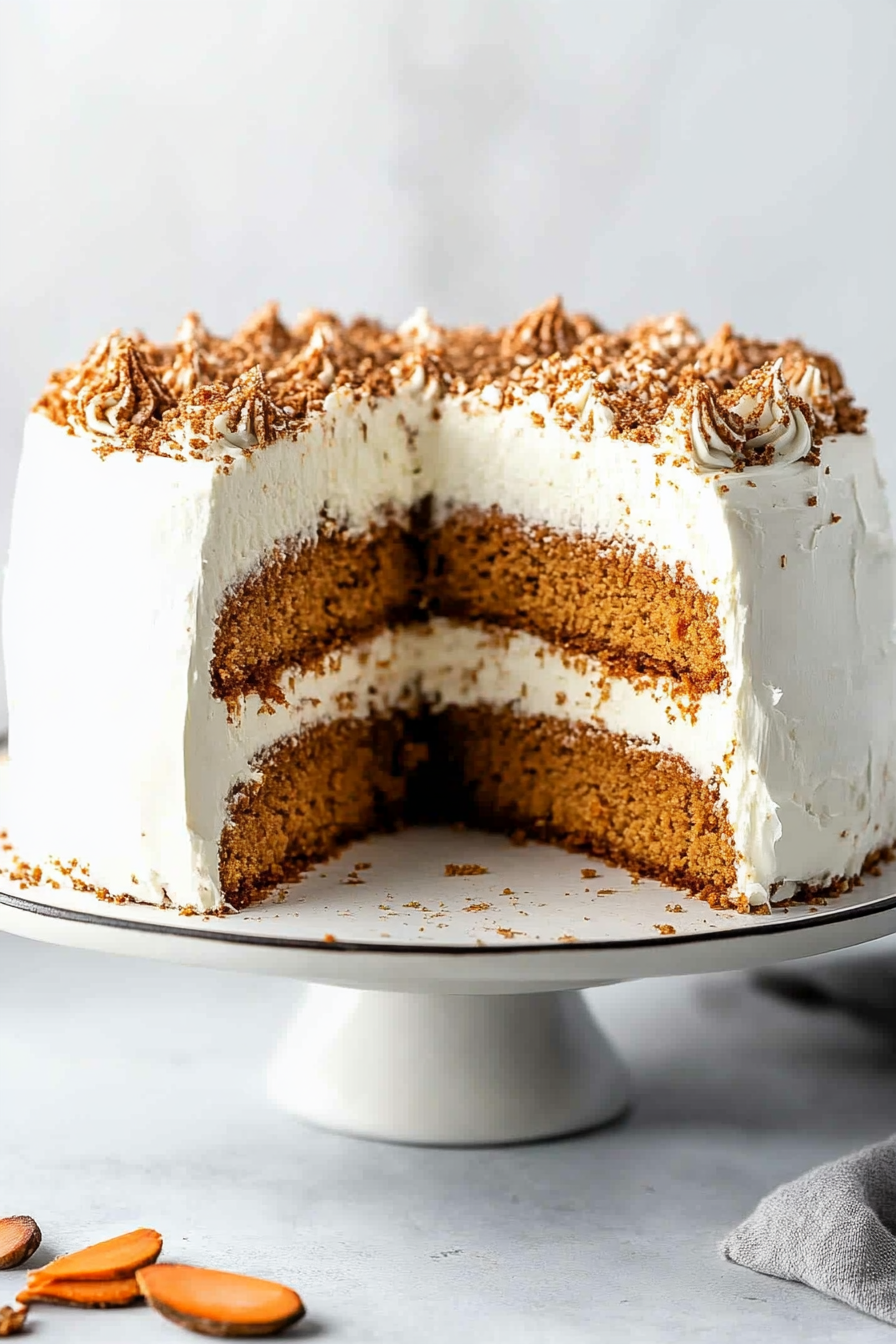
carrot cake
Ingredients
Method
- Beat heavy whipping cream until stiff peaks form.
- Beat cream cheese in a large bowl until smooth with a hand mixer. Beat in sweetened condensed milk. Switch to a wooden spoon or spatula and stir in vanilla. Fold in whipped cream.
- Line an 8-inch round cake pan with plastic wrap, making sure some of it hangs over the sides. Place ice cream in the prepared pan. Cover and freeze for at least 4 hours or overnight.
- Preheat oven to 350°F. Grease and flour one or two 8-inch cake pans.
- Stir together eggs, oil, applesauce, and vanilla. Stir in sugars. Add salt, baking powder, baking soda, and cinnamon and stir until they are just mixed in. Add flour and stir until smooth. Stir in pecans (if using) and carrots.
- Pour batter evenly into pan(s).
- Bake for 20-40 minutes (depending on number of pans and pan size) until a toothpick comes out clean.
- Cool completely before removing from pans.
- Add cold heavy cream to a large bowl and whip until stiff peaks form, adding in powdered sugar and vanilla during mixing.
- If you used one cake pan, torte the cake by cutting it in half horizontally. Place one half on the cake plate.
- Remove ice cream from pan and remove plastic; place it on top the cake layer. Top with second cake layer.
- Do a thin layer of frosting all over the cake (the "crumb coat") to pick up any stray crumbs. Freeze at least one hour.
- Do a second coat of frosting, thicker, over the first coat. Decorate as desired. Optional: add some chopped toasted pecans to the outside of the cake.
- Serve immediately or freeze. Once the frosting is frozen you can cover the cake with plastic wrap and keep in the freezer for up to a month.


This recipe sounds perfect for bringing that cozy, family warmth back—I’ve been wanting to try something like this for a while!
I love this! Orange spice sounds perfect—so comforting and cozy.
I love this idea—what a fun twist on a classic! The orange spice combo sounds so cozy and perfect for family desserts.
I’ve always loved baking with my family too—those moments feel so cozy and full of love. This cake sounds perfect for bringing that warmth back!
I love this recipe! Orange spice adds such a unique twist—perfect for summer. Can’t wait to try it with my kids on Sunday.