
Easy Chicken Veggie Skillet Dinner
I remember the first time I made zucchini banana bread. It was late one Sunday afternoon, and I had a couple of bananas that were turning brown faster than I could eat them, plus this giant zucchini that I somehow forgot I bought during the grocery run. I threw everything into the bowl without much thought, expecting it to be a decent loaf. But when it came out of the oven, oh boy — the smell alone brought everyone rushing into the kitchen. The warm, cinnamon-spiced air, mingled with the gentle sweetness of bananas and the subtle, savory punch of zucchini, made it feel like I had stumbled upon a secret family recipe I’d somehow never known. My kids ask for this all the time, especially when I want a quick treat that feels a little special but takes no time at all. Honestly, this zucchini banana bread is what I turn to when I need something comforting, wholesome, and just a little different from the usual. And trust me — this one’s a lifesaver on busy nights when snacking needs to be quick but satisfying. I always do this when I want to bake something that my whole family will devour—no fuss, no complicated steps. Just pure, cozy goodness in every slice.
What is Zucchini Banana Bread?
Think of zucchini banana bread as the lovechild of a classic banana loaf and a sneaky vegetable upgrade. It’s essentially a moist, tender bread packed with mashed bananas for sweetness and zucchini for moisture and a touch of earthiness. The name might sound a little fancy, but it’s really just a smart way to sneak some veg into a dessert everyone loves. The zucchini, when grated and folded in properly, melts into the batter and keeps the bread unbelievably soft—almost like a hug in every bite. This recipe is all about that perfect balance: sweet enough to satisfy your sugar cravings, but wholesome enough to feel good about enjoying it for breakfast, a snack, or even dessert. It’s definitely a crowd-pleaser—my friends always ask for the recipe—and once you get the hang of it, you won’t believe how easy it is to whip up something so satisfying from simple pantry staples.
Why you’ll love this recipe?
What I love most about this zucchini banana bread is how versatile and forgiving it is. It’s perfect for those moments when you’ve got overripe bananas and a lonely zucchini sitting in the fridge, begging to be used up. The flavor is a beautiful dance of sweet, nutty, and just a hint of earthiness—think of it as comfort food with a little healthy punch. Plus, it’s ridiculously easy to make; you don’t need fancy equipment or special skills. I’ve tested this with almond milk instead of regular milk, and honestly, it made it even creamier and more tender—trust me on this one. It’s budget-friendly, too. The ingredients are staples you probably already have on hand, so no extra trips to the store. And the best part? You can customize it easily—throw in some chocolate chips for the kids, walnuts for extra crunch, or even a handful of blueberries if you’re feeling fancy. This bread is what I reach for when I want something that’s as wholesome as it is delicious, and my family agrees—it disappears in minutes at my house!
How do you make Zucchini Banana Bread?
Quick Overview
This zucchini banana bread is all about simple, straightforward ingredients mixed with a loving touch. You start by grating your zucchini and mashing your bananas—nothing fancy, just reliable, everyday ingredients. Mix the dry stuff—flour, baking soda, spices—and set aside. Then, in another bowl, whisk up eggs, oil, vanilla, and mashed bananas. Combine the wet and dry, fold in the grated zucchini, and pour into a loaf pan. A quick swirl of your favorite filling or topping, pop it into the oven, and in about an hour, you’ve got a loaf that smells like heaven. What makes this method special is how forgiving it is—overmix if you like, or keep it gentle for a more tender crumb. I promise, it’s foolproof, and the result is always moist, flavorful, and just a little rustic looking—which is part of its charm!
Ingredients
For the Main Batter:
– 3 ripe bananas, mashed (the browner, the better for sweetness)
– 1 cup grated zucchini (see tips below for moisture control)
– 1/3 cup vegetable oil or melted coconut oil
– 2 large eggs
– 1 teaspoon vanilla extract
– 1 1/2 cups all-purpose flour (or gluten-free blend, see tips!)
– 1 teaspoon baking soda
– 1 teaspoon ground cinnamon
– 1/2 teaspoon salt
For the Filling (optional, but highly recommended):
– 1/2 cup chocolate chips or chopped nuts
– Or try a streusel topping made from brown sugar, oats, and butter for extra crunch.
For the Glaze:
– 1/2 cup powdered sugar
– 1-2 tablespoons milk or cream
– A dash of vanilla or lemon zest for a twist. Use enough to drizzle but not too runny.
Step-by-Step Instructions
Step 1: Preheat & Prep Pan
Set your oven to 350°F (175°C). Grease a standard loaf pan with butter or line it with parchment paper—trust me, this is a lifesaver when it comes to clean-up and getting that perfect slice. I always do this first so my batter is ready to go by the time the oven is hot.
Step 2: Mix Dry Ingredients
In a bowl, whisk together flour, baking soda, cinnamon, and salt. This helps distribute everything evenly. I’ve learned from experience that mixing dry ingredients beforehand prevents clumps and ensures a consistent rise.
Step 3: Mix Wet Ingredients
In a separate large bowl, mash your bananas until smooth—show them some love with a good fork. Add the eggs, oil, and vanilla, then whisk until smooth and slightly frothy. This is the best way to build flavor and ensure everything’s blended perfectly. I like to test the mixture for temperature—if the eggs are cold, just let the mixture sit for a minute or two before combining with the dry ingredients.
Step 4: Combine
Pour the dry ingredients into the wet and fold gently until just combined. Overmixing is a rookie mistake that makes bread dense, so keep it light. The batter will be thick but still pourable. Then, fold in the grated zucchini—remember, squeeze out excess moisture first to prevent a watery batter. I’ve made the mistake of skipping this step, and let me tell you, the loaf was a bit too dense because of extra liquid. Not fun.
Step 5: Prepare Filling
If using chocolate chips or nuts, fold them into the batter now. For a swirl effect, save a few to sprinkle on top for visual appeal. You can also add a teaspoon of lemon zest here for brightness—this recipe is all about personal tweaks.
Step 6: Layer & Swirl
Pour half the batter into your prepared pan, then add your filling—a handful of chocolate chips or dollops of fruit compote work beautifully. Swirl with a toothpick for a marbled look. Repeat with the rest of the batter, creating a layered effect. This step is my secret weapon — it makes every loaf look gourmet and appetizing.
Step 7: Bake
Bake for about 50-60 minutes. Do the toothpick test—insert in the center and it should come out clean. Every oven is different, so start checking around 50 minutes. If your loaf browns too fast on top but isn’t baked through, tent it with foil and continue baking. Trust me, patience pays off for that perfect moist crumb!
Step 8: Cool & Glaze
Let it cool in the pan for about 15 minutes, then transfer to a wire rack. This step is key to avoiding crumbs everywhere. Once cooled, drizzle with your glaze. I like to let it set for a few minutes, then slice with a serrated knife—keeping a steady hand makes all the difference in avoiding squished slices.
Step 9: Slice & Serve
Slice with patience—this bread is moist and tender, so gentle pressure is best. Serve warm or at room temperature with a dollop of butter or a smear of your favorite jam. It’s fantastic toasted the next day, too, with just a smear of cream cheese or nut butter. Trust me, it gets even better as it sits—if it lasts that long!
What to Serve It With
This zucchini banana bread is my absolute go-to for breakfast with a big mug of coffee—nothing beats that first sip and bite combo. My kids love it warm, with a drizzle of honey or a little yogurt on the side. For brunch, I’ll layer it with fresh berries, whipped cream, or even smear some mascarpone on slices for an elegant touch. It’s also perfect as a late-night treat when you’re craving something sweet but don’t want to turn on the oven again. Once cooled, I slice and store a few pieces in the fridge wrapped tightly—this gets you through busy mornings without fuss. And if I’m feeling extra indulgent, I’ll add some cream cheese or Nutella spread on a slice—trust me on this—it’s a game-changer. I’ve even frozen slices for quick snacks when I need a sweet pick-me-up. Honestly, this bread just makes life a little sweeter and a whole lot cozier.
Top Tips for Perfecting Your Zucchini Banana Bread
Making this bread perfect every time takes a little patience and a few tricks I’ve picked up over the years. First, when grating zucchini, I always squeeze out excess moisture with a clean kitchen towel—otherwise, your batter gets too watery and the loaf won’t rise properly. For the bananas, I prefer really ripe—almost black—bananas; they mash easily and provide that deep caramel flavor that makes all the difference. When mixing, I’ve learned to fold gently—overmixing develops gluten and makes the bread dense, especially if you’re using whole wheat flour, which I often do to add a bit more healthiness. If you’re swapping in alternative flours, start with 1:1 ratios but keep an eye on moisture—sometimes almond or oat flour needs a little extra egg or moisture. Swirling in jam or fruit preserves can add a little surprise and color, so don’t be shy to experiment! I’ve tested this with different spices, like a pinch of nutmeg or cardamom, and it just elevates the flavor. Always bake until a toothpick comes out clean—every oven bakes differently, so this is your best guide. As for the glaze, I’ve played around with lemon zest or a splash of maple syrup—delicious options for jazzing it up. The key is keeping it moist, flavorful, and forgiving—just like a good hug in bread form.
Storing and Reheating Tips
This bread stays moist and delicious for a few days when stored properly. Wrap it tightly in plastic wrap or keep it in an airtight container at room temperature if you plan to eat it within 2 days. Beyond that, it’s best to refrigerate, which keeps it fresh and prevents mold. I like to slice it first and then keep it in a resealable bag—this way, I just grab what I want without exposing the whole loaf each time. For longer storage, freeze it—wrap slices individually in plastic wrap and then place them in a freezer-friendly bag. Thaw at room temperature or pop in the microwave for a quick warm-up. About the glaze—if you’re making it ahead of time, I recommend adding it just before serving to keep that glossy, fresh look. If you need to reheat a slice, a quick 10-15 seconds in the microwave does the trick, making it taste just baked. The smell alone will make your house smell like a bakery, so trust me, this bread is worth the little extra effort for storing. It’s a great make-ahead treat for busy mornings or cozy afternoons.
Frequently Asked Questions
Final Thoughts
This zucchini banana bread has become my cozy kitchen staple. It’s a humble recipe that packs a punch—moist, flavorful, and so forgiving. Whether it’s a lazy Sunday morning, a quick afternoon snack, or a special breakfast for guests, it never disappoints. I love how adaptable it is—adding chocolate, nuts, or even a little citrus—so it really feels like your own creation every time. The smell alone during baking is enough to lift your spirits, and the taste keeps everyone coming back for more. Honestly, I hope you try it and find as much joy in making and sharing it as I do. Trust me, once you’ve got the hang of it, it’s going to be one of those recipes you make again and again. Happy baking! And don’t forget to leave a comment or share your own twists—I love hearing how others customize their favorites.
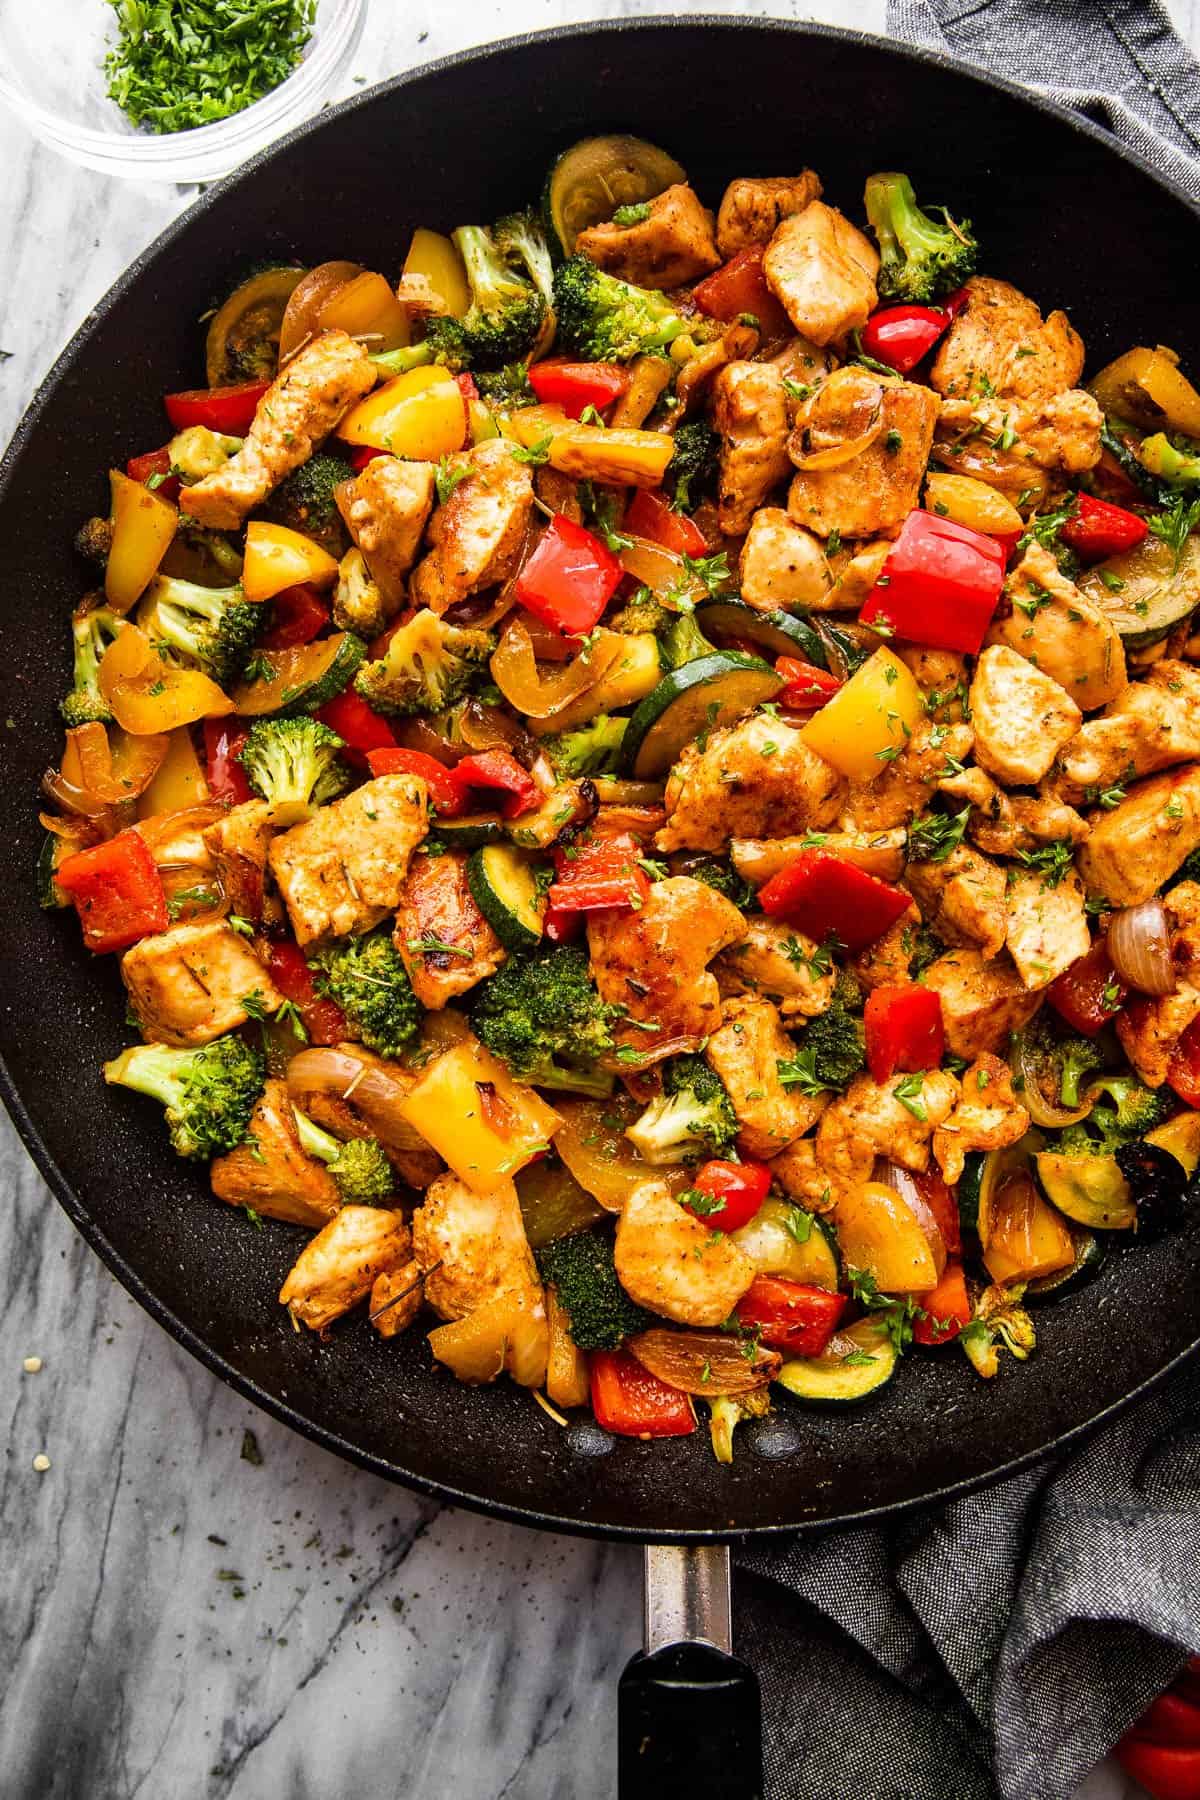
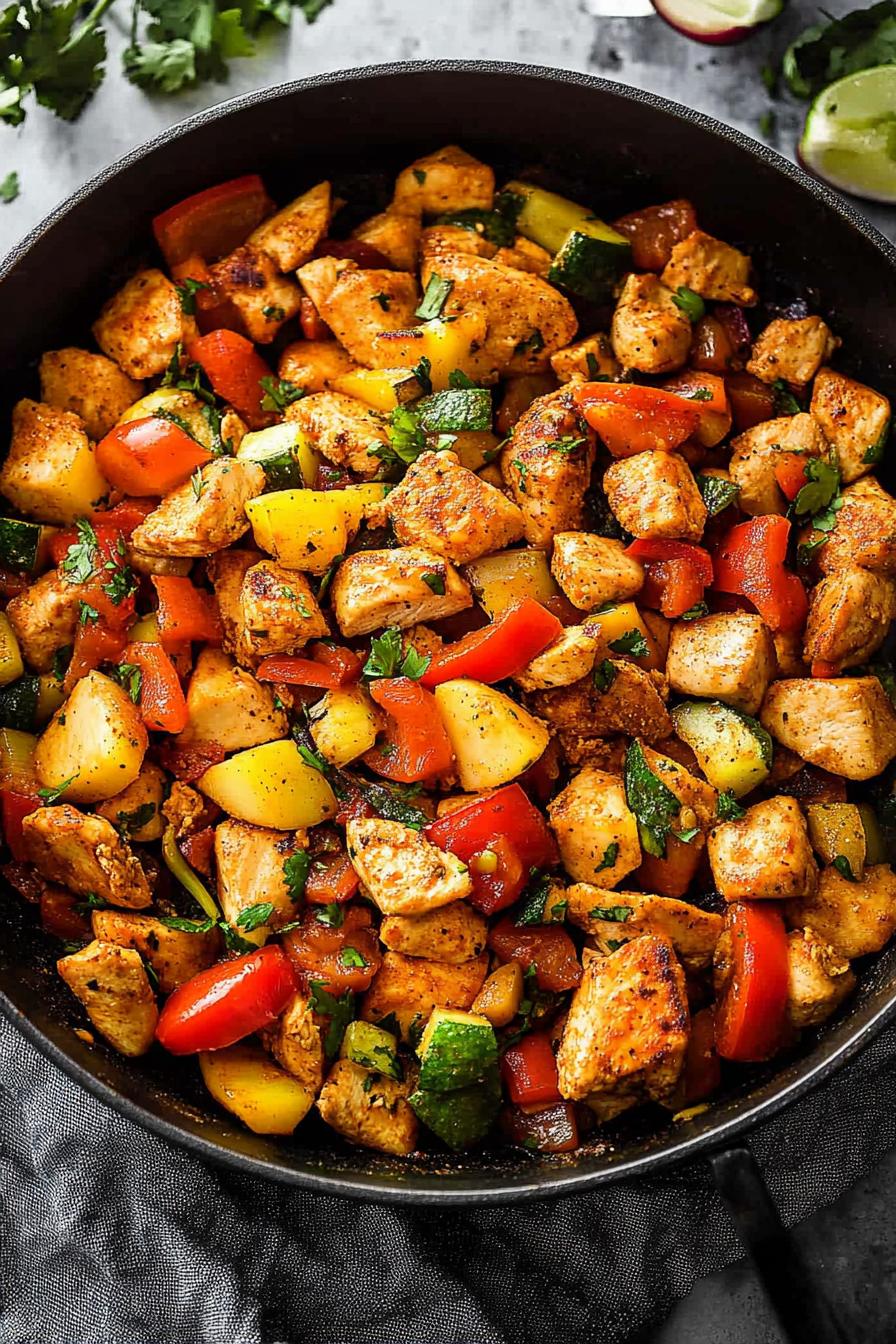
chicken skillet
Ingredients
Method
- Cut the chicken into 1-inch pieces and season with salt and pepper; set aside.
- In a small mixing bowl combine garlic powder, onion powder, thyme, rosemary, paprika, and chili powder; sprinkle half over the chicken.
- Add ½ tablespoon olive oil to the chicken and toss to coat evenly.
- Heat 1 tablespoon olive oil in a large skillet over medium-high heat. Add the chicken and cook for 6 to 8 minutes until browned and cooked through. Remove and set aside.
- Add remaining olive oil to the skillet. Stir in sliced onion and cook for 2 minutes. Add broccoli, zucchini, and bell peppers. Season with remaining spices, salt, and pepper. Cook for 4 to 6 minutes until vegetables are crisp-tender.
- Stir in chicken broth, then return the cooked chicken to the skillet. Cook for 1 minute to combine flavors.
- Remove from heat, taste, and adjust salt as needed. Garnish with chopped parsley and serve hot.


That sounds so cozy and delicious! I love how simple recipes like this can turn everyday ingredients into a comforting meal.
That sounds delicious! I love how simple and healthy skillet dinners can be.
That sounds delicious! I’ve been looking for a quick weeknight dinner recipe—this one looks perfect and easy to customize.
That sounds so cozy—banana bread in the middle of a lazy Sunday? Love how homey this post feels!
That sounds delicious—easy and healthy meals like this are perfect for busy weeknights!