
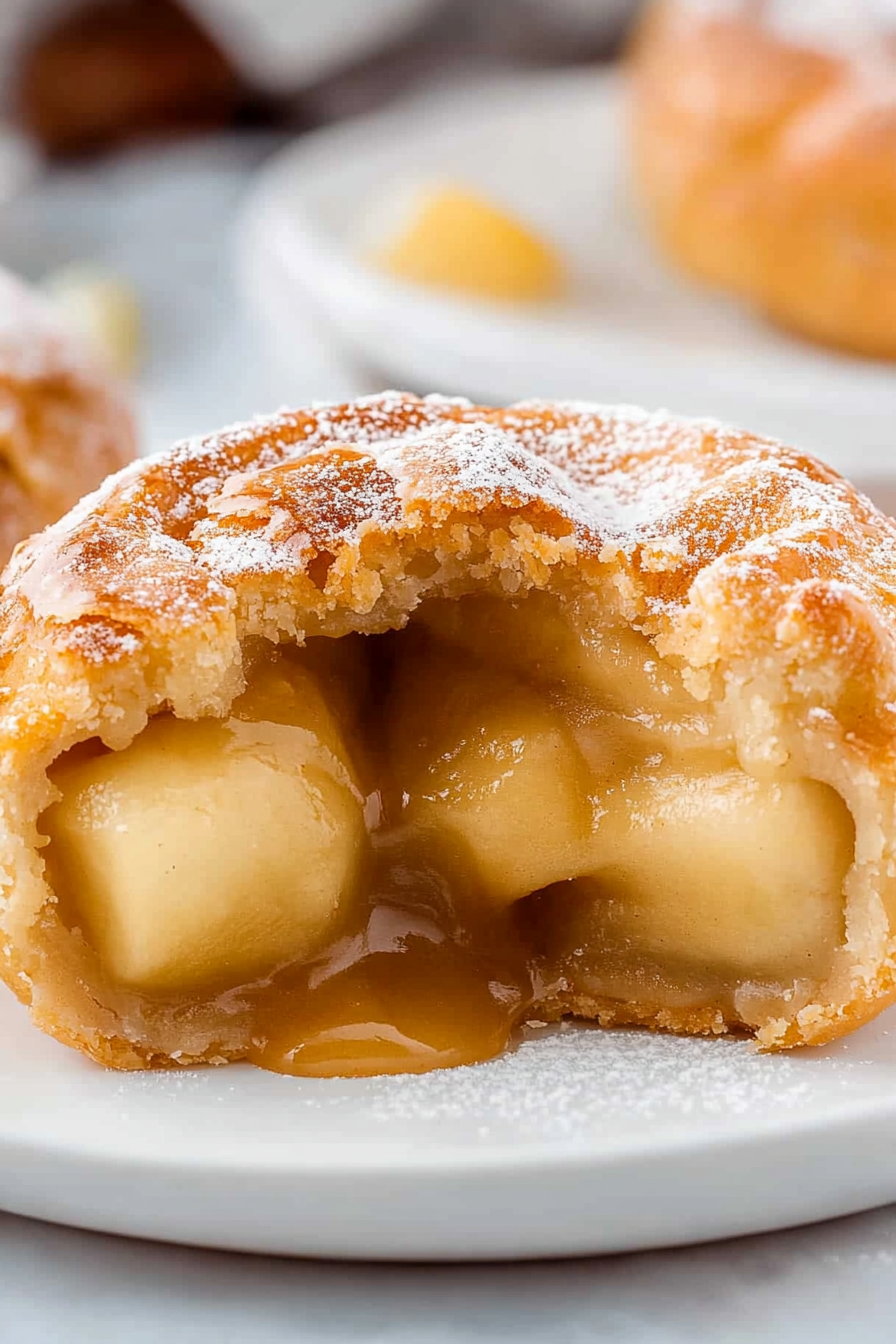
Sweet Caramel Apple Pie Bites How To
If you’re like me, there’s nothing quite like the smell of freshly baked cake wafting through the house on a lazy weekend morning. I still remember sneaking a piece of my mom’s zucchini bread as a kid — back then, I thought it was just a sneaky way to get us to eat our greens, but now I realize it’s a secret weapon for turning humble zucchini into something truly special. So when I discovered this zucchini coffee cake with its tender crumb, sweet swirls, and that irresistible cream cheese ribbon, I knew I’d hit a new family favorite. This one’s a lifesaver on busy nights or when I want to impress friends without pulling out a complicated recipe. Honestly, my kids ask for this all the time — especially when I make it in mini muffin form for a quick snack. Trust me, once you try it, you’ll find yourself craving that warm, comforting aroma, and I promise — the taste is just as incredible as the smell.
What is Zucchini Coffee Cake?
Think of this zucchini coffee cake as the cozy cousin of classic coffee shop treats. It’s essentially a tender, moist cake infused with shredded zucchini — yes, that sneaky veggie again — which keeps it unbelievably soft and adds a subtle earthiness that balances out the sweetness. The real star is the luscious cream cheese swirl weaving through each slice, giving it that irresistible marbled look and a tangy punch that pairs perfectly with the sweet cinnamon topping. It’s called a “coffee cake” because it’s perfect alongside a steaming mug of coffee or tea, but honestly, it makes a killer breakfast, brunch, or even dessert. It’s kind of like a hybrid of banana bread and a cinnamon roll, but with that added zucchini magic. Think of it as a way to sneak healthy into something downright delicious — and trust me, nobody will be able to tell that zucchinis are involved.
Why you’ll love this recipe?
What I love most about this zucchini coffee cake is how foolproof it is — I’ve made this countless times, and it never fails to disappear within minutes at my house. The flavor? Oh, it’s pure comfort: warm cinnamon, slight nuttiness from the zucchini, and that cream cheese swirl blotting in each bite like a little treasure. And the best part? It’s super simple. I always do this when I want to treat my family without spending hours in the kitchen. The ingredients are budget-friendly, mostly pantry staples, and you probably already have everything you need. Plus, it’s incredibly versatile — you can serve it warm with a dollop of whipped cream, dust it with powdered sugar, or even add a handful of chopped nuts on top for crunch. I’ve tested this with a splash of almond milk, and honestly, it made it even creamier — so don’t be afraid to experiment! This cake is one of those recipes that just makes you happy, no matter what kind of day you’re having.
How do I make Zucchini Coffee Cake?
Quick Overview
This cake comes together in a flash. You start by mixing your dry ingredients and setting them aside. Then, whip up the wet ingredients—think eggs, oil, sugar, and shredded zucchini. mix everything gently, layer half of the batter in your pan, spread the cream cheese filling, add the rest of the batter, and swirl it all together. A quick bake, and voilà — a moist, flavorful cake with that gorgeous cream cheese ribbon. It’s the kind of dessert where you can prep everything ahead, pop it in the oven, and finish with a sweet glaze that makes it look even more tempting. And trust me, the aroma alone will have everyone rushing to the kitchen.
Ingredients
For the Main Batter:
– 2 cups all-purpose flour (I like using unbleached for a richer flavor)
– 1 cup granulated sugar (trust me on the slightly less sweet side, it balances well)
– 1 teaspoon baking powder
– ½ teaspoon baking soda
– ½ teaspoon ground cinnamon
– ¼ teaspoon salt
– ½ cup vegetable oil or melted unsalted butter
– 3 large eggs
– 1 teaspoon vanilla extract
– 1 cup grated zucchini (squeeze out excess moisture; a little salt on the zucchini before grating helps. I’ve also tested this with yellow squash — works beautifully!)
For the Filling:
– 4 oz cream cheese (softened to room temperature — don’t skip this step, or you’ll struggle spreading it)
– ¼ cup powdered sugar
– ½ teaspoon vanilla
– Optional: a pinch of lemon zest for brightening the flavor
For the Glaze:
– ½ cup powdered sugar
– 2-3 teaspoons milk or almond milk
– ¼ teaspoon vanilla extract
– Optional: a sprinkle of cinnamon or lemon zest for extra punch
Step-by-Step Instructions
Step 1: Preheat & Prep Pan
Set your oven to 350°F (175°C). Grease a 9-inch round or square baking pan and line it with parchment for easy removal. I usually give it a quick spritz of non-stick spray and dust it with a little flour — makes everything come out clean.
Step 2: Mix Dry Ingredients
In a large bowl, combine the flour, sugar, baking powder, baking soda, cinnamon, and salt. Use a whisk to blend everything evenly. This step makes sure your leavening agents are distributed so your cake rises uniformly and isn’t dense — nothing worse than a heavy zucchini loaf!
Step 3: Mix Wet Ingredients
In another bowl, whisk together the eggs, oil, vanilla, and shredded zucchini. I always do this before adding the wet to the dry; it keeps everything smooth and prevents overmixing. The zucchini should be grated finely, almost like a soft pulp. I tested this with just a regular box grater — no fancy equipment needed, just a gentle squeeze to remove excess water afterwards.
Step 4: Combine
Add the wet ingredients to the dry, stirring gently until just combined. Be careful not to overmix — a few lumps are fine! Overmixing can toughen the cake, and nobody wants a rubbery texture.
Step 5: Prepare Filling
In a small bowl, beat the softened cream cheese, powdered sugar, vanilla, and lemon zest if using. The filling should be smooth and spreadable but not runny. If it’s too soft, pop it in the fridge for a few minutes.
Step 6: Layer & Swirl
Pour about half of the batter into your prepared pan, spreading it evenly. Spread the cream cheese mixture gently over this layer, then top with the remaining batter. Use a skewer or knife to swirl the batter slightly — don’t overdo it; you want a beautiful marbled effect, not a not-so-precise mix.
Step 7: Bake
Pop it into the oven and bake for about 40-45 minutes. Check doneness by inserting a toothpick in the center; it should come out clean or with a few moist crumbs. Every oven is slightly different, so start checking at 38 minutes, especially if you like your cake super moist or slightly extra baked.
Step 8: Cool & Glaze
Let the cake cool in the pan for about 15 minutes, then transfer it to a wire rack. Once it’s cooled completely, drizzle with that simple glaze — I like to do this while it’s still just a little warm, so it seeps into the cracks a bit. The smell alone is enough to make everyone linger in the kitchen.
Step 9: Slice & Serve
Use a sharp knife for clean slices, and serve it warm or at room temperature. A dollop of whipped cream or a sprinkle of chopped nuts on top makes it even prettier. Trust me, this looks just as gorgeous as it tastes, and it’s guaranteed to be a hit at brunch or tea time.
What to Serve It With
This zucchini coffee cake pairs beautifully with so many things. For breakfast, I love it with a strong cup of coffee or a tall glass of milk — good news is, it’s delightful even the next day toasted with a pat of butter. My family enjoys it for brunch alongside fresh berries or a platter of sliced fruit, with some sparkling water or mimosa on weekends. As a dessert, I love serving it with a scoop of vanilla ice cream or a drizzle of caramel sauce — the flavors contrast so nicely. When I want a simple, cozy snack, I cut it into squares and pack them in small containers for the kids to grab on their way out the door. Either way, this cake is a crowd-pleaser, and it’s even better when you make it ahead — the flavors meld beautifully after a night in the fridge.
Top Tips for Perfecting Your Zucchini Coffee Cake
After dozens of tests, I’ve picked up a few tricks to make sure your cake turns out just right:
- Zucchini Prep: Grate it finely and always squeeze out excess moisture with a clean kitchen towel or paper towels. Too much water can make the batter droopy and affect the texture.
- Mixing Advice: Use a gentle folding motion when combining wet and dry ingredients. I used to overmix, and I learned the hard way that dense, rubbery cakes are the result. Stop mixing as soon as you see no more dry flour!
- Swirl Customization: Feel free to add a sprinkle of cinnamon or cocoa powder into the cream cheese filling for a flavor boost. For a colorful swirl, I sometimes mix in a little food coloring—my kids think it’s fun!
- Ingredient Swaps: Want to make it dairy-free? Coconut oil and dairy-free cream cheese work beautifully. I’ve also tried honey as a sweetener in the glaze — adds a nice floral note but keep the consistency thick to avoid runoff.
- Baking Tips: Oven temperatures vary, so start checking a few minutes early. The cake should bounce back lightly when touched and have a golden crust—your signal that it’s done.
- Glaze Variations: For a tangy twist, add a few drops of lemon juice or zest. Or go nutty with chopped walnuts sprinkled on top before baking for added crunch.
My biggest lesson? Patience is key. Don’t rush the cooling process—warm cake and hot glaze don’t mix well. Let it cool entirely for the best presentation and clean slices. And don’t be discouraged if it looks a little rustic — the flavor and smell will more than compensate!
Storing and Reheating Tips
This cake keeps beautifully for a few days. Store leftovers in an airtight container at room temperature for up to two days or in the fridge for up to five. If refrigerating, I recommend bringing slices to room temperature or warming them slightly in the microwave—about 20 seconds should do it. For longer storage, wrap tightly in plastic wrap and freeze for up to three months. Thaw at room temperature or in the fridge, then warm gently. If you’re serving the next day, a quick zap in the microwave (careful not to overdo it) brings back some of that freshly baked warmth. I usually add the glaze again just before serving if it’s been stored in the fridge — it helps keep that shiny, tasty look. Just remember, the glaze can get a little thicker overnight, so stir it up with a splash of milk if needed.
Frequently Asked Questions
Final Thoughts
If you’re looking for a way to enjoy zucchini in a whole new light, this coffee cake is your answer. It combines the humble vegetable with cozy spices, a dreamy cream cheese swirl, and just enough sweetness to keep everyone coming back for more. I’ve shared this recipe with friends, family, and a handful of neighbors — and every single time, it’s been met with happy smiles and empty plates. It’s simple enough for a novice baker but refined enough to impress, and the aroma alone makes it impossible to resist. Trust me, once you make this, it’ll become a staple in your baking rotation. Plus, it’s one of those recipes that taste even better the next day — perfect for breakfast, brunch, or afternoon tea. Happy baking! And I can’t wait to hear how yours turns out. Feel free to leave a comment or share your own tweaks — I love hearing from fellow zucchini enthusiasts!

caramel apple pie
Ingredients
Method
- Fill a 2-3 quart heavy-bottomed saucepan a little over half way with vegetable oil. Set aside.
- In a small heat safe bowl, stir together the granulated sugar and ground cinnamon. Set aside.
- Open the can of biscuits, and flatten the dough with fingers or a rolling pin. Lightly flour work surface if needed.
- Place 1 tablespoon of apple pie filling in the center of each biscuit circle.
- Place halved caramel on top of the apples, ensuring caramel is cut to prevent melting improperly.
- Pinch the edges of the dough together to seal, then roll ends into a ball shape.
- Heat oil over medium until a small piece of dough bubbles upon contact.
- Carefully lower dough balls into oil, cooking no more than 2 at a time. Fry until golden brown, turning occasionally.
- Remove bombs, coat in cinnamon sugar, and serve immediately. Drizzle with caramel topping if desired.


These look so delicious! I can almost smell them baking right now—definitely adding this to my weekend recipe list.
Love the idea of these bites—they sound perfect for a cozy weekend treat! I can already imagine how delicious they’d smell baking in the kitchen.
I just tried these and they’re incredible—perfectly sweet with a gooey caramel center. Definitely adding this to my holiday baking list!
I’ve made these before—so easy and absolutely delicious! The caramel drizzle is a game changer.
I love the idea of mini pie bites—perfect for portion control and so cute! Can’t wait to try this recipe this weekend.