
Easy Philly Cheesesteak Tortellini Delight
There’s something about baking with zucchini that makes me feel cozy and nostalgic all at once. Growing up, my mom would always sneak zucchini into her bread, claiming it was “secret vegetable magic,” and I swear, nobody ever figured it out until I got older. Now, I do the same with my kids — it’s a sneaky way to get them to eat more greens, and honestly, this zucchini cinnamon swirl loaf is just too good to keep hidden. The smell alone makes my whole house feel warm, and it’s one of those recipes I turn to when I need a quick treat that’s more wholesome than your usual sugary bake. This loaf is incredibly moist, full of cinnamon-spiced goodness, and that beautiful swirl of zucchini and cinnamon sugar makes every slice feel like a special gift. Trust me, this one’s a lifesaver on busy nights or when you’re craving something sweet at 10pm but don’t want to bake a whole cake — it’s fast, flavorful, and practically foolproof. Plus, my kids actually ask for seconds and thirds — yes, it’s that good! I’ve tested this with different nuts and even swapped in almond milk, and it turns out amazing every time. So, let’s get baking and fill our kitchens with that inviting, cinnamon-y aroma!
What is Zucchini cinnamon swirl loaf?
This zucchini cinnamon swirl loaf is a cozy, bread-like treat that combines the moistness of a quick bread with the indulgence of cinnamon rolls — but it’s much simpler and quicker to whip up. Think of it as a mash-up between a hearty zucchini bread and gooey cinnamon babka, all wrapped into a single loaf pan. The “swirl” comes from mixing cinnamon sugar into a soft, tender batter and then marbling it with grated zucchini, which keeps the loaf lush, tender, and surprisingly light. It’s essentially a sneaky way to add veggies into a dessert or breakfast, and yet it never feels “healthy” in the least — just irresistibly comforting. The name says it all: zucchini gives it a moist, dense texture, while that swirl of cinnamon sugar creates pockets of spicy sweetness throughout. It’s perfect for breakfast, brunch, or even a casual snack with a cup of coffee on a lazy weekend morning. I love making this ahead of time — it keeps well, and honestly, it tastes even better the next day when all those flavors have had a chance to meld. Think of it as a warm hug, baked and sliced in perfect, cinnamon-kissed slices.
Why you’ll love this recipe?
Oh, where do I even start? This zucchini cinnamon swirl loaf is one of my all-time favorites, and not just because it’s delicious — although, that’s a big reason! What I love most about this is how outrageously moist and flavorful it turns out, thanks to the zucchini. It’s way better than your average banana bread or muffin, mostly because of that hidden vegetable that keeps everything super tender without making it heavy. Plus, the cinnamon swirl? Honestly, it’s like biting into a warm, sweet cinnamon roll, but in loaf form — so much easier to serve and share. This recipe is also crazy simple. The batter comes together in minutes, and I always do this when I’m short on time but want to impress. It uses common pantry ingredients, so no special grocery runs needed. And, bonus — it’s budget-friendly! Leftovers are perfect toasted with a smear of butter or a drizzle of honey, and the whole family asks for it. My kids call it “the magic zucchini bread,” which makes me smile every single time. Whether I’m making a quick breakfast or bringing someone a homemade gift, this loaf always feels special and cozy. It’s one of those recipes I keep on repeat because I know I can count on its reliability and pure deliciousness.
How do you make Zucchini Swirl Loaf?
Quick Overview
This zucchini cinnamon swirl loaf is surprisingly straightforward. You basically mix up a tender batter, prepare the cinnamon-sugar swirl, layer everything in a loaf pan, and bake until golden. The key to great results is not overmixing the batter and ensuring your zucchini is drained well — that keeps the loaf from turning into a soggy mess. Once it’s baked, all that cinnamon-sugar goodness bakes into a glorious, marbled swirl that’s visually stunning and ridiculously tasty. It’s perfect for a lazy weekend or a busy weekday, and the smell alone will have everyone in the house asking, “When’s it ready?” The best part? It keeps well, so you can enjoy slices over a couple of days or even freeze some for later. Plus, it’s versatile—you can add nuts, raisins, or even a splash of vanilla or lemon zest if you’re feeling fancy. Whatever your spin, this recipe will quickly become a staple in your kitchen, I promise.
Ingredients
For the Main Batter:
– 2 cups all-purpose flour (I like unbleached for a richer flavor)
– 1 cup granulated sugar
– 1 teaspoon baking powder
– 1/2 teaspoon baking soda
– 1/2 teaspoon salt
– 1 teaspoon ground cinnamon
– 1/2 cup vegetable oil or melted coconut oil
– 1 cup grated zucchini (about 1 medium zucchini, grated and squeezed dry)
– 2 large eggs
– 1 teaspoon vanilla extract
For the Filling:
– 1/4 cup brown sugar
– 1 teaspoon ground cinnamon
– 1 tablespoon melted butter (or coconut oil for dairy-free)
For the Glaze:
– 1/2 cup powdered sugar
– 1-2 teaspoons milk or almond milk
– A splash of vanilla or lemon juice (optional)
Step-by-Step Instructions
Step 1: Preheat & Prep Pan
Preheat your oven to 350°F (175°C). Grease or line a standard loaf pan with parchment paper — trust me, parchment makes cleanup so much easier! I usually give it a quick spray with non-stick spray and then a light dusting of flour. This helps prevent sticking. Set your baking station nearby with all your ingredients within reach — baking feels calmer that way, right?
Step 2: Mix Dry Ingredients
In a large bowl, whisk together the flour, sugar, baking powder, baking soda, salt, and cinnamon. These dry ingredients are the backbone of the loaf — ensuring everything is evenly distributed is key to a toothy, tender crumb. I always sift mine if I have a moment — little tricks from my baking grandma — but a good whisk does the job just fine.
Step 3: Mix Wet Ingredients
In a separate bowl, whisk the eggs, then add the oil, vanilla, and grated zucchini. I like to squeeze out excess moisture from the zucchini before adding it; it’s a small step that keeps the batter from being too wet. If you want it even more moist, you can swap in almond milk, which I tested, and it made the loaf extra tender. Mix until all the wet ingredients are well combined.
Step 4: Combine
Add the wet mixture to the dry ingredients. Fold gently — no vigorous mixing! Overmixing can lead to a dense loaf. I usually do about 15 seconds of gentle folding until just combined. You should still see a few streaks of flour here and there—that’s perfect. Overworking the batter makes it tough, and nobody wants that.
Step 5: Prepare Filling
In a small bowl, mix the brown sugar, cinnamon, and melted butter. This is the magic cinnamony layer that gives the loaf its signature swirl and sweet punch. Feel free to add chopped nuts or raisins here if you like — I sometimes toss in a handful of walnuts just for texture.
Step 6: Layer & Swirl
Pour half the batter into your prepared pan, then sprinkle evenly with the cinnamon-sugar mixture. Add the rest of the batter on top, and finally, swirl with a butter knife or skewer to create a beautiful marbled effect. Don’t overdo it — you want that pretty, mixed swirl, not a muddy mess. This part always makes me feel like I’m creating an edible piece of art.
Step 7: Bake
Pop it into your preheated oven and bake for about 50-60 minutes. Check for doneness by inserting a toothpick into the center — it should come out clean or with a few moist crumbs. Every oven is different, so start checking around the 50-minute mark. If it’s browning too fast on top but isn’t baked through, tent it with foil for the last few minutes. Trust me, patience pays off here — that perfect crust is worth waiting for!
Step 8: Cool & Glaze
Allow the loaf to cool in the pan for about 15 minutes, then transfer it to a wire rack. Once cooled, whisk together your glaze ingredients and drizzle generously over the top. The glaze adds just that extra touch of sweetness and a glossy finish that makes the loaf irresistible. If you’re in a rush, skip the glaze — it’s still fantastic either way.
Step 9: Slice & Serve
Use a sharp serrated knife to cut slices once it’s cool — this prevents squishing. Serve warm or toasted with butter, honey, or even a dollop of whipped cream for a dessert feel. I love serving it during brunch with fresh berries or just alongside my morning coffee. Honestly, it’s just so comforting and addictive — I warn you, it disappears in minutes at my house!
What to Serve It With
Now, this loaf is pretty versatile. For breakfast, I love pairing it with a strong dark roast coffee and a handful of fresh berries. The slight tartness of the berries balances that sweet, cinnamon-rich bread. During brunch, it’s gorgeous on a wooden board alongside some cream cheese or Greek yogurt drizzled with honey — people always ask for my “secret” dip. As a dessert, warm slices with vanilla ice cream or a dusting of powdered sugar totally hits the spot. And honestly, my kids consider it a snack any time of day. I tend to keep a loaf in the fridge for up to four days, wrapping it tightly, or freeze slices for later. When I reheat in the toaster, it’s like the smell just came straight out of childhood — cozy, cinnamon-y, sweet perfection.
Top Tips for Perfecting Your Zucchini Cinnamon Swirl Loaf
After making this countless times, I’ve learned a few tricks that really make a difference. First, when grating zucchini, I always do it on the fine side, then squeeze out as much moisture as possible — otherwise, the batter might be too wet, and the loaf could turn dense. I’ve tested with almond milk, oat milk, and regular milk, and honestly, almond milk makes it even creamier without any added dairy. For the swirl, don’t overmix; gentle folding is key to that beautiful marbling. If you want a more pronounced cinnamon swirl, sprinkle more cinnamon sugar in layers or swirl it more vigorously. Adjusting the sweetness is easy — just cut back on sugar or swap in maple syrup for a richer flavor. When baking, I always position my pan in the center of the oven and rotate halfway through to promote even browning. If your top is browning too fast, tent it with foil, and keep an eye on it past the 50-minute mark. As for the glaze, I love keeping it simple, but adding a splash of lemon juice brightens the flavors. You can also sprinkle chopped pecans or coconut flakes on top before baking for extra crunch. The lessons learned from tweaking this recipe over time have made it my go-to for any occasion.
Storing and Reheating Tips
This loaf keeps surprisingly well. Once cooled completely, I wrap it tightly in plastic wrap or store in an airtight container. At room temperature, it’s good for about two days, perfect for slicing fresh in the morning. If you want to keep it longer, pop it in the fridge — it’ll stay fresh for up to four days. Just be sure to wrap it well to prevent it from drying out. For longer storage, I freeze slices individually wrapped in plastic. They’re perfect to grab on busy mornings or afternoon snacks. Just thaw at room temperature or toast directly from the freezer. A quick reheat in the oven or toaster keeps it nice and soft, and the cinnamon swirl stays vibrant. If you like glazing it, I recommend adding the glaze after reheating, as it can soften or become runny if applied too early. Overall, I find this loaf is quite forgiving — a little fridge time only deepens the flavor, and it’s still delicious reheated or at room temp. Plus, it’s one of those baked goods that tastes just as good a couple of days later, which makes it perfect for bake-aheads!
Frequently Asked Questions
Final Thoughts
This zucchini cinnamon swirl loaf is truly a baked hug — moist, flavorful, and loaded with cinnamon magic. It’s one of those recipes I feel good about serving any time: hearty enough for breakfast, sweet enough for dessert, soft enough for snacks. The best part? It’s flexible — you can customize it with nuts, dried fruit, or even switch up the spices. I love how simple it is to put together, yet it looks and tastes like you fussed for hours. Every time I make it, I get smiles from everyone and a lot of “Wow, this is so good!” moments. I hope you give it a try and make it your own. Let me know how it turns out — I always love hearing about new twists or little tips! Happy baking, and may your kitchen be filled with the irresistible smell of cinnamon and zucchini goodness!
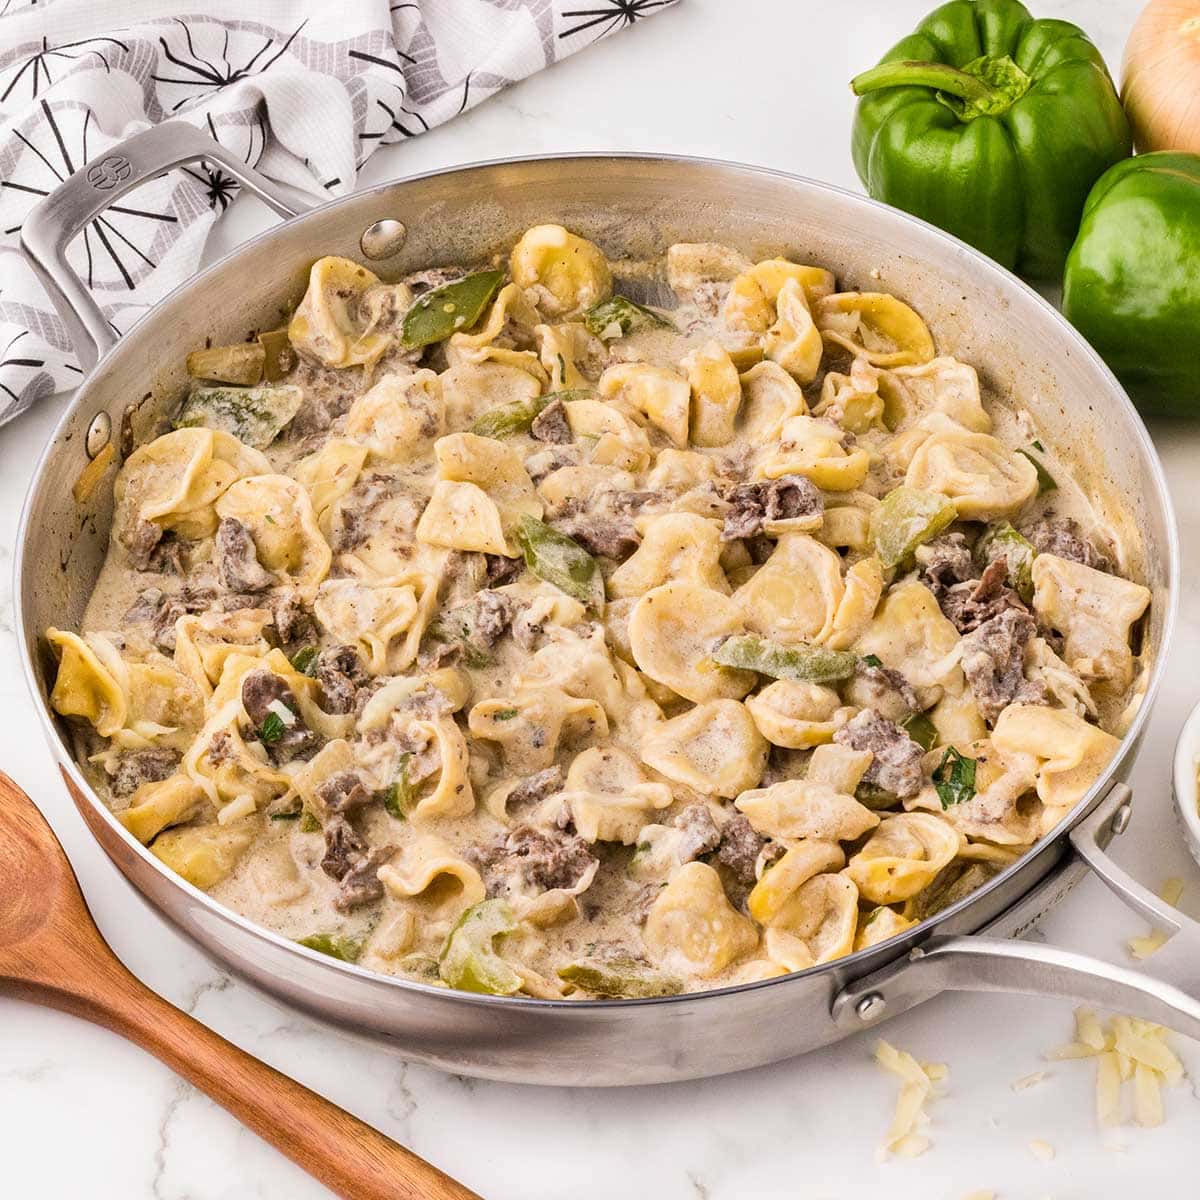
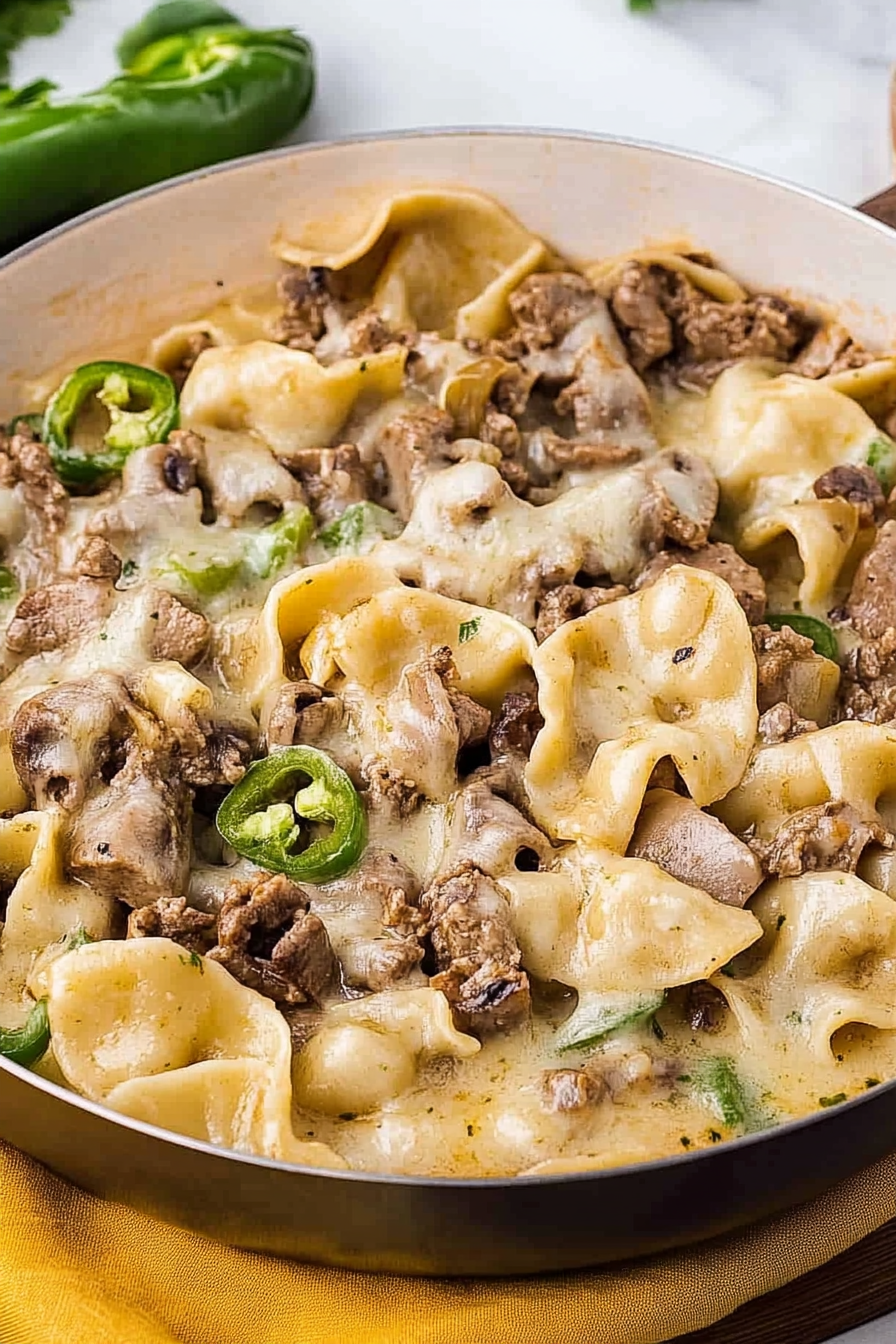
Philly Cheesesteak
Ingredients
Method
- To a large, 12 inch, skillet over medium-high heat add the olive oil. When the oil is hot, add the frozen pieces of quick steak.
- Allow the quick steak to cook, and brown, undisturbed for 2 minutes on the first side. Using a spatula, flip the quick steak pieces over to cook and brown the other side for an additional 2 minutes or until no pink remains. Be careful not to break up the quick steak pieces too much as you want to see larger pieces of steak in the finished dish.
- Using a slotted spatula (a fish spatula works great), remove the cooked and browned quick steak from the skillet and place it onto a plate, leaving some of the fat in the skillet to cook the onions and bell peppers. Set aside.
- To the hot skillet add the diced sweet yellow onion and diced green bell peppers. Cook for 5-6 minutes or until the vegetables are lightly golden brown, tender and the onions are translucent.
- To the cooked vegetables, add the cream cheese and stir to combine until the cream cheese has melted.
- Return the cooked quick steak to the skillet and add the salt, black pepper, beef broth and half & half. Gently stir to combine, being careful to not break apart the steak pieces too much.
- Bring the liquids to a boil and add the frozen cheese tortellini to the skillet. Stir to cover all the cheese tortellini with the liquids. Reduce the heat to low and cover the skillet with a lid.
- Allow the philly cheesesteak tortellini to gently simmer for 10 minutes or until the cheese tortellini is cooked through and the sauce has thickened and been absorbed by the tortellini. Be sure to stir the mixture often to prevent the cheese tortellini from sticking.
- Remove the lid and add the shredded mozzarella and shredded provolone cheese to the surface of the Philly cheesesteak tortellini. Replace the lid and allow the cheeses to gently melt in the skillet for 1-2 minutes.
- Remove the skillet from the heat and stir the melted cheese into the pasta and sauce before serving.


Love this twist on a classic! Zucchini adds such a nice texture and flavor—great idea to sneak it into a cheesy dish like this.
Love this! My family does the same thing with zucchini—it’s such a cozy, comforting twist on classic dishes.
I love this recipe—it brings back childhood memories! My mom used to hide zucchini in everything too.
I love how zucchini adds moisture and sweetness—this tortellini version sounds perfect for a comforting weeknight dinner!
I love this idea! Zucchini in recipes really does add a comforting, homemade vibe. Reminds me of my grandma’s kitchen too!