
Spiced Pumpkin Bread How to Bake It Easy
There’s something about waking up in the morning and the smell of baked goods wafting through the house that just gets me every time. I remember my grandma’s kitchen when she’d be baking her famous banana bread—I’d lean in close just to catch a whiff of that warm, cinnamon-sweet aroma. Over the years, I’ve tweaked her recipe a bit, adding in zucchini to keep things moist and sneaking a little extra sweetness with a simple glaze. Honestly, this zucchini banana bread is one of those recipes I keep in my back pocket, especially when I need a quick, satisfying treat that feels sort of indulgent but is still totally homey. It’s perfect for breakfast, a snack, or even a lazy weekend brunch. And trust me, once you try it, I bet it’ll become a staple in your kitchen, too. This one’s a lifesaver on busy nights when dessert needs to be quick but still delicious!
What is Zucchini Banana Bread?
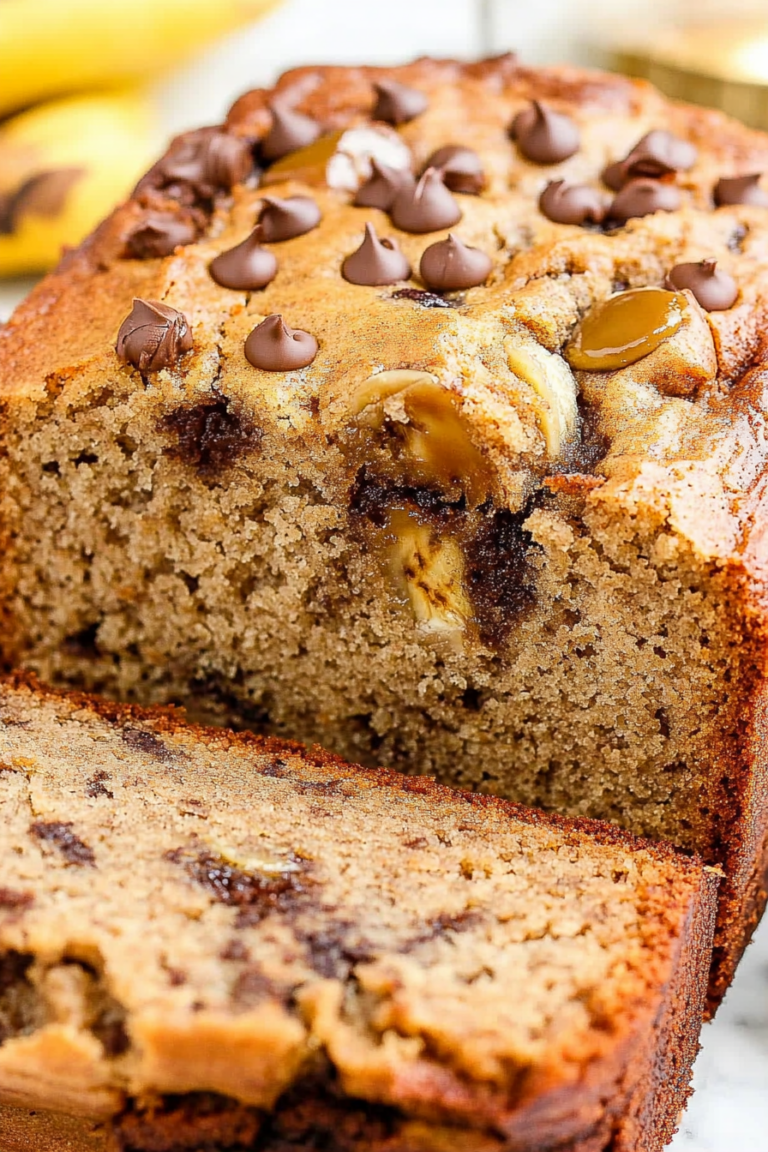
Think of zucchini banana bread as a cozy mash-up of a classic banana loaf and a sneaky vegetable powerhouse. It’s essentially moist, fluffy bread infused with ripe bananas and tender zucchini. The zucchini adds a subtle earthy flavor and keeps the bread incredibly moist—I always do this when I want a slice that stays soft even a day later. The name might sound a little unconventional, but it’s all about making the most of your ingredients and turning what some see as “misfits” (like that lonely zucchini lurking in your fridge) into something wonderfully show-stopping. It’s like a breakfast comfort food, but also a fancy enough dessert to serve at brunch. Think of it as a warm hug in bread form, packed with natural sweetness and a hint of spice—sounds pretty tempting, right?
Why you’ll love this recipe?
Honestly, what I love most about this zucchini banana bread is how forgiving it is. I’ve tested this recipe with overripe bananas, less zucchinis, even almond milk—trust me, it’s flexible. The flavor is incredible—banana and zucchini blend into a gentle sweetness, enhanced by just a touch of cinnamon and vanilla. It’s not overly sweet, which makes it perfect for breakfast or a snack, but that glaze on top? That’s what takes it over the edge and makes it feel special. Plus, this recipe is a total budget-saver. I always have bananas and zucchinis in my fridge, and a quick glance in the pantry usually yields everything I need. What’s more, it’s versatile: slice it thick for breakfast, serve it warm with butter, or whip up a quick glaze for a dessert that’s just a little fancier. And honestly, my kids ask for this all the time — it’s become a household favorite because it’s so darn easy and so delicious.
And let me tell you, I’ve made this countless times and it never fails to impress. I’ve learned that a little extra zucchini makes it extra moist and that the glaze—oh, the glaze—can be customized with lemon zest or even a splash of bourbon for a grown-up twist. Trust me on this one, once you get the hang of mixing everything just right, you’ll be reaching for your loaf pan every week. It’s that good.
How do you make Zucchini Banana Bread?
Quick Overview
This zucchini banana bread is a simple one-bowl miracle. The process involves grating zucchini, mashing bananas, mixing dry ingredients separately, then combining everything just until smooth—no overmixing traps here! The batter comes together quickly, and I love that you can fold in your filling, swirl, or add nuts for extra texture. Baking it up fills the house with that irresistible aroma, and in under an hour, you’re slicing into moist, flavorful bread with a sweet glaze that totally elevates the whole thing. The best part? It’s forgiving and flexible, so don’t sweat small variations. Just follow the steps, and you’ll get a loaf that’s perfect every time.
Ingredients
For the Main Batter:
– 2 ripe bananas, mashed (the darker, the better for sweetness)
– 1 ½ cups grated zucchini (squeeze out excess moisture)
– ¼ cup olive oil or melted butter
– ½ cup brown sugar (or honey if you prefer natural sweetness)
– 2 eggs
– 1 teaspoon vanilla extract
– 2 cups all-purpose flour (I like unbleached for flavor)
– 1 teaspoon baking soda
– ½ teaspoon baking powder
– ½ teaspoon ground cinnamon
– ¼ teaspoon salt
For the Filling:
– Optional: chopped nuts, chocolate chips, or dried fruit (add a handful or two)
– A dash of nutmeg or ginger if you’re feeling warm and spicy
For the Glaze:
– 1 cup powdered sugar
– 2-3 teaspoons milk or lemon juice
– Optional: lemon zest or vanilla for extra flavor
– Adjust the liquid until it’s pourable but thick enough to coat the bread nicely
Step-by-Step Instructions
Step 1: Preheat & Prep Pan
Preheat your oven to 350°F (175°C). Grease a loaf pan with butter or line it with parchment paper—trust me, this makes slicing a breeze later. Set aside while you prepare the batter. I often toss in a little extra butter on the pan just to be extra safe, especially if I’m using a non-stick, just to prevent sticking.
Step 2: Mix Dry Ingredients
In a small bowl, whisk together the flour, baking soda, baking powder, cinnamon, and salt. Sifting isn’t necessary but it helps keep the batter light and no clumps sneak in. I’ve learned that this step really helps keep the bread fluffy and even.
Step 3: Mix Wet Ingredients
In a large mixing bowl, mash your bananas with a fork until mostly smooth—leave a few lumps for texture if you like. Add the oil, sugar, eggs, and vanilla, then beat until well combined. The smell alone of this step will make you hungry. I sometimes add a splash of almond milk here if I want it extra creamy, and it actually works beautifully.
Step 4: Combine
Gently fold in the grated zucchini, then sprinkle your dry ingredients over the wet. Use a spatula to fold everything together just until combined—don’t overmix or the bread can get dense. If you’re adding nuts or chocolate chips, fold them in now. Overmixing is the enemy here—I always do this when I’m tired, but I’ve learned that patience makes the difference between a moist loaf and a tough one.
Step 5: Prepare Filling
If you’re using fillings like nuts or dried fruit, fold them into the batter now. For a swirl effect, spoon a layer of batter into your pan, add filling or a bit of jam, then layer more batter on top and swirl with a knife. It’s a simple way to make it look pretty and extra flavorful.
Step 6: Layer & Swirl
This part’s fun—pour your batter into the prepared loaf pan. If you want a marbled look, add in a spoonful of jam or cocoa and swirl gently with a knife. I love doing this with lemon curd sometimes. It’s little tricks like these that make homemade bread feel special.
Step 7: Bake
Pop the loaf in the oven and bake for about 50-60 minutes. Check doneness with a toothpick inserted in the center—if it comes out clean, it’s ready. Ovens vary, so keep an eye on it around the 50-minute mark. If the top starts to brown too fast, tent it with foil. This is my foolproof method for avoiding burnt edges but still getting a perfectly baked loaf.
Step 8: Cool & Glaze
Let the bread cool in the pan for about 10-15 minutes before transferring to a wire rack. Once cooled slightly, drizzle with your prepared glaze. I love adding a bit of lemon zest to the glaze—stunning and adds a lovely zing. Let the glaze set for a few minutes before slicing.
Step 9: Slice & Serve
The best part—cutting into that moist, fragrant loaf. Use a serrated knife for clean slices. I serve this warm with butter or a dollop of mascarpone, or just plain with a cup of coffee. It’s gorgeous on its own, but that glaze just takes it to another level. My kids actually ask for seconds, and I rarely get leftovers to store—this disappears in minutes at my house!
What to Serve It With
This zucchini banana bread is honestly versatile enough to shine at any meal. For breakfast, I love it toasted with a smear of cream cheese or a drizzle of honey, paired with a hot mug of coffee or tea. It’s perfect with a fresh fruit salad or a handful of nuts on the side. During brunch, I layer thin slices with some berry compote and a sprig of mint—the smell alone gets everyone in the mood for a lazy weekend gathering.
As a dessert, I like to serve it warm with a scoop of vanilla ice cream or whipped cream on top. The sweetness and moist crumb make it ideal for that. And if I’m feeling extra casual, I’ll just cut a thick slice and warm it up for my kids after school—simple, satisfying, fuss-free. It also makes a thoughtful gift when wrapped nicely or placed in a cute tin during the holidays. My family always loves when I bake this—they’re always asking me to make it again, which is the best kind of compliment, don’t you think?
Top Tips for Perfecting Your Zucchini Banana Bread
After making this so many times, I’ve picked up a few tricks that I swear by. First, always squeeze out excess moisture from the zucchini—this keeps your bread from becoming too wet or gummy. I use a clean kitchen towel and give it a good squeeze, then let it sit for a minute to drain any last drops. Sometimes I even toss it in a tiny bit of lemon juice to keep it fresh-tasting. Second, don’t overmix once you combine the dry and wet ingredients. I fold just until everything’s barely incorporated—trust me, overmixing makes the crumb dense and heavy. Third, feel free to experiment with flavor add-ins—the chocolate chips are a hit with my kids, and a pinch of ginger warms it up beautifully. I’ve tested this with coconut milk, and it made the loaf even moister. I’ve also discovered that baking at a slightly lower temperature for a little longer yields an even more tender crumb. Oh, and if you want the glaze to really stick, let the bread cool just enough that it’s warm, but not hot—then drizzle generously. These little tips make a big difference, and I promise, once you nail the technique, you’ll get perfect loaf after loaf.
Storing and Reheating Tips
This bread stays moist and tasty for a few days if stored properly. I usually wrap slices tightly in plastic wrap or keep the loaf in an airtight container at room temperature for up to 2 days. After that, I transfer it to the fridge—you can keep it fresh for about 4 days that way. If I want to keep it longer, I freeze individual slices wrapped in foil and then in a zip-top bag; they thaw beautifully on the counter or in the microwave. When reheating, I pop a slice into the microwave for about 15-20 seconds or warm it in a low oven—just enough to make it cozy again. I usually wait to add the glaze until just before serving; if it’s been stored for a while, I brush on a little fresh glaze or even a drizzle of honey on reheated slices to perk it back up. It’s genuinely surprising how well it keeps without losing moisture or flavor, which is a testament to that zucchini’s magic.
Frequently Asked Questions
Final Thoughts
This zucchini banana bread has truly become my go-to whenever I have ripe bananas and a forgotten zucchini sitting in the fridge, begging to be used. It’s warm, moist, and perfectly balanced—with just enough sweetness, a hint of spice, and that satisfying loaf texture everyone loves. I love how adaptable it is—adding nuts, chocolate chips, or even swapping ingredients—making each batch unique. It’s a real comfort food that feels sophisticated enough to serve at brunch yet simple enough to whip up on a busy weekday. I hope you give it a try and that it becomes as special in your home as it has in mine. And honestly, I’d love to hear how yours turns out—so don’t forget to leave a comment or share your tweaks! Happy baking—your kitchen’s about to smell amazing.
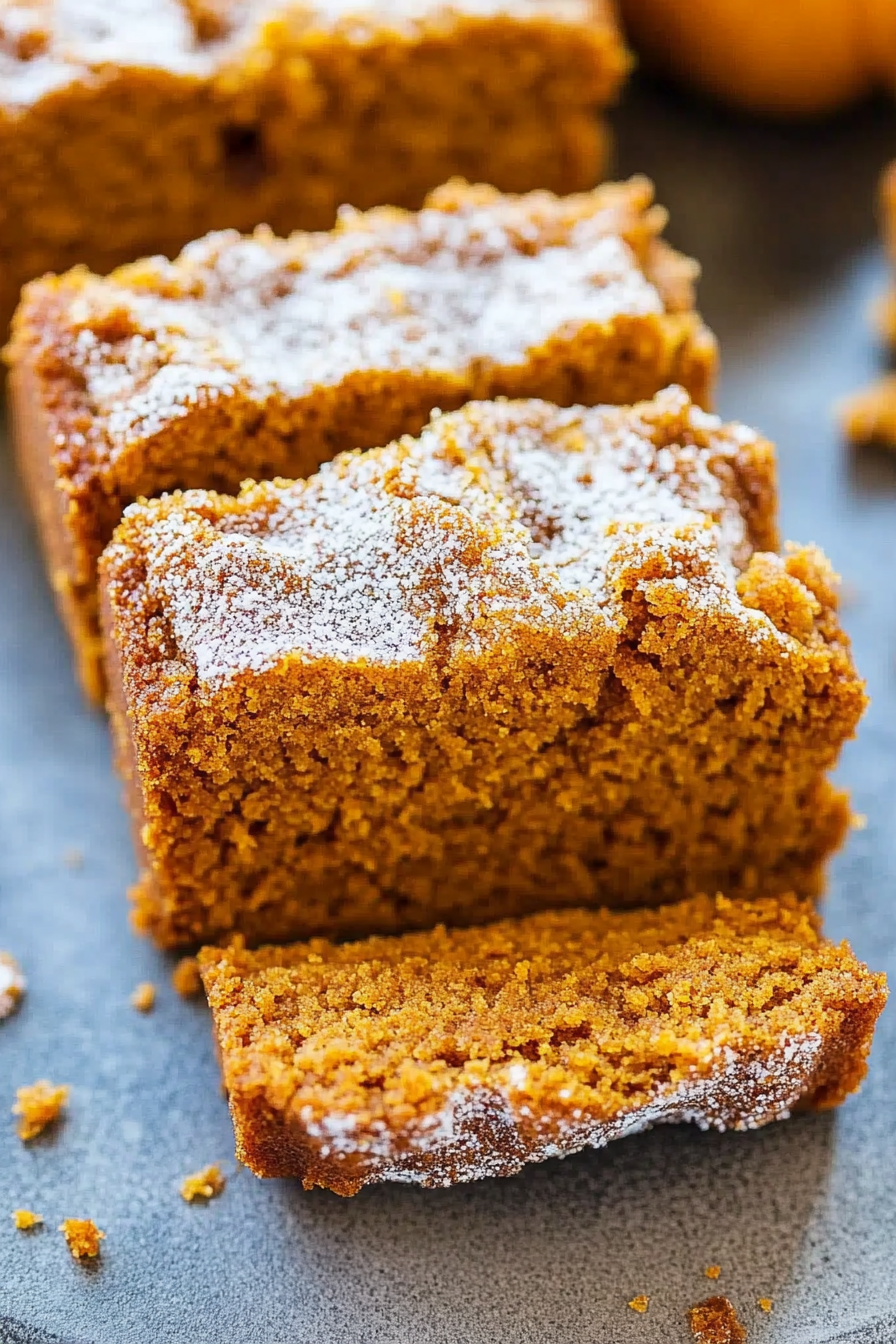
pumpkin bread
Ingredients
Method
- Preheat oven to 400F. Spray three mini loaf pans with cooking spray and set aside.
- In a large bowl, whisk together flour, baking powder, pumpkin pie spice, and salt; set aside.
- In another large bowl, whisk together sugars, pumpkin puree, oil, milk, molasses, vanilla, and 1 tablespoon sugar until smooth.
- Pour wet ingredients into dry ingredients and stir until just combined. Avoid overmixing.
- Divide batter evenly among the three pans, filling each about 2/3 full.
- Sprinkle 1 tablespoon sugar and 0.5 teaspoon cinnamon over each batter-filled pan.
- Bake for 40-43 minutes or until a toothpick inserted in the center comes out clean.
- Allow the bread to cool in pans for 15 minutes, then transfer to a wire rack to cool completely.


This recipe sounds amazing! I can already imagine the cozy, warm aroma filling the house—just like grandma’s kitchen. Can’t wait to try it!
That smell takes me right back to my grandma’s kitchen—this recipe sounds perfect for recreating those cozy mornings.
That sounds so cozy and comforting—nothing beats the warmth of homemade spiced pumpkin bread filling the house in the morning.
So comforting—this recipe sounds like a hug in a loaf! Can’t wait to try it and fill my kitchen with that warm, spiced aroma.
I love the cozy feeling of homemade bread in the morning—this spiced pumpkin version sounds perfect for fall!